Pieces consisting of random fragments of junk arranged into a mosaic. People’s memories are often strongly triggered by a particular fragment, “Oh that’s a thing, I remember…”


Size: 30cm wide x 40cm high wall hanging; 30cmm deep.
Materials: Scrap acrylic, domestic & industrial fragments, silicone bathroom caulk. Figure is car battery terminal cleaner, springs, bike brake blocks, scraps.
Date: 2021.
Note: requires mains power for lights.
I made I Made It Myself for a recycled art show held in Kingston in 2021. The theme was “Messages of Hope” and the direction was to make a mailbox.
Here’s the artist’s description I wrote:
The happy fellow putting the finishing touches to his mailbox has had enough of doom and
gloom, assembling his mailbox from materials at hand, the castoffs of our mad throwaway
society: parts of smashed appliances, last year’s must-have techno-toys, unknown
fragments from a drawer, the detritus of shed and garage. Finding some broken Christmas
lights, he's illuminated his mailbox hoping to attract some gentle moth-like Hopeful
Messages.

He's quite proud that all parts are reused, saved from a one-way trip to the tip, reducing
the impacts of fossil fuels, before the parts resurface in the coming centuries as
microplastics & pollutants.
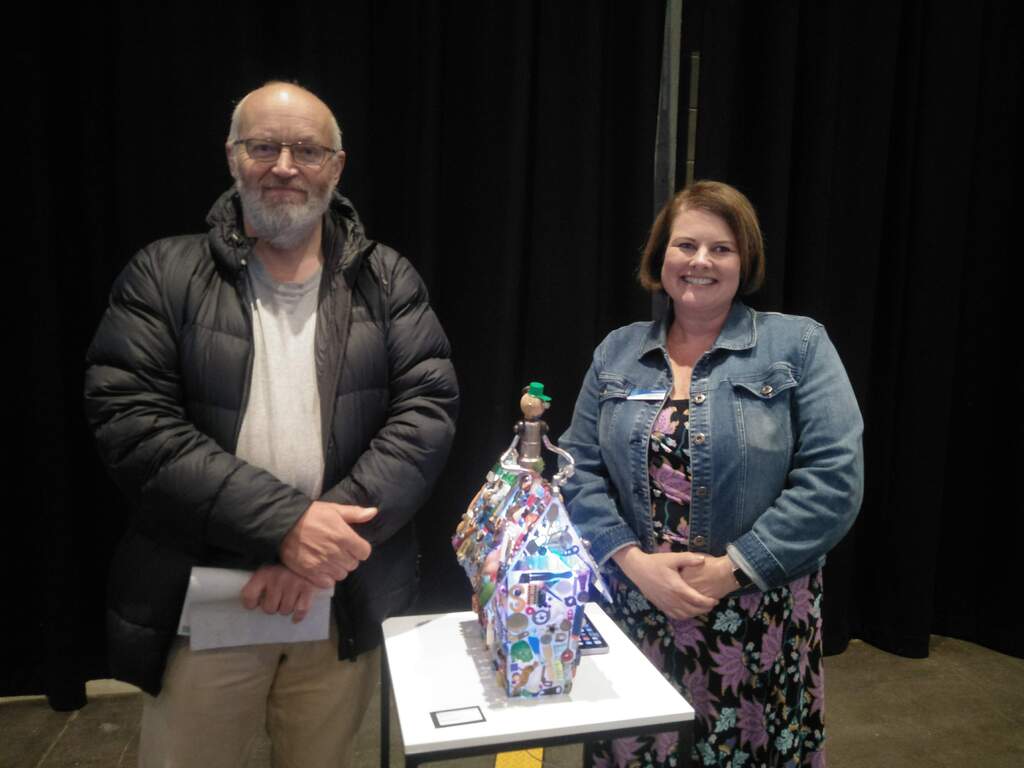
I was rather pleased that I won the open award, here’s me & the Mayor Paula Wreidt at the opening.
The box is made of scrap clear acrylic glued together. I have yet to find a good glue for acrylic, even bathroom silicone (the sort that smells like ants) doesn’t seem to hold very well. I probably should have sanded it first. I’ve fixed it a few times. Onto this I glued lots of fragments from my bits box, including fragments of a barbie doll, like the arms and the bum. On top there’s a little man putting the finishing touches to his creation. He’s quite proud that he built it himself, out of junk.
The lightshow inside is made from a string of LEDs from Aliexpress that I bought to make a desklamp, unfortunately they were far too dim and were incapable of producing a white light that does not give a headache. However they are perfect for a gentle lightshow if the colour is dialed down a bit. I used a cheap little microcontroller to drive the LED string, its got about enough brains to run a toaster so it can do a dozen LEDs no problem.
I like going to the openings, I like to loiter and see how people react to my creations. As usual people had lots of fun recognising things reused as fragments “Oh that’s a ….”. Kids especially like the idea of sticking lots of things together. One mother did accuse me of being a bit creepy with the use of doll parts, but I don’t think her opinion was shared by her daughter who ran off to show her friend the doll’s bum stuck to the side, with lots of giggles.
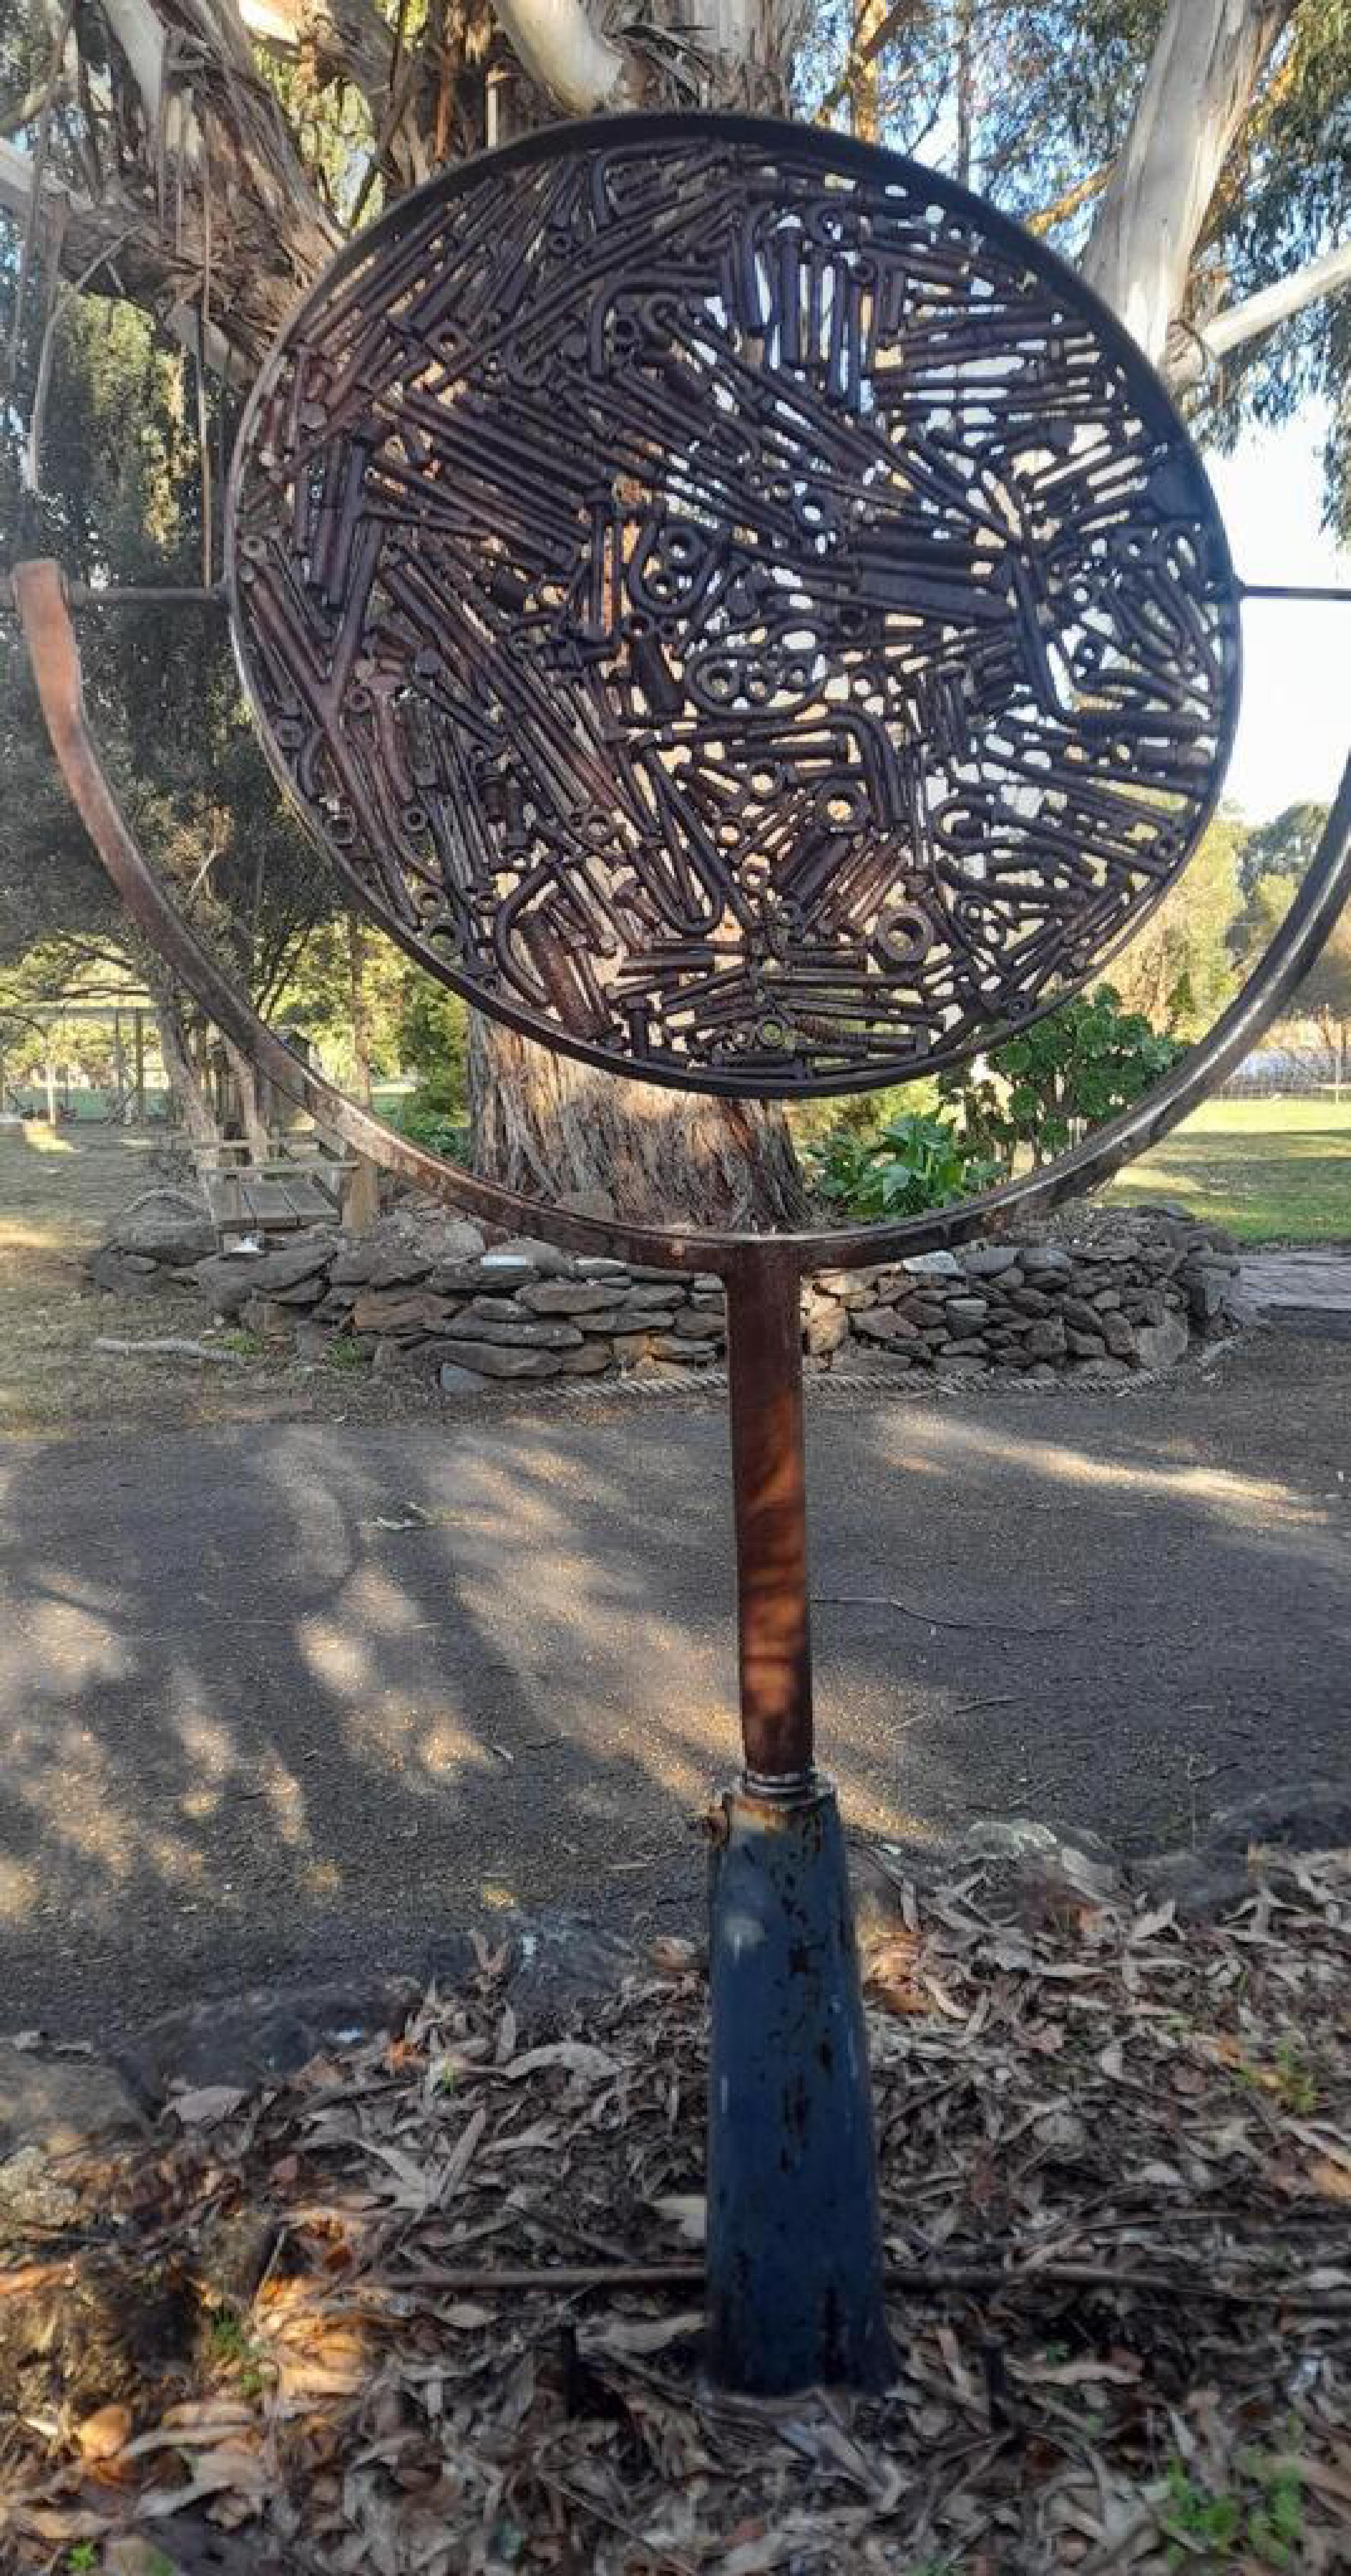
Iron Mirror 1 is a model for a piece that I never completed. It had a slightly complicated gestation.
I initially made a circular frame for sitting a piece of tempered glass into. I made the frame from strip steel on a machine called a Ring Roller, that passes the work over two undriven rollers in a row with a third driven roller pressing down on the work, so by repeated passes it forms a perfect circle (apart from the ends, which remain straight as they can’t go through the machine). Then you cut the unbent ends off and weld it together to form a ring. The machine was very heavily built and hard work as it was completely manual. I have since found that I can make a perfectly acceptable ring by just tying two round fenceposts together, and passing the steel over it whilst an assistant hits the steel over the gap in the middle with a sledgehammer. It’s a bit tricky to keep things straight so that the ring isn’t twisted, but not too difficult, and the ring can always be twisted or bashed into shape.
Then I infilled the ring with lots of iron scrap bolts and engine parts. I first burned the grease and plating off them in a homemade forge powered with a leafblower, and then cleaned them up in a cement mixer with a slurry of beachsand. One side of the infill I kept very flat as it was going to have the glass resting on it, whilst I welded the bits on the other side. I used fluxcore wire in the MIG welder. It’s easier than using sticks where you need to strike the arc before welding, which usually moves little bits like bolts etc. which are not clamped together. Also fluxcore gives better welds on dirty metal, as after cleaning the bolts are bright steel which goes rusty very quickly.
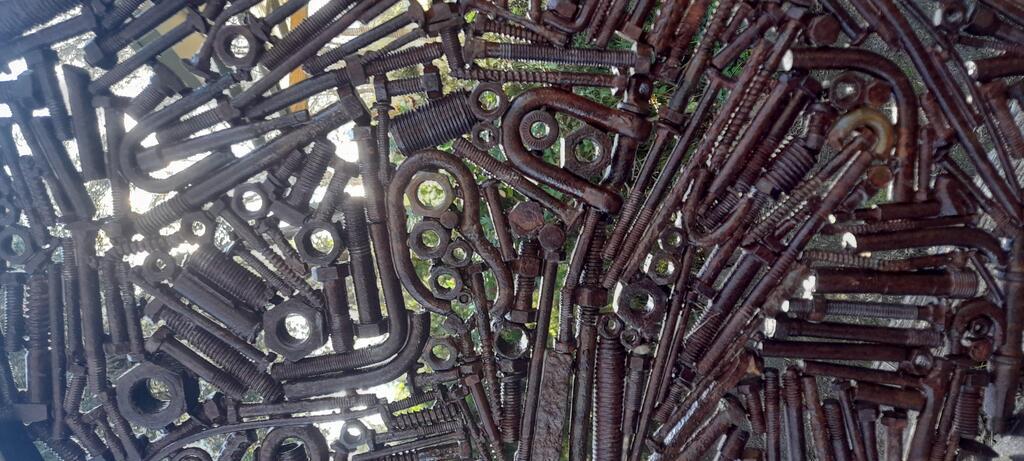
I didn’t really do a design, just filled it with whatever I had to hand, as I was just trying out how it looked. I found that nuts & bolts can easily be formed into all sorts of designs, suggesting stars or flowers, and were easy to bend as their soak in the forge had removed the hardness / toughness of the steel. Other design elements can be realised with odd bits of scrap, but I mostly had nuts & bolts.
But then I wasn’t happy with the look of the design, so I never built the table, just kept the top lying around.
Years later I was doing a local art event “Art in the Hills” which is a huge open studios weekend for lots of artists around the Dandenong Ranges near Melbourne. As I was new to the event the organisers assigned me a “buddy” Jessie Jornaud-Ryan, who makes sculptural mosaic pieces from broken crockery that are really worth a look, particularly birds, I have one of her wrens in the kitchen. She did a walkround of my workspace, and I showed her the tabletop, and asked for suggestions, she suggested mounting it on a pedestal.
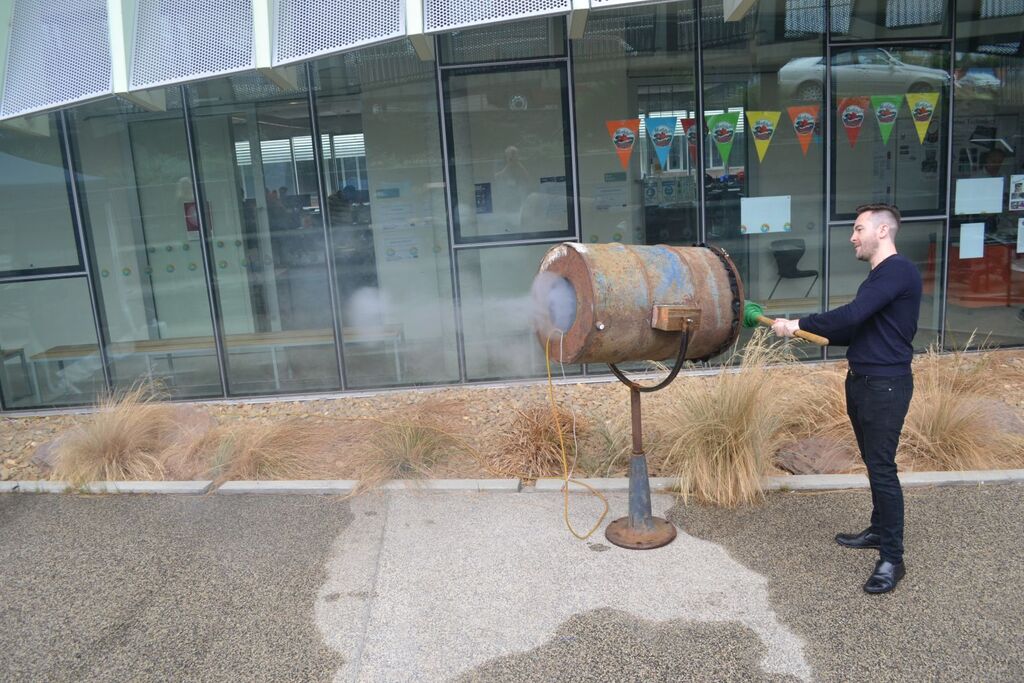
I happened to have made a large U shaped mount for my vortex cannon (a machine that launches smoke rings when whacked with a largemallet) which I made after observing ihe trials of savant Mark Thomson’s giant cannon, allegedly a Nazi secret weapon, cunningly disguised as a tin water tank. I had junked the cannon since I had nowhere to store it, but I still had the mount, consisting of a large U on a central axis, that could swivel horizontally and vertically. It was easy to fit the round panel in the mount, and I knew that I had something.
It is extraordinarily satisfying to look at (or through or into?) the Mirror, and to turn it to different positions. I certainly enjoy having it around, and the visitors on the weekend of my open studio were intrigued with it. I still have it, and visitors still stop to admire it. Of particular interest is the two sides to the mirror, with the design mirrored of course, but one clear of welds, the other chockers with spotwelds. Of course the mirror world is only an approximate copy of our world…

Here’s me with the mirror in actuality. Tle local balckbirds like to perch on it and the spiders like it as a base for webs so it does need a bit of a clean sometimes. I wonder if there is a metal treatment that includes wildlife repellant?
I really should make the final version of this piece, with a properly engineered mount with some sort of bearing rather than unlubricated metal on metal, and a nice design for the Mirror. I’d like to up the diameter to a metre to make give it more presence, and about 1.8m high.

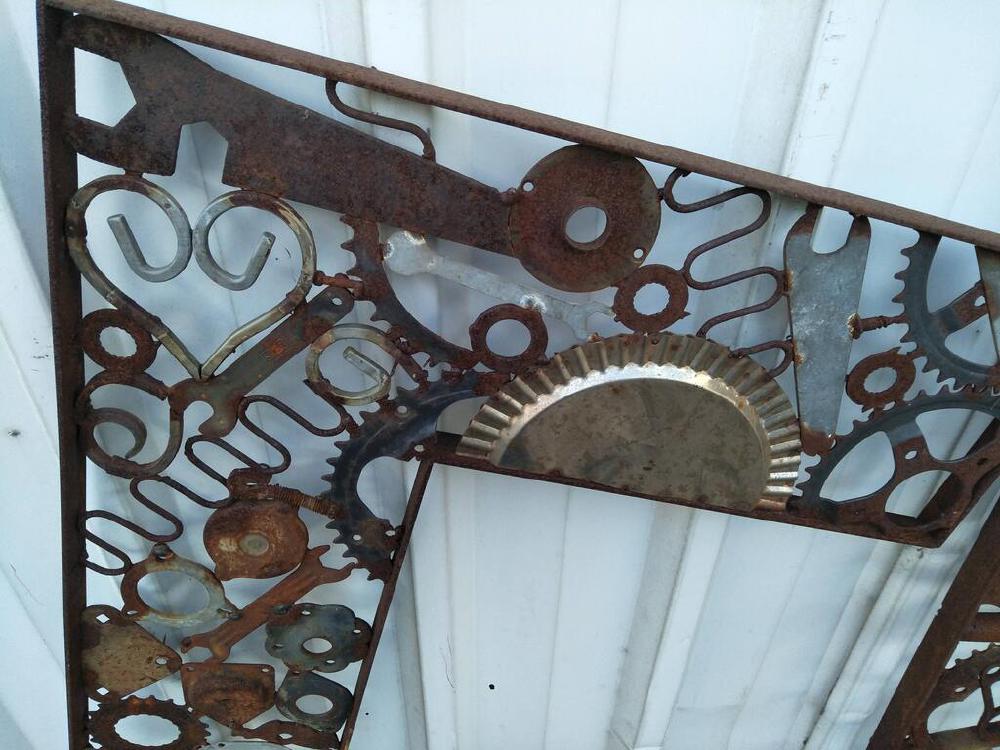
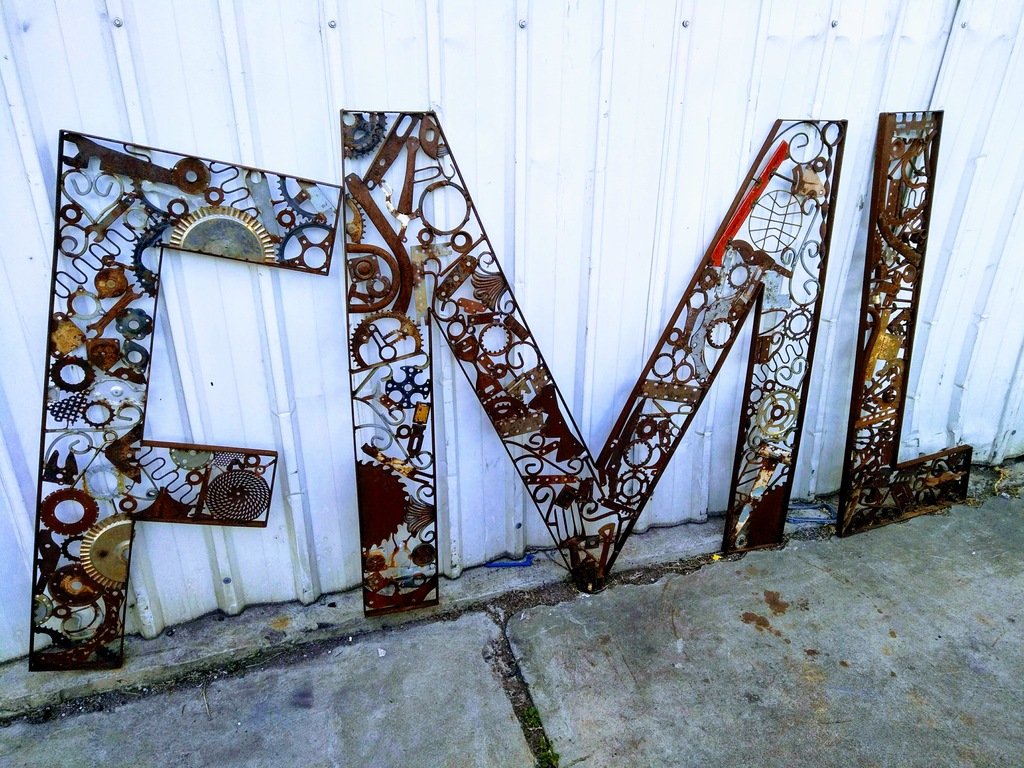
FML Sign was a sign for the shared studio space “Footscray Maker Lab” or FML in inner Melbourne. Situated in a semi-derelict warehouse that the owners only leased to us as I suspect no-one else would rent it. It was a noted rave venue in the 90s, and there was plenty of graffiti in the place, but even the ravers thought it too shabby and moved on. It was an interesting experience at a difficult personal time, and certainly gave me something else to think about.
The sign was intended to go on the roof on a wire fence that had once contained the building’s electrical supply, backlit with red diffused light (shades of Dark Mofo?), but it ended up being fixed to a wall in the yard. I don’t have a good photo of it now. I still think it would look fantastic backlit.
I built the frame freehand with strap iron, and then infilled with the most lightweight bits of steel that I could find. I think I got a good selection of shapes. I used fluxcore wire in the MIG, as it makes a good weld even through paint or plating. I do know that welding through plating is a bad idea as the fumes can make you sick as a dog so please don’t tell me.
Looks like I sharpened this photo up a bit, the place rarely looked that clean!
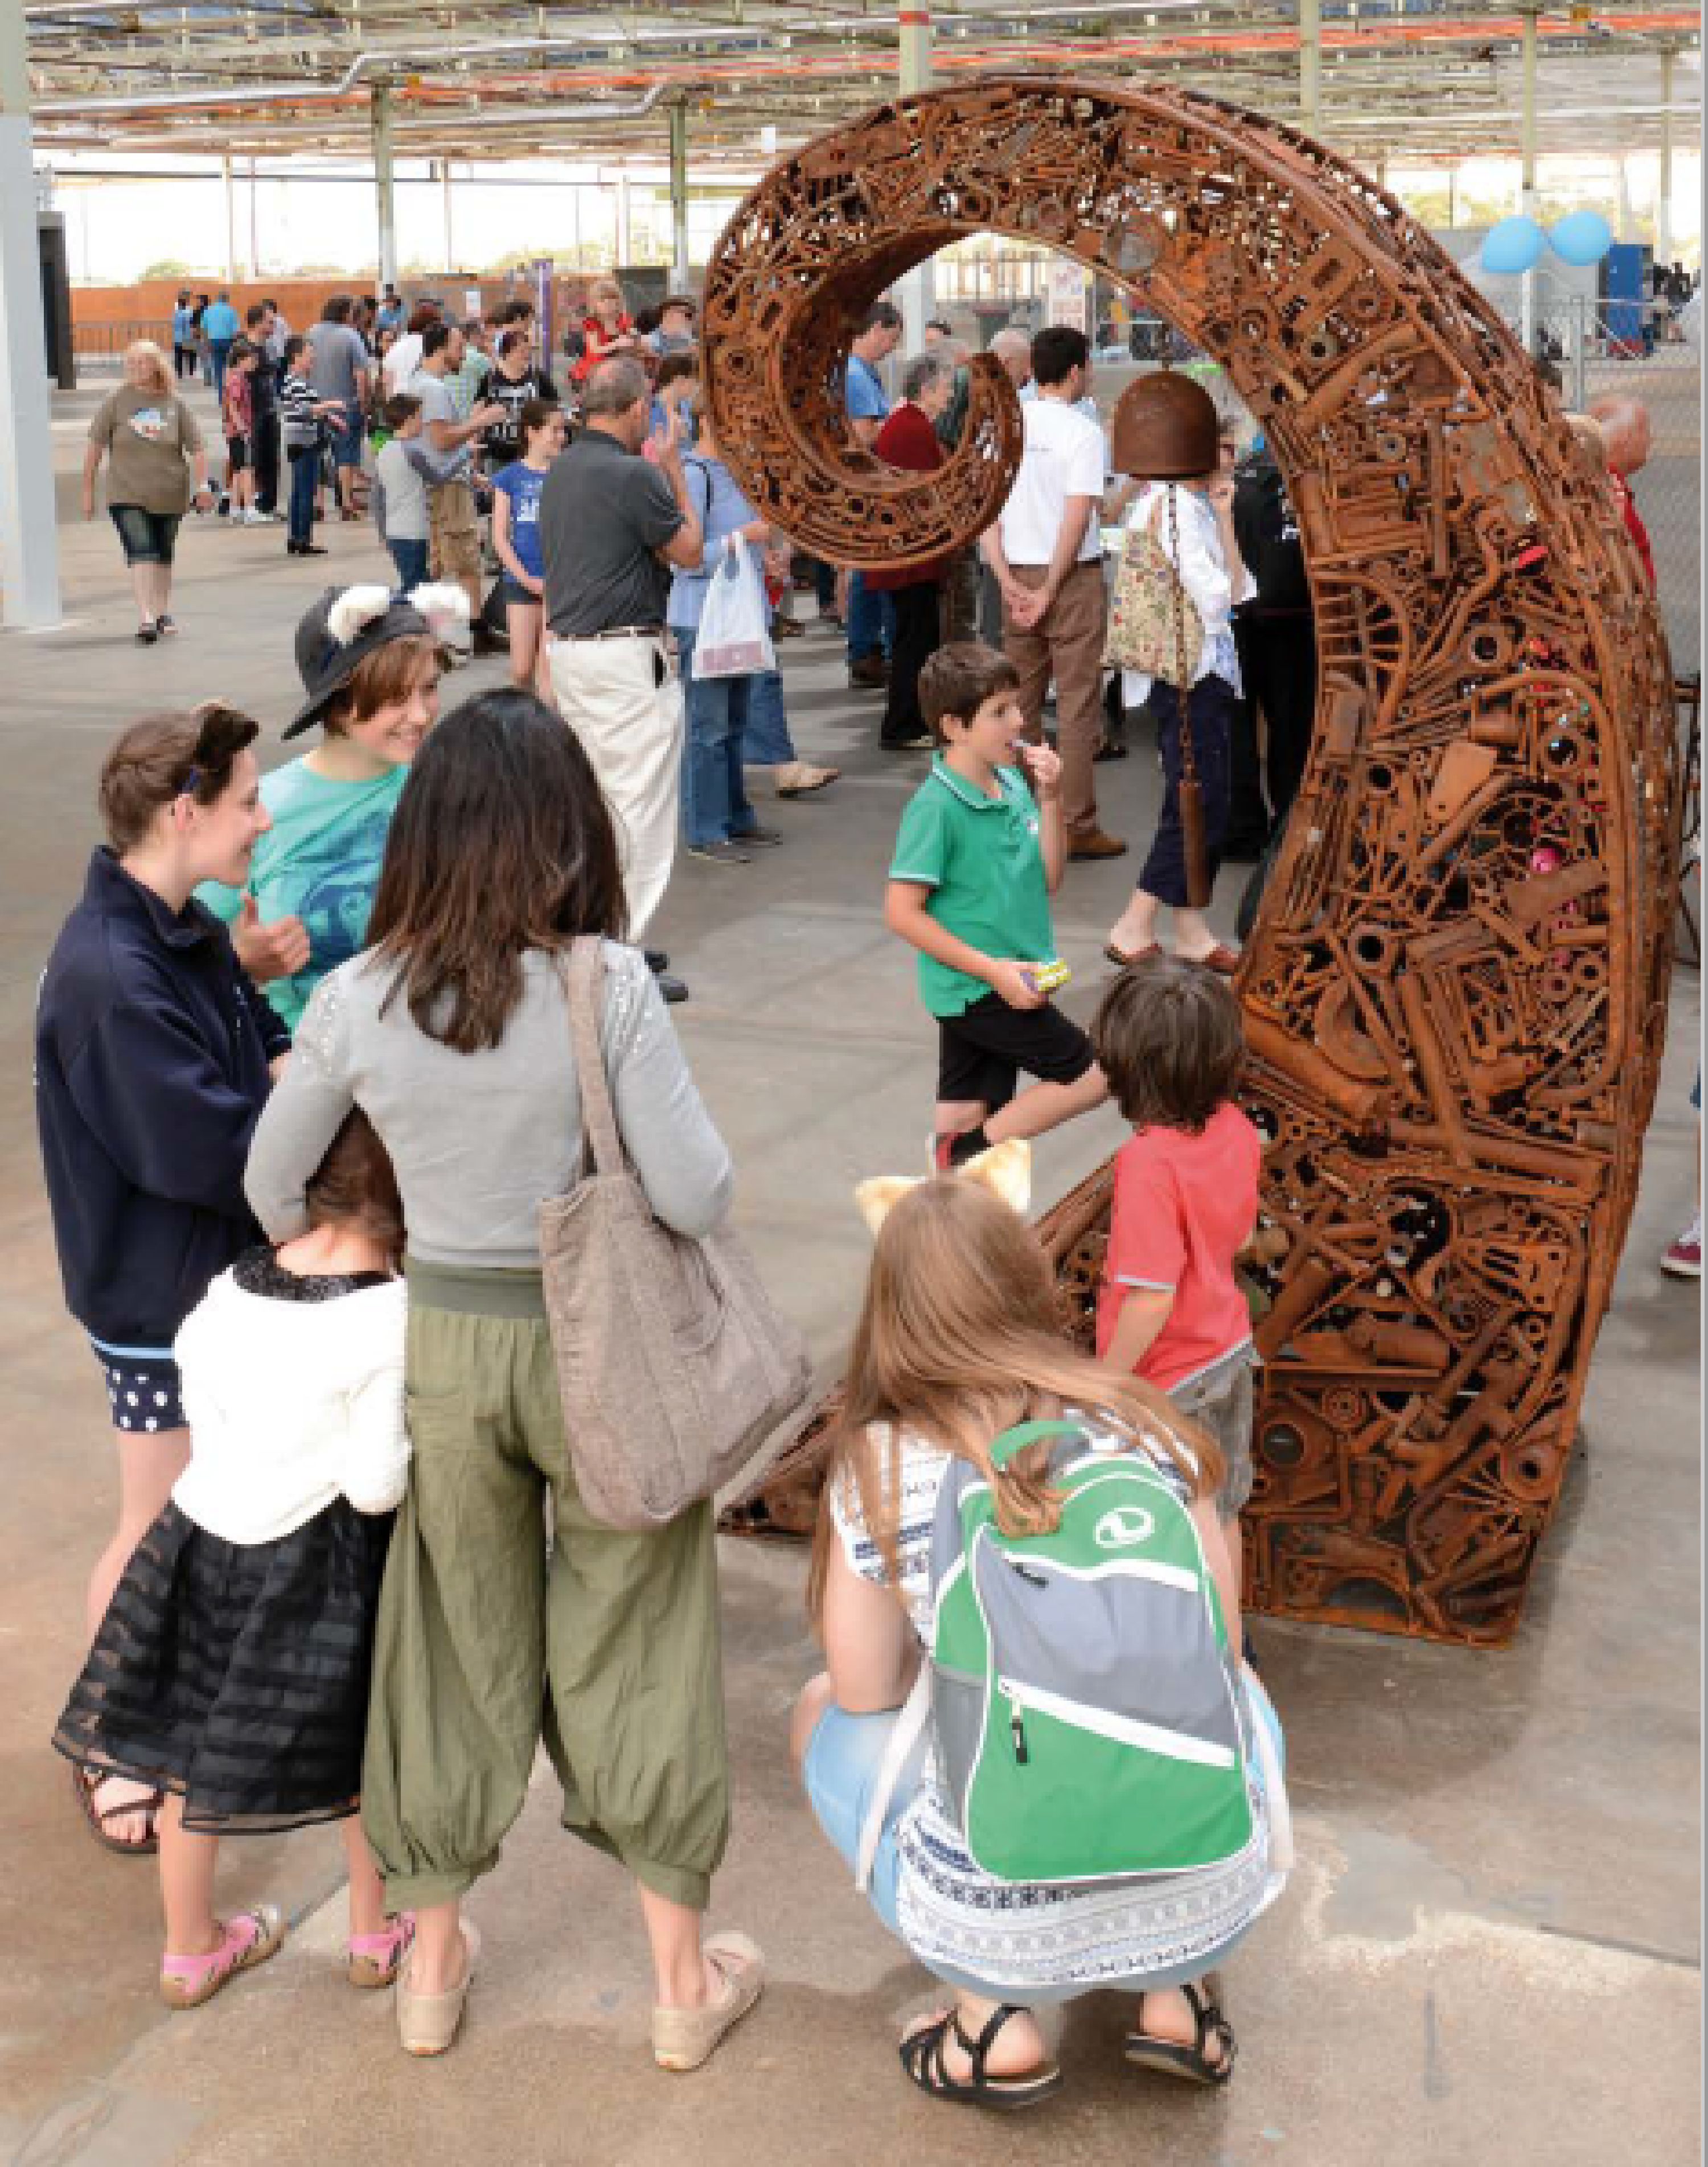
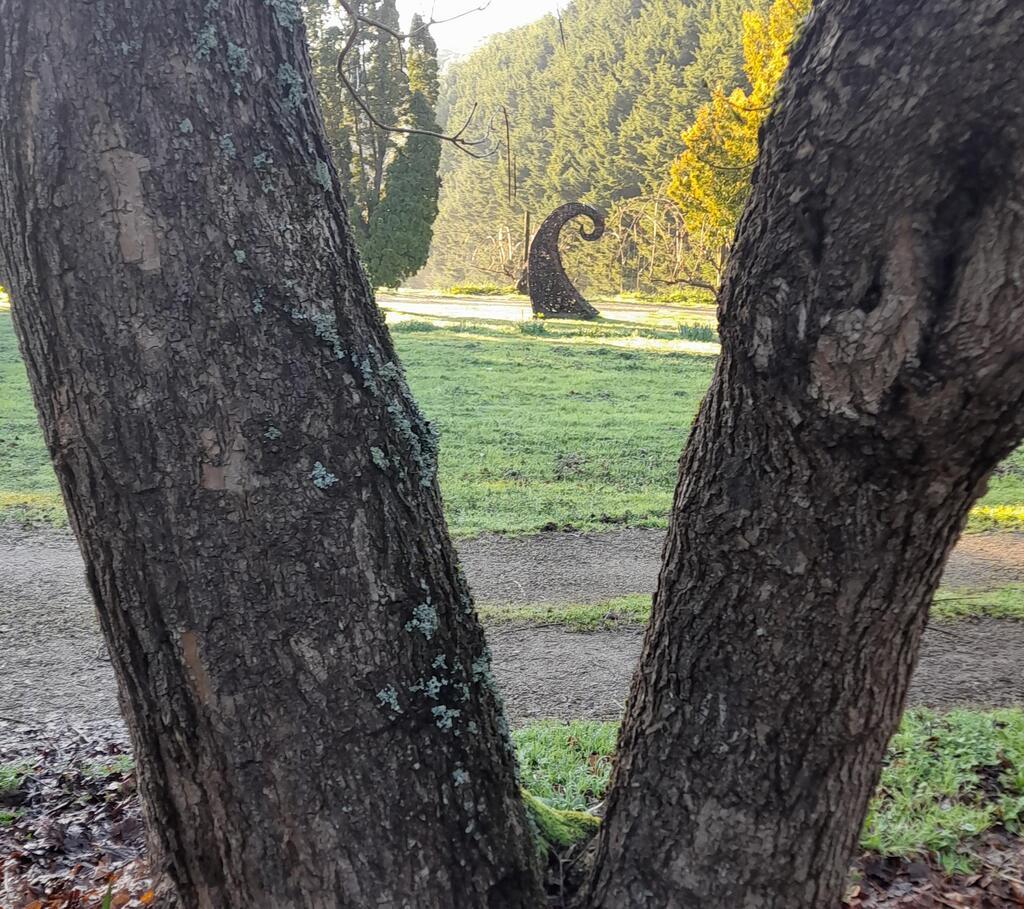
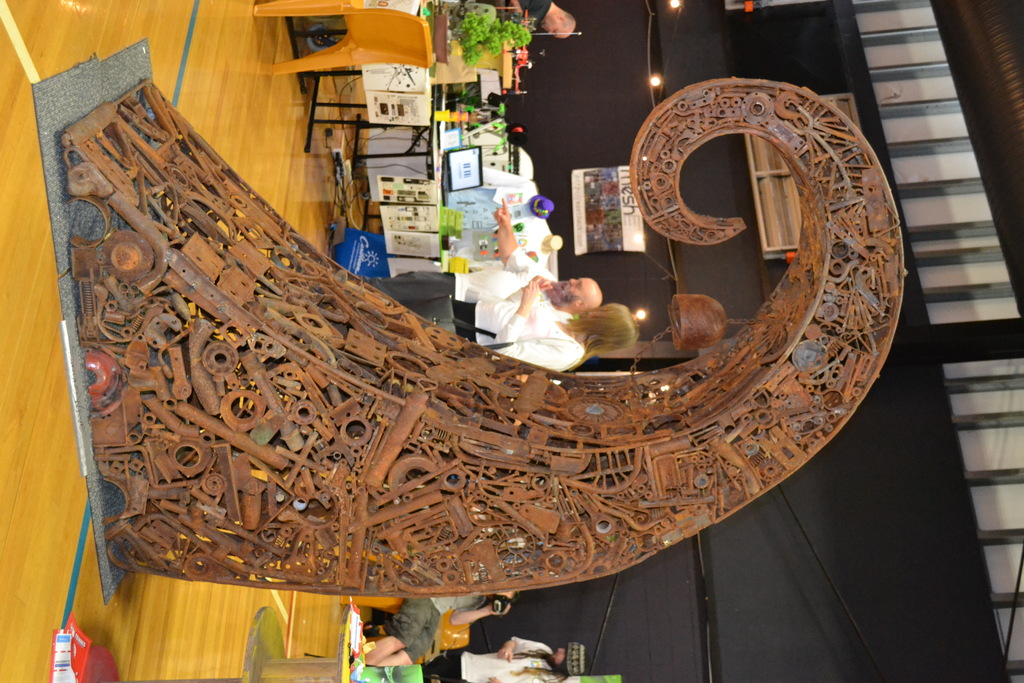
Sound Wave was easily my biggest and heaviest sculpture, 2.4m high and over 250Kg as that’s where my scale stops! Like most of my ideas the actual result differed from the concept.
My concept was inspired by a fern shoot bursting through the ground. It always amazes me how something as soft as a fern shoot can break through hard earth and push through layers of packed bark and forest trash considering that it is about the strength of an asparagas stalk. In New Zealand Moari culture such a shoot or koru is a central symbol of the strength of new life, and stylised forms are seen everywhere in NZ. Of course plant shoots are a commonly shaped like spirals, and people just like spirals. They look cool.
Somehow inspiration struck one day (how I wish you could bottle it) and I had a vision of Sound Wave bursting though a brickpaved patch of ground. I immediately did a sketch like a good boy. Unfortunately I left the sketch outside in the rain on my old workspace and that was the end of it. I really should get better at keeping records.
Sound Wave is made exclusively of scrap iron and steel. This was a mistake, the frame should have been made of new steel to give the finished piece structural strength. I’ve had to perform repairs over the years.
All parts were first burned in a furnace to get rid of grease and plating, and then tumbled in a cement mixer with a slurry of sand and crushed rock. This was a huge undertaking in itself, as I could only process about 15Kg at a time. The noise made by a cement mixer with rocks and old iron in it has to be heard to be believed! Some parts what couldn’t fit in the cement mixer were cleaned with a 1950’s era pedestal grinder that I fitted with a wire brush.
I had to make a special bench to build Sound Wave, it was a single sheet of plywood 2.4m by 1.2m. I still have this, I made it with removable legs, now it’s on castors so I can move it out of the shed for dirty work. The bench also needed an outrigger to do the curly bit on the top.
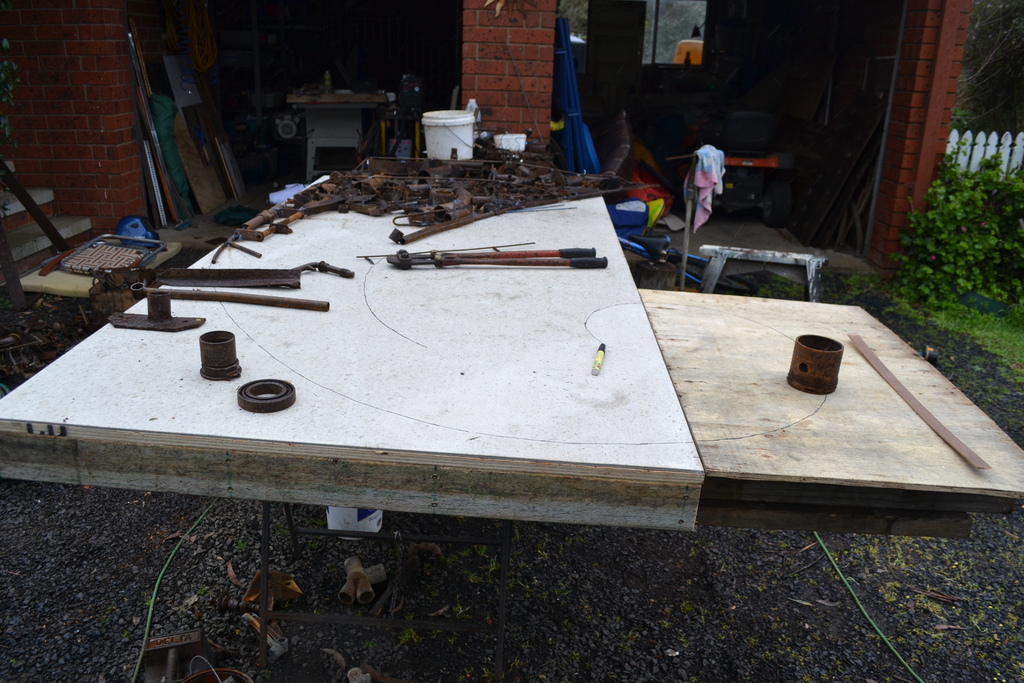
I transferred my design from a sketchbook by the old method of drawing squares over it, and then magnifying each and drawing on to my bench. I built the sides on the bench, then put them side by side and started welding the rest of it, using odd bits of wood to make sure the design was flat between the sides. This was difficult enough, I have no idea how people freeform sculptures with no armature. I suspect they use polystyrene or wood and burn it out.
I don’t remember how long it took but it was months of work.
Then I had the problem of what to do with it. It featured in a few local galleries, and I took it to Maker Fayre in Adelaide, I got lots of comments along the drive from Melbourne. It fitted in the ute as I had designed the footprint so that it just fitted between the wheelwells. The SA Makers (organisers of the Fayre) must have liked it, they featured in their final report (source of title image) and they gave me a grant to attend next year.
I did enter it in a country show in Boort in Victoria in 2015 or so, it actually won second prize, which was impressive. Boort somehow has a bit of a tradition of junk sculpture, I helped them make an iron fish and a cormorant that now are displayed by the Boort Lake.
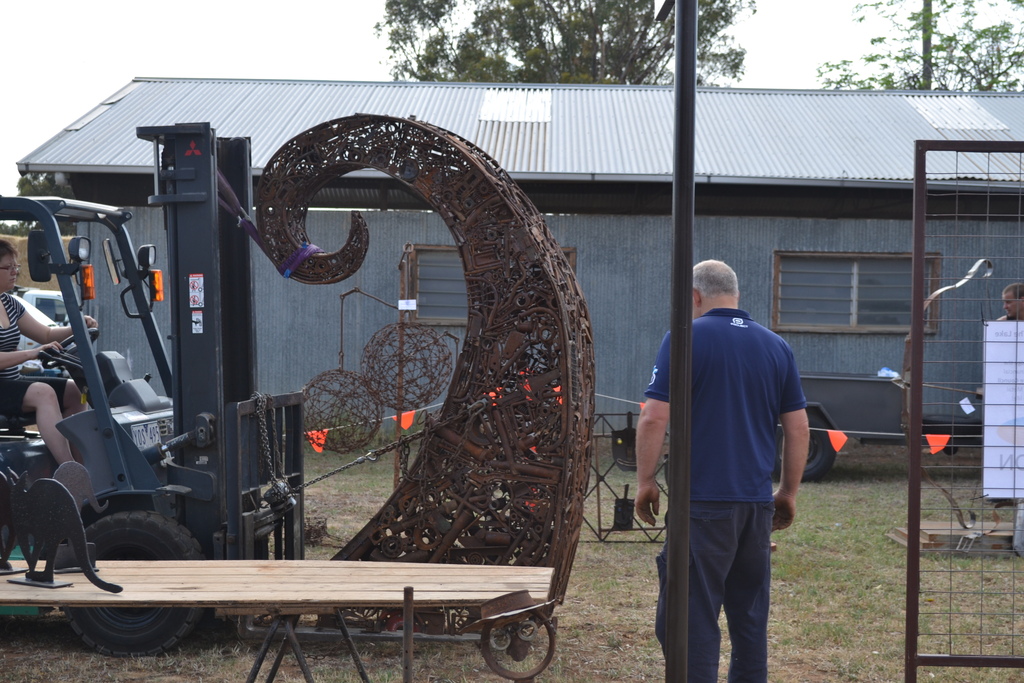
Unloading was a breeze, the local tyre shop owner used her heavy 4WD forklift to move it across site.
When I lived in Victoria my makerspace had a big presence at a local festival organised by the council, unusually for such affairs it was quite good with lots of good stuff going on. As part of the makerspace display I took along Sound Wave. The access was so tight we had to lift it onto the forklift by hand. That look a lot of hands!
Still it was worth it; the kids loved it!
It did live in the yard at my shared studio space for quite a while, I had a hoist there so I could get it onto the ute easily, as long as they had a forklift at the other end to unload it. Now I have it on longterm loan to my ex-boss on his farm in rural Silvan where he also runs his disability engineering business.