Miscellaneous things that I have only made one or two of.


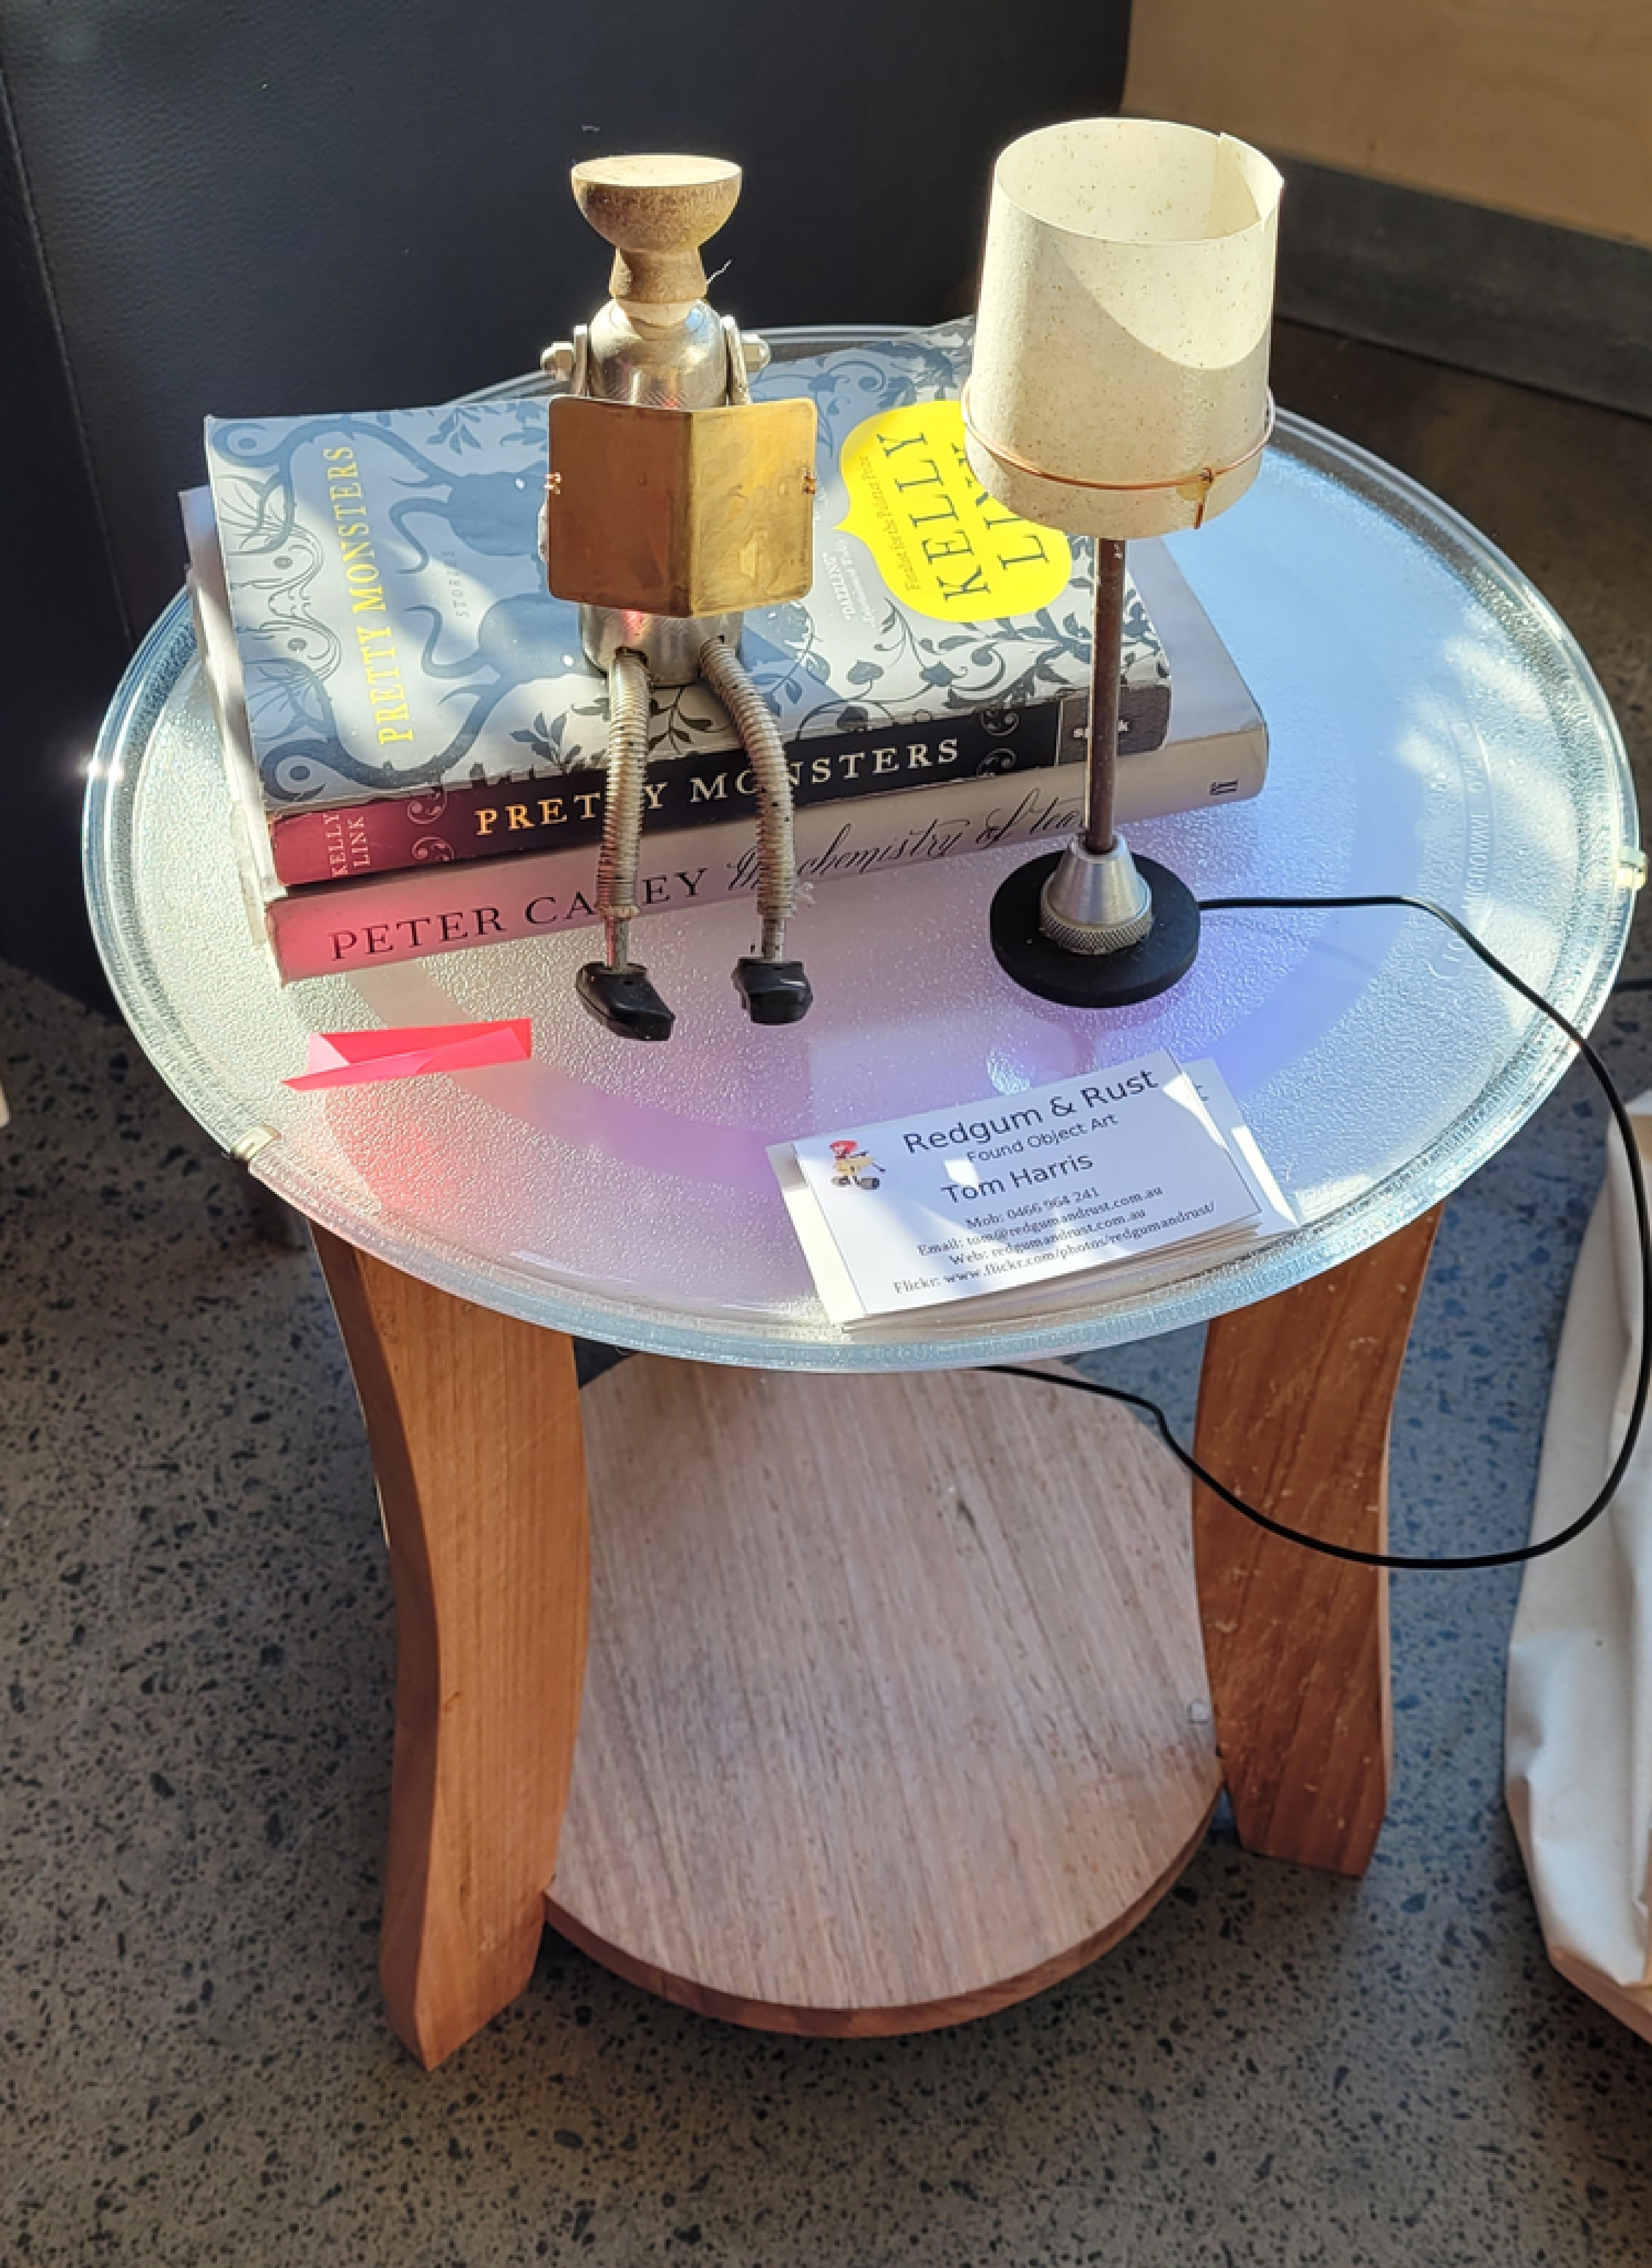
Size: 50cm x 50cm x 60cm high.
Materials: Lampshade and microwave oven plate from tip shop, legs are recycled furniture timber. Lights recycled Xmas decorations. Charger from e-waste. Books from my library, from op-shops. Reader made from miscellaneous workshop junk.
Date: 2023.
Note: requires mains power for lights.
I made My Happy Place for a recycled art show held in Kingston in 2023 (I entered I Made It Myself in 2021, the show is biennial). The theme was “Health & Wellbeing” and the direction was “Through your artwork, let us know what makes you feel joy, gratitude, hope, a sense of belonging or purpose and/or a connection to nature.”.
Here’s the artist’s description I wrote:
As well as making art my happy place is reading somewhere quiet. As you can see I
have combined a coffee table to hold a drink and a few books with a relaxing light
show and a recharge socket for my tablet.
Of course one of my little creations has found a congenial place to sit and read and
has moved in. As she’s no trouble at all I’ve let her stay.
I won the amateur artist award this time.
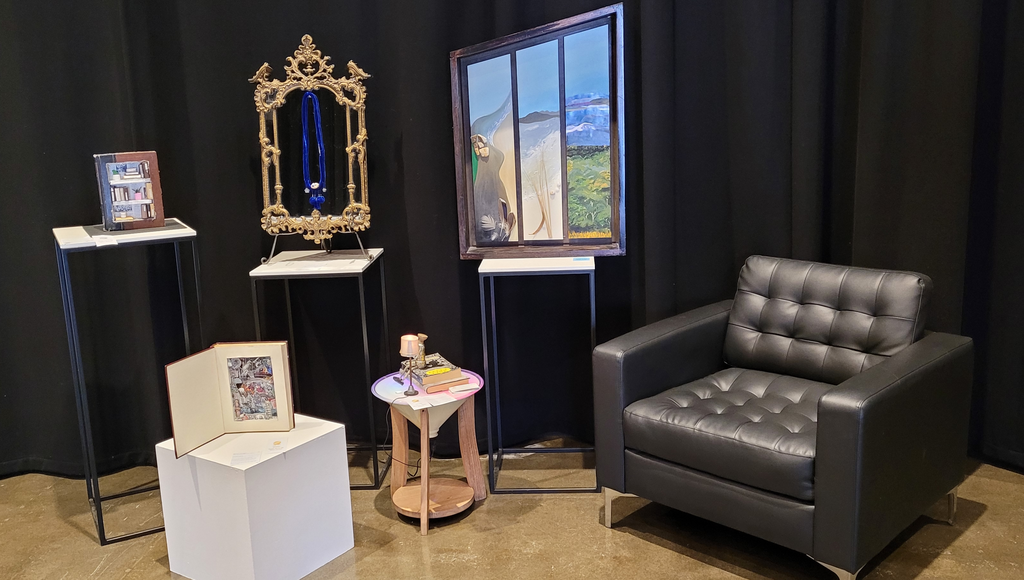
The curators made a sort of living room arrangement for a few themed pieces, I quite like the setting, even though mine does get a bit lost next to the ugly black armchair.
I’m splitting this up as the piece is really 3 parts.
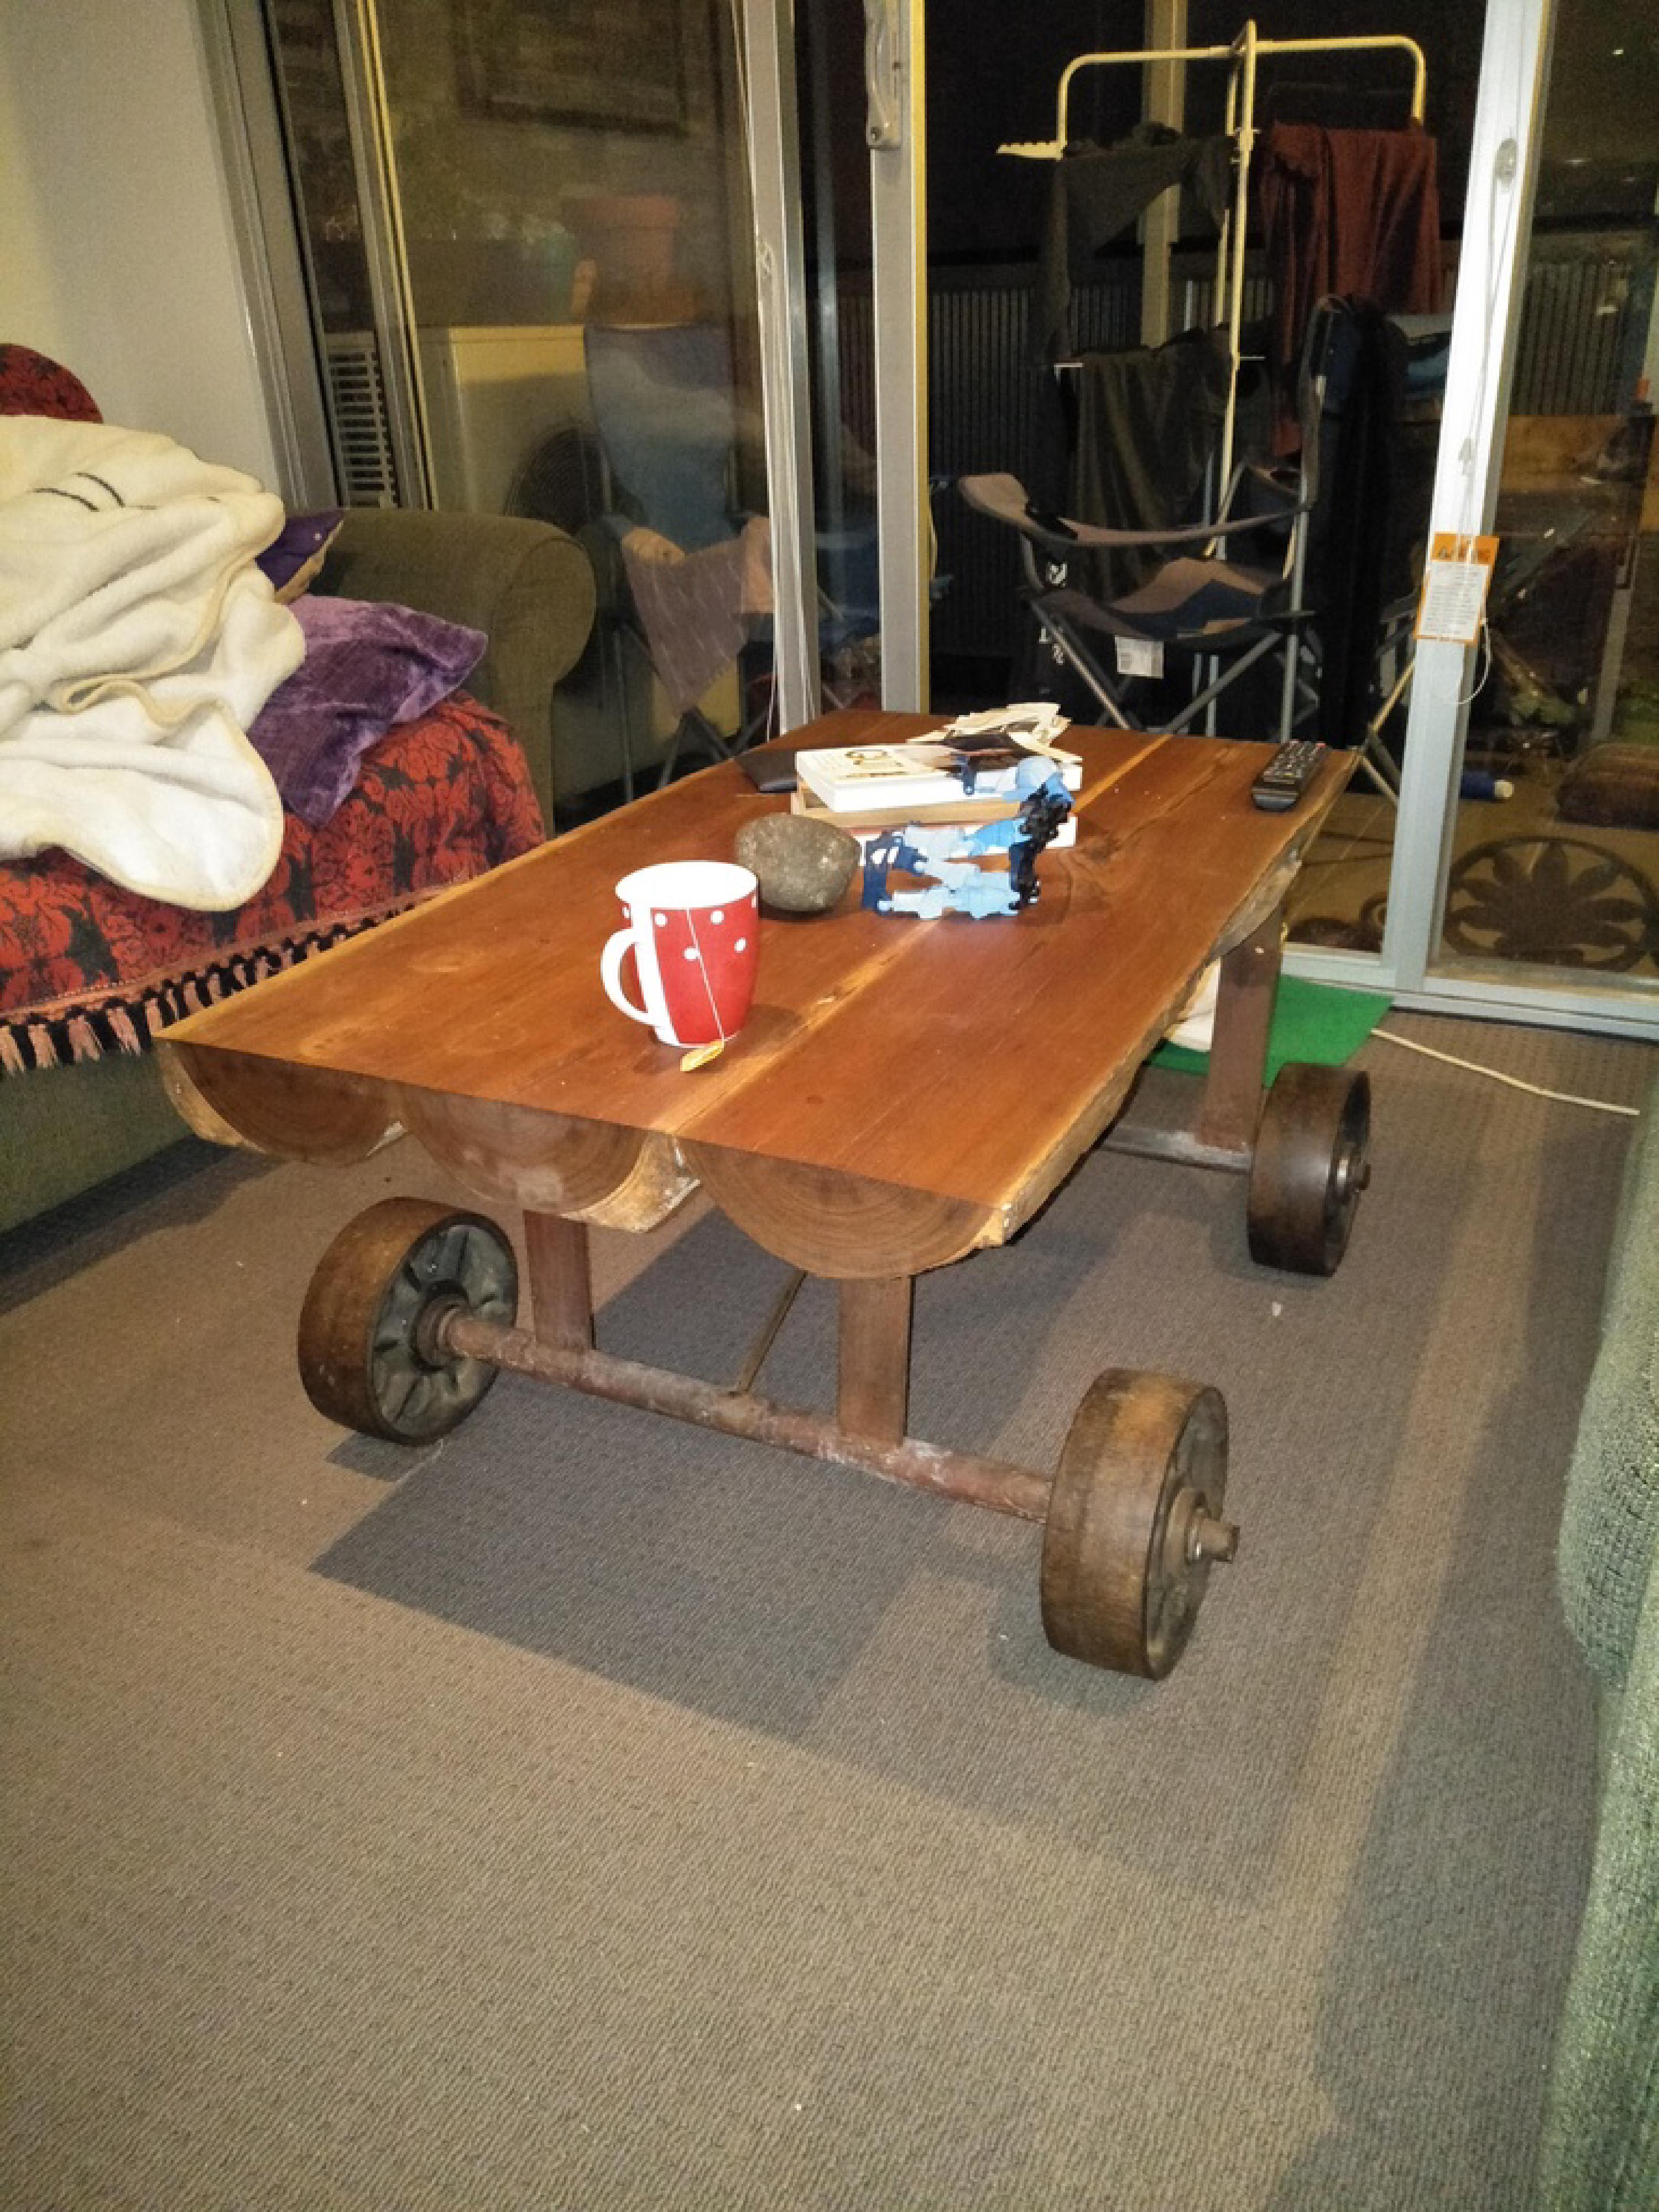
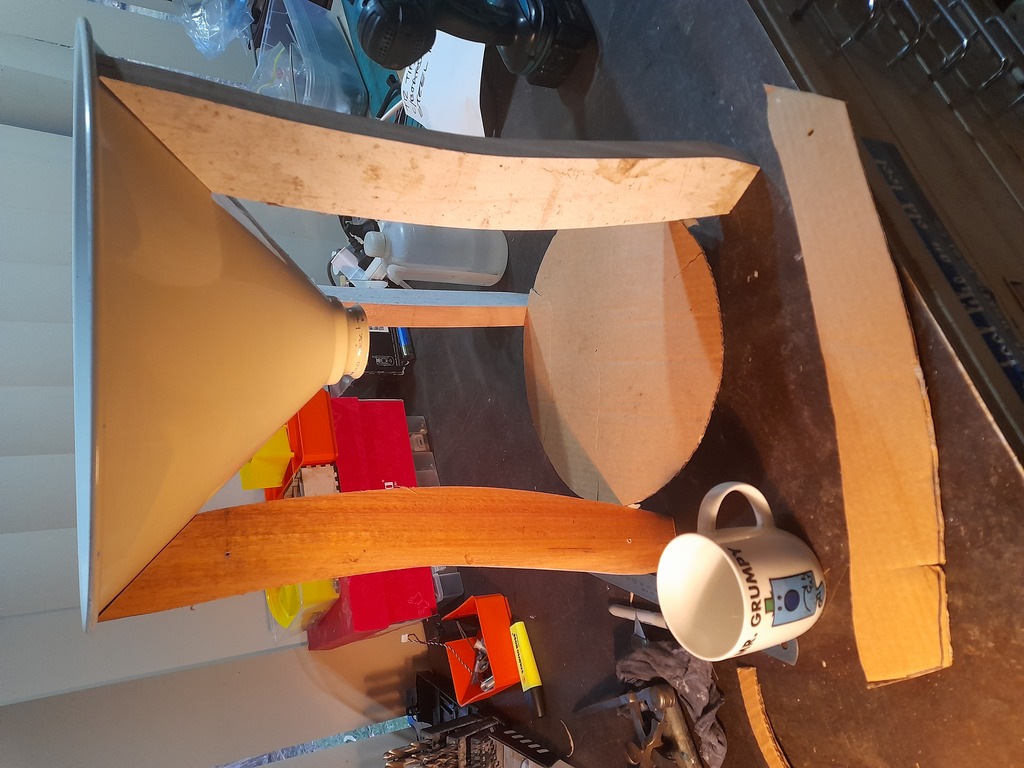
The inspirational part for this piece was the conical lampshade that I found at South Hobart Tip Shop, have I mentioned that this is one of the best tip shops I know? It was missing the fitting for the globe so I could use it with an easy conscience that I was not preventing something being used for its original prurpose. I also needed a library table for my reading room, and the shade would make a perfect base.
I made the top from an old microwave plate, for some reason there were 3 in the shed. It is quite a large one and fits perfectly on the shade. The only problem I had was holding it onto the shade. In the end I used 3 little clips made from picure hangers, but they are a bit flimsy and I should replace them with something stronger.
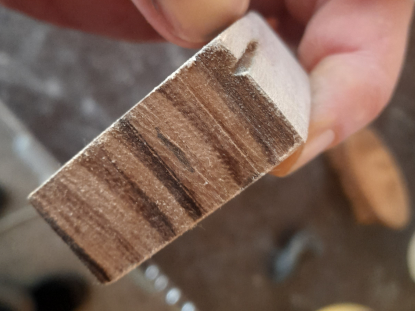
The legs were cut out of scrap hardwood I found in the shed. I have no idea what it was once part of, maybe furniture. It was fairly well used so had paint and dings on it, I sanded off the paint but left the dings, one shoudn’t erase history. I “designed” the profile of the legs by sketching a shape on cardboard and refining it until I decided I’d spent enough time with a Stanley knife and masking tape. Then I made a MDF template of the shape and cut out 3 legs on a router table with one of those bits that can follow a template stuck to the work. I call this process “CAD” which I use to mean “Cardboard Auded Design”.
The bottom circular shelf is a place a put more books and it was needed to tie the legs together, as the shade was soft aluminium so they wobbled and were not secure. It does look a bit thick when assembled, given more time I would have found a thinner bit or put a bevel on the edges to reduce the visual thickness.
Pro tip I learnt from theatre propmakers: if you don’t want something to wobble, give it 3 legs!
Here’s the legs attached minus the shelf. The somewhat battered cardboard design in in front.
Here’s an annoyyance of using recycled timber: you never know when you are going to cut through an old hole which then becomes very visible. A fine furniture maker would carefully fit in a piece of wood carved to fit. I just used filler.
The bottom of the shade has a USB charger socket that I made with a broken car lighter plug adaptor. I use a power supply (donated to Hobart Hackerspace) to power it with the 12V it expects. Also (very importantly) there is a a brightness control, as sometimes you want things dialed down a bit. The LEDs mount on a circle of cardboard about half way up. The glass top has a sort of stippled finish on the bottom that does scatter the light a bit, but it was still a bit glarey. So I used another trick that I saw used in the theatre: frost gel, thick plastic sheet with a frosted finish, specifically made to diffuse light. A sheet of this under the top got exactly the look I wanted.
If somethings worth making its worth putting LEDs in it.
The lightshow inside is made from a strip or ribbon on tiny LEDs that can be stuck on just about anything, each LED (there are 22) can be programmed to any colour or brightness. I used one of my favourite electronics parts, an Arduino, a physically small cheap fairly brainless module that can control just about anything. I programmed it to generate a spectrum of pastel colours that slowly changed colour, repeating the sequence maybe in a minute.
The actual program is below. About half of it came as a demo and I just modified it until I was happy with the look. This is all that is running the LEDs and setting the brightness from a knob.
#include <FastLED.h>
FASTLED_USING_NAMESPACE

constexpr uint8_t DATA_PIN = A0;
constexpr uint8_t GPIO_BRIGHTNESS_POT = A1;
constexpr uint8_t GPIO_BRIGHTNESS_VCC = A2;

#define LED_TYPE    WS2811
#define COLOR_ORDER GRB
constexpr uint8_t NUM_LEDS = 22;
constexpr uint8_t BRIGHTNESS_MIN = 17;
constexpr uint8_t FRAMES_PER_SECOND = 10;

CRGB leds[NUM_LEDS];

void setup() {
  FastLED.addLeds<LED_TYPE, DATA_PIN, COLOR_ORDER>(leds, NUM_LEDS).setCorrection(TypicalLEDStrip);
  FastLED.setBrightness(50);		// Set default brightness until the main reads the control.
  pinMode(GPIO_BRIGHTNESS_VCC, 1);
  digitalWrite(GPIO_BRIGHTNESS_VCC, 1);
}

static uint8_t gHue;

void loop() {
  fill_rainbow( leds, NUM_LEDS, gHue, 7);
  FastLED.show();
  FastLED.delay(1000 / FRAMES_PER_SECOND);

  // do some periodic updates
  EVERY_N_MILLISECONDS( 20 ) {
    gHue++;  // slowly cycle the "base color" through the rainbow
  }

  EVERY_N_MILLISECONDS(100) {
    uint8_t b = (map(analogRead(GPIO_BRIGHTNESS_POT), 0, 1023, BRIGHTNESS_MIN, 255));
    FastLED.setBrightness(dim8_video(b));
  }
}
The tittle figure is a Reader, one of many little creatures who just sit on things reading. I made her years ago and never got around to giving her a book. The body is a tool for cleaning car battery terminals, legs are springs with bike brake blocks for feet. The head is a drawer pull.
As I had a spare USB socket with volts coming out of it I thought I’d make a lamp. The globe is probably from an old car, the lampshade is some heat resistant material that came out of an old hairdrier, I held it together with copper wire that was used as part of an instrument that measured environmental conditions as it was dropped into the ocean, sending the results back up to the surface; very useful stuff.
The show looks very pleasing and gentle, totally appropriate for a reading environment.

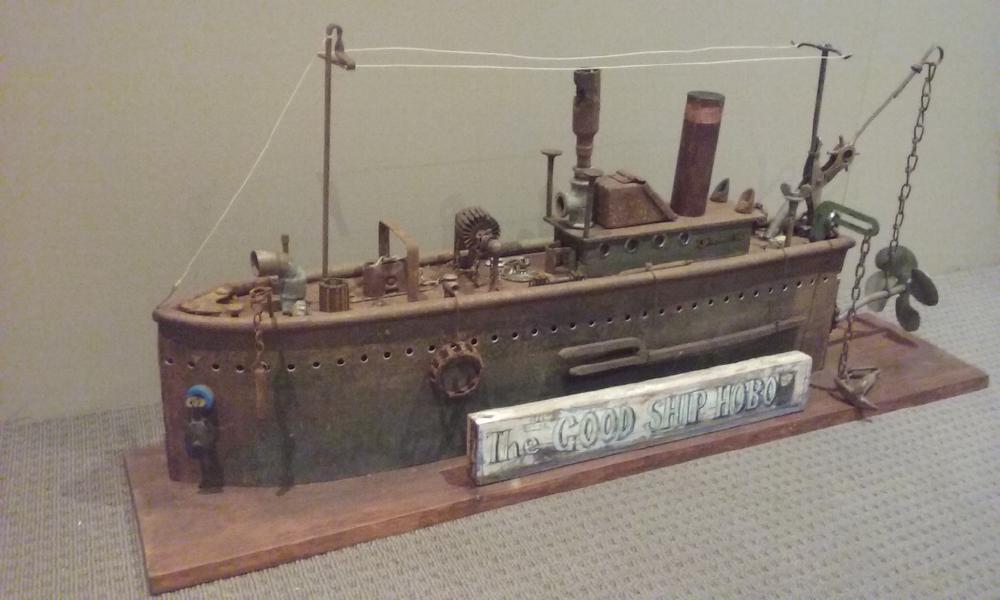
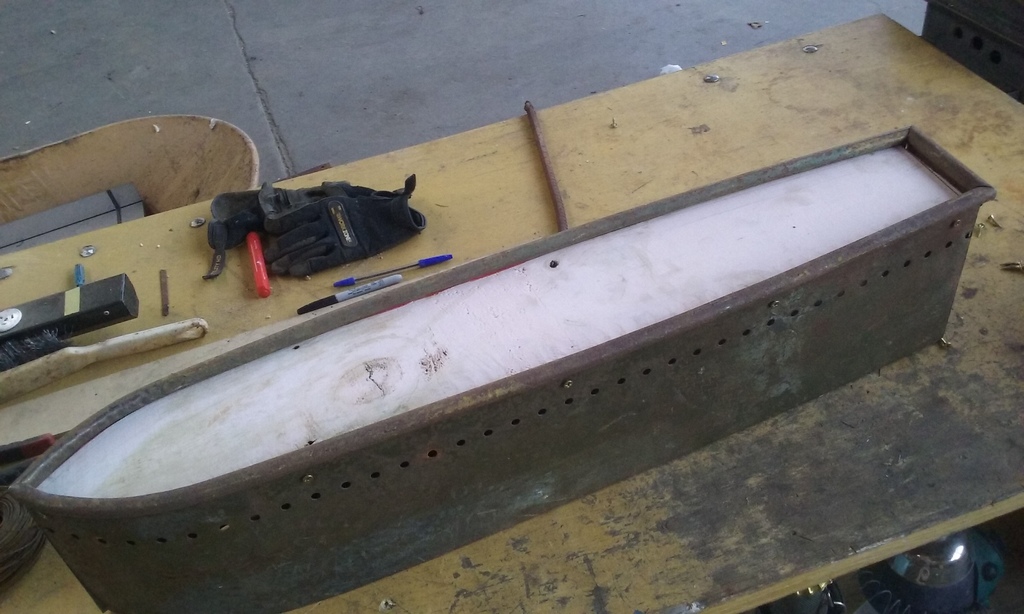
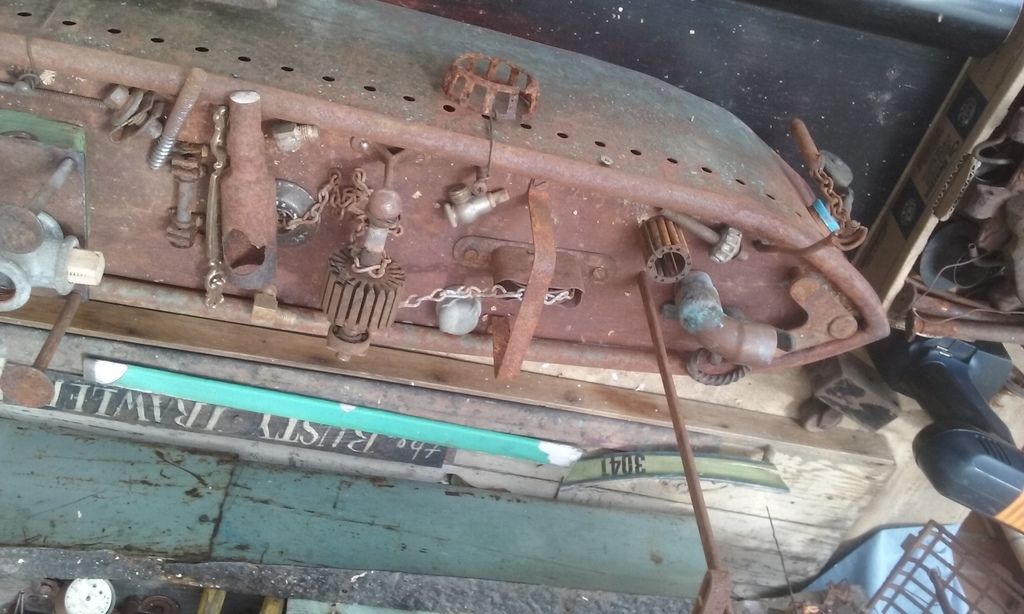
The Good Ship Hobo was a collaboration with Claude Ciccione of Belgrave. I made the hull out of an upright from a set of Brownbuilt steel shelves, the row of holes where the shelves could be fixed looked to me like portholes. I did get the hull welded up by a professional welder who is also an artist. Claude and I worked on the trimmings on the deck together, using mainly my bits & pieces.
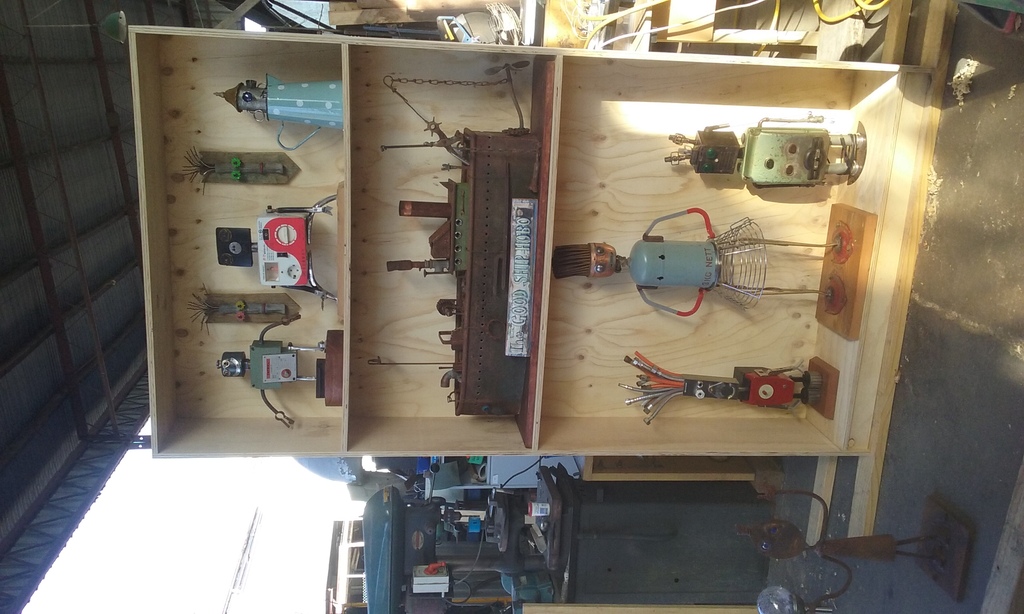
Heres a shot of the complete display I made for the show.
And here are some work in progress shots taken on a dull day at Claude’s house in Belgrave.
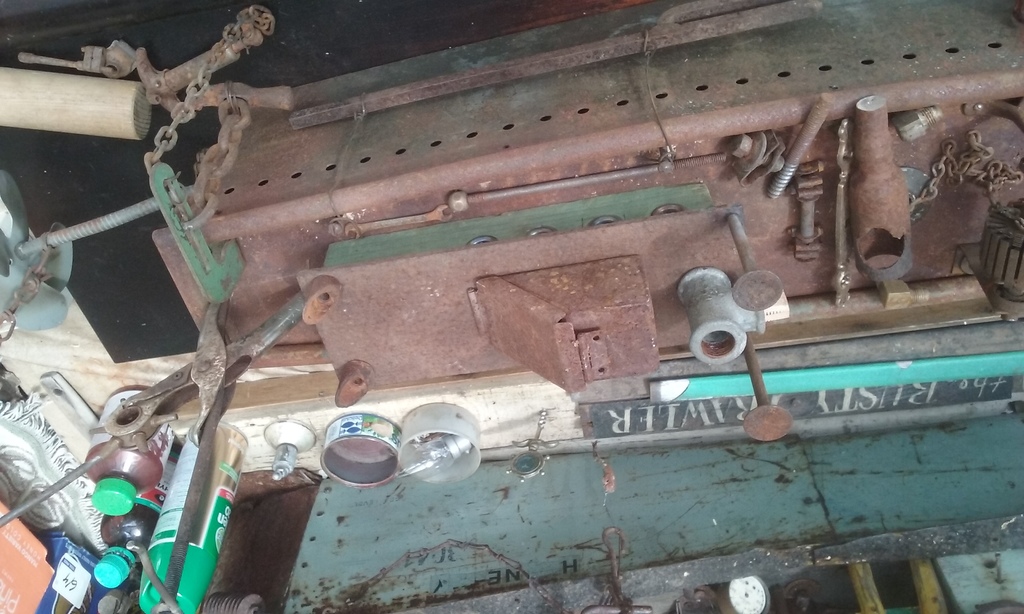
Since The Good Ship Hobo sold (my biggest sale!) at the show I don’t have any better photos. I installed LEDs inside the hull which shone out of the portholes so she looked fantastic in subdued lighting, like a real ship. I hope she went to a good home.

Height: 37cm
Materials: Coffee pot, lamp parts, glass beads, curtain rings, table forks.
Date: 2016
Domestic Goddess is a piece of folk art, so like all such she’s not particularly original, you will find plenty like her out there in internet land. Folk art endlessly reuses motifs: Domestic Goddess' hands are table forks and she lives in a piece of retro kitchenalia. My kids really used to like that her earrings are curtain rings; a favourite movie was Planes, Trains and Automobiles where John Candy’s character makes quick money peddling shower curtain rings to various people, telling two young teens girls that as earrings “You know something? It makes you look a little older, too. I mean not just a little bit. You could pass for 18 or 19.”.
But she’s a happy thing to brighten a dull corner; or a dull day.
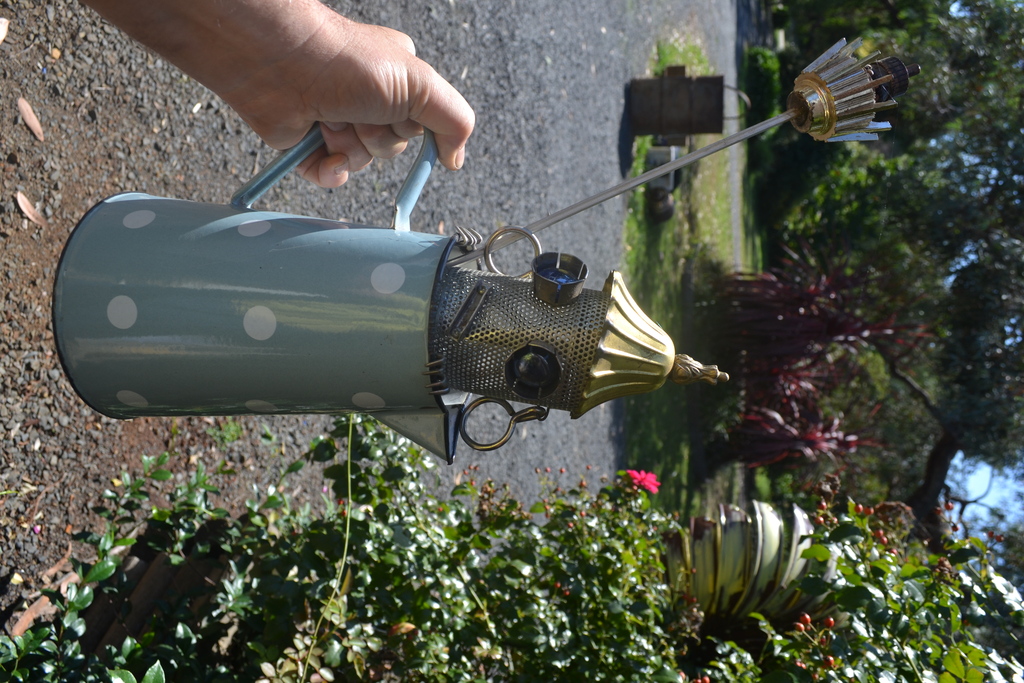
She used to have a flower but it got lost, I think she looks fine without it. I just made her when I found the old enamel coffee pot and the brass bit of a lamp that I turned into a hat. The other parts are just stuff I had to hand.


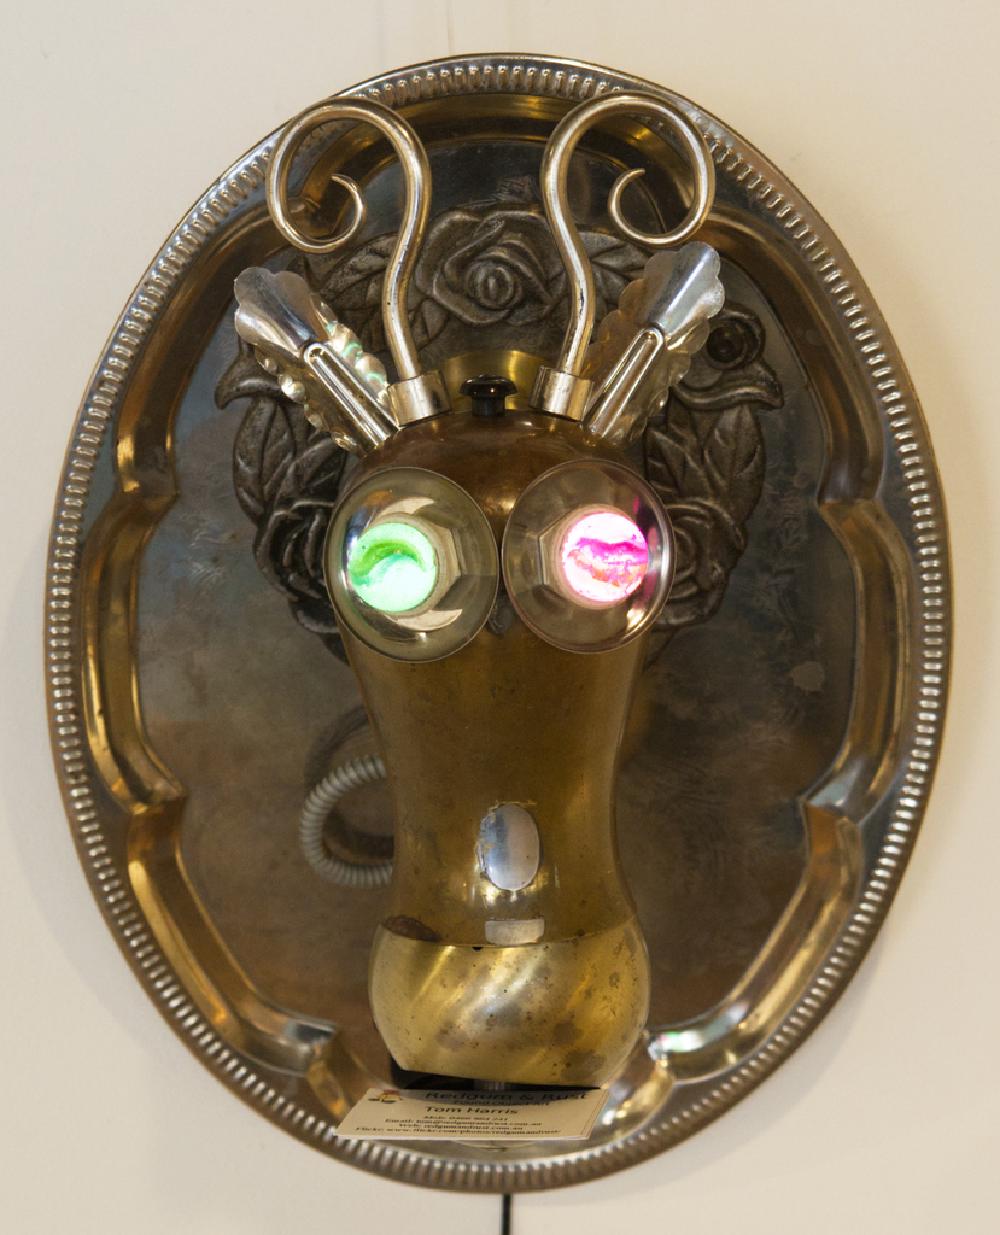
Size: 30cm wide x 40cm high wall hanging; 30cmm deep.
Materials: Brass coffeepot, saucepan lid, lighting fixture parts, tongs, curtain rod ends, old marbles, industrial electrical plug parts, Christmas lights, old phone cable, tea tray.
Date: 2023.
Note: requires USB for lights.
Still Ahead was made for the annual “Art From Trash” art show in 2023 at the Long Gallery, Salamanca Arts Centre, Hobart. Organised by South Hobart Tip Shop, perhaps the premier tip shop in the state, though Mornington is pretty good as well.
Here’s the artist’s description I wrote:
Years ago I picked up an old coffeepot with broken legs and spout from the scrap yard. I just
liked the shape and used it for incense. Then it went to the shed for a while, until it
happened to come together with the ball thing from an old lamp. Still Ahead was alive!
It didn't take long to find ears and horns, all sorts of things will do the job. I needed
new tongs for the barbie anyway.
The eyes took a bit longer to get right. They are big marbles glued into some sort of
electrical plug bit from Margate tip shop. My happy place, me & my partner went on our
first date there! An old tea tray and a mystery aluminium wreath from the tip shop make
a fine plaque.
Some Christmas lights, an old phone charger and bits from my big box of electrical junk
make the eyes light up.
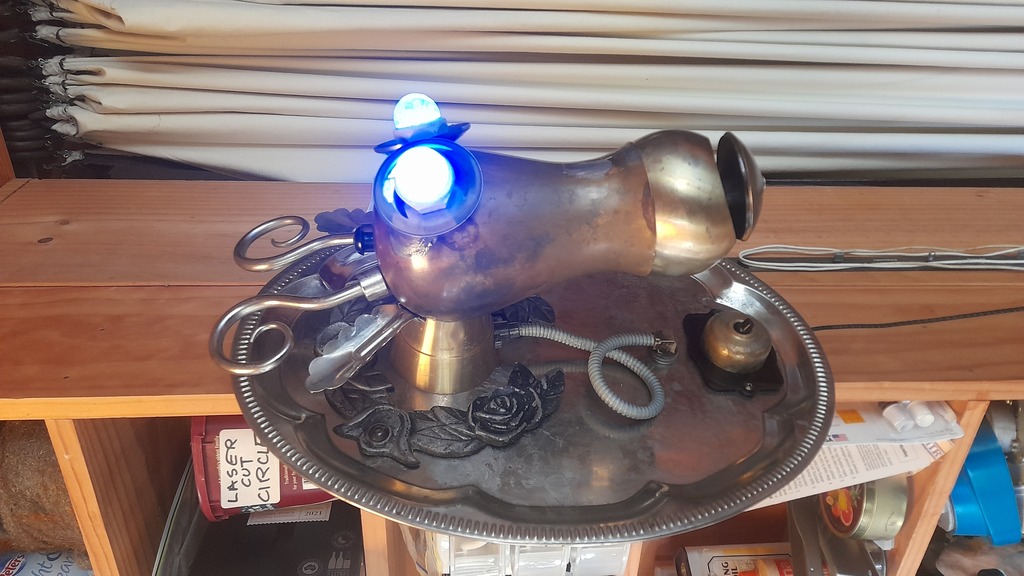
As I was entering Aurora in the show as well I wanted to do another piece, but was a bit stuck. Then inspiration arrived from the usual source: the Shed. I was looking through a box of old pots and bits and I found the broken brass jug that forms the top of the head, and then I found a ball shaped bit that fitted perfectly in the mouth of the jug, making a perfect mouth, I think it was part of a standard lamp. Instant head! I’ve made a few trophy heads over the years, so I thought that I’d make another, as they are a bit folk-arty, variations on a theme: onto a head goes horns and ears, and some eyes, the whole lot mounted on something flat.
The two head parts are put together with a spring, which means that the mouth bit is movable side to side, which gives a small variety of expressions. The mouth also makes an admirable card dispenser. The silver spot on the head is where the handle was soldered to, but looks like it belongs there. The horns were made for the ends of fancy curtain rods and do the job very well. The ears were from an old rusty set of tongs.
The silver eye surrounds are plumbing fittings: they hide the mess where a pipe goes through the wall. The eyeballs are old worn glass marbles glued into some sort of electrical fitting. Behind the marbles are more of my colour changing LEDs. They are controlled by the large switch on the bottom of the plaque, with a fairly unnecessary bit of flexible metal conduit for a bit of a steampunk look. The plaque is an old tea tray, with an aluminium wreath from somewhere bolted on.
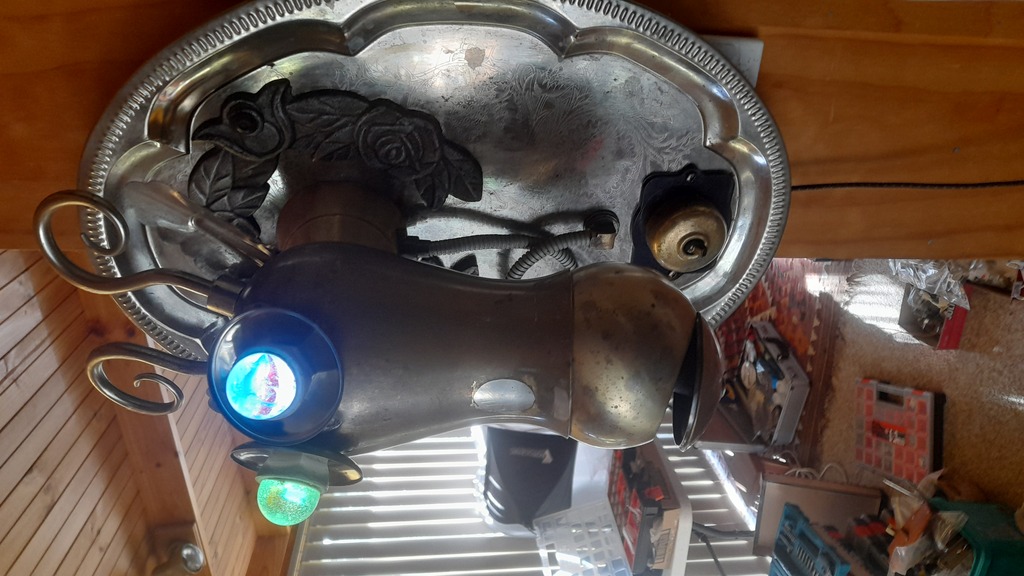
Someone must have liked it as it sold at the show. Hope they enjoy it. And that it keeps working, but the LEDs are running at very low power so they should last forever.
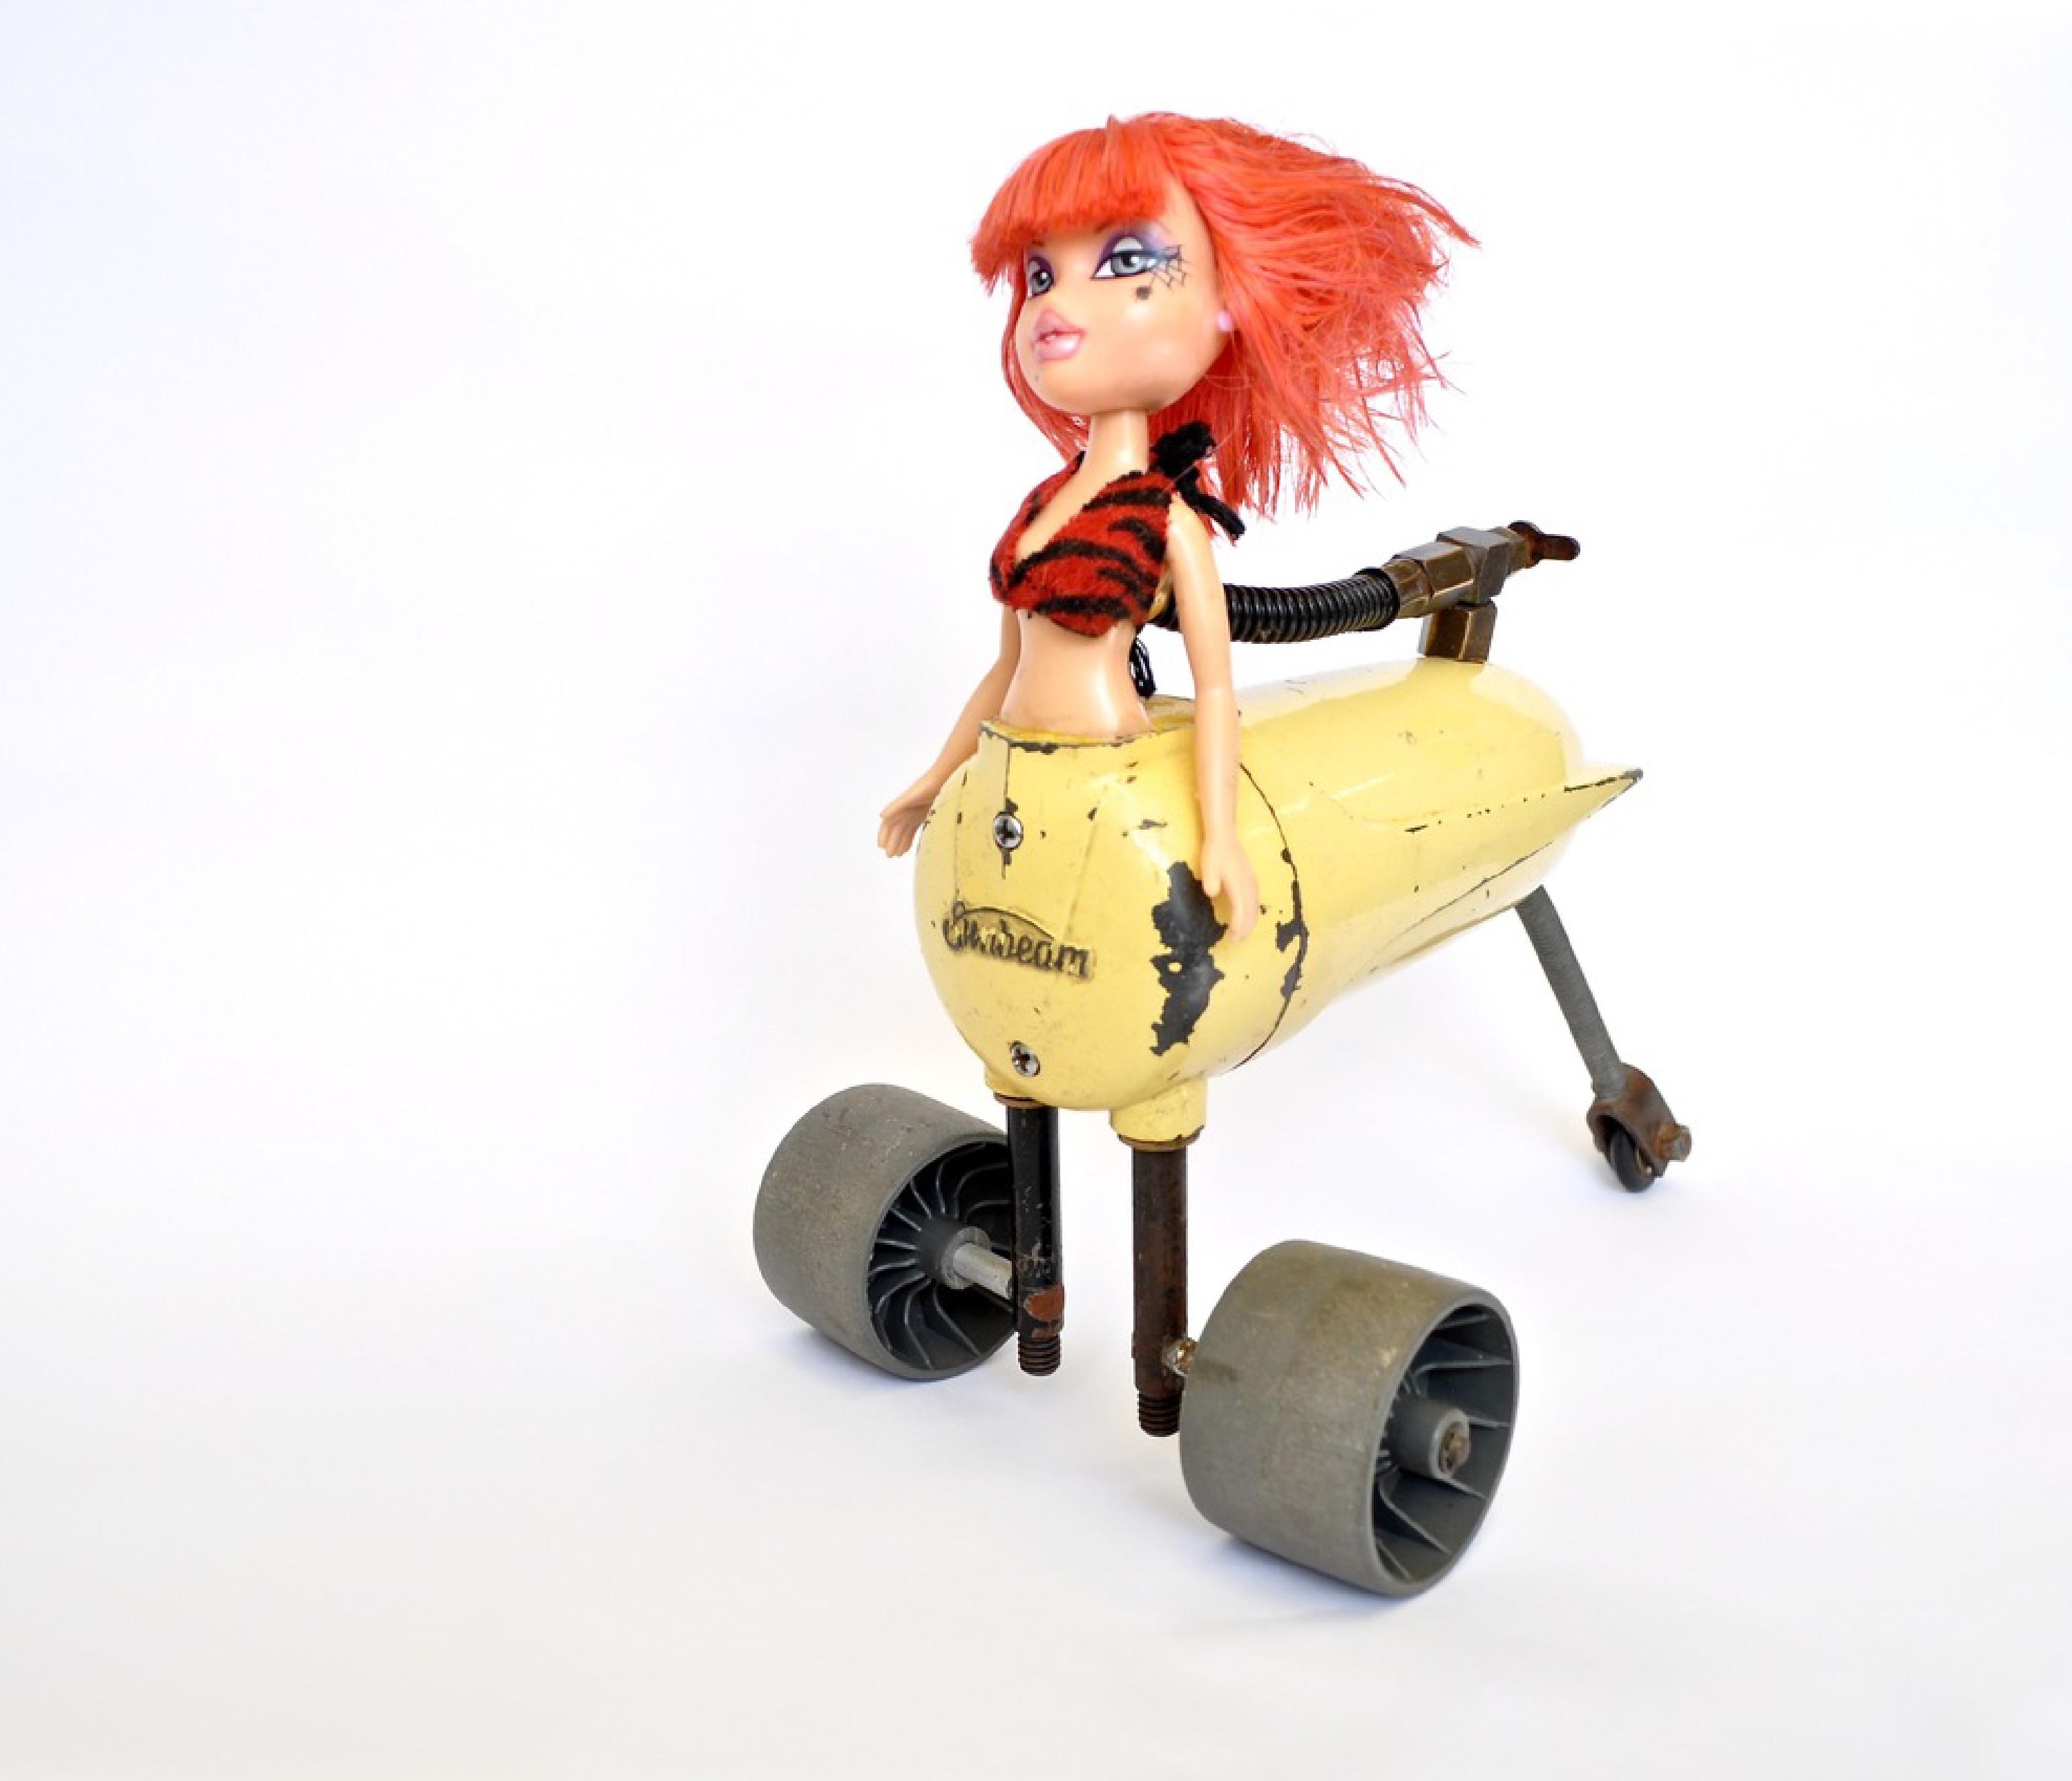
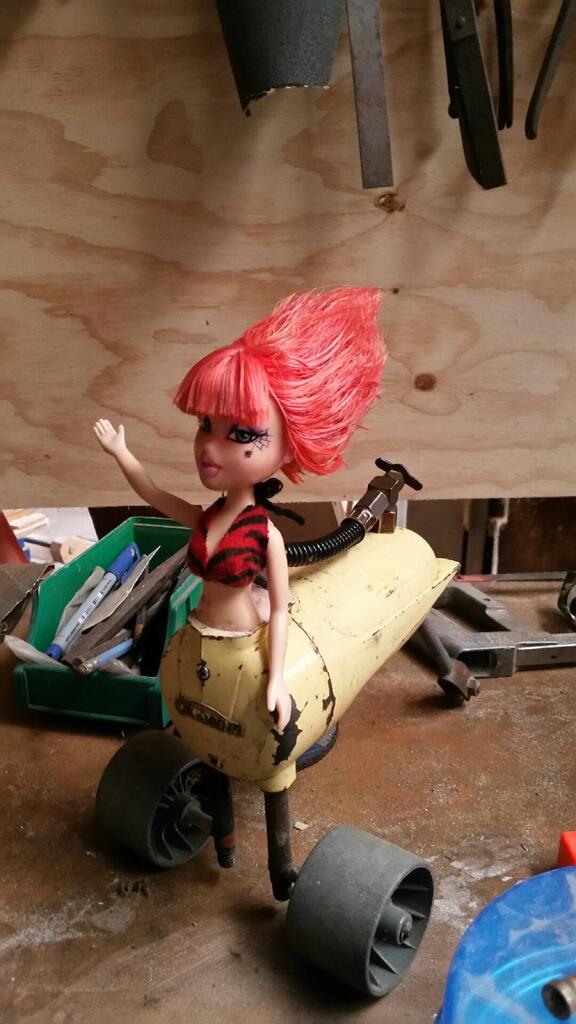
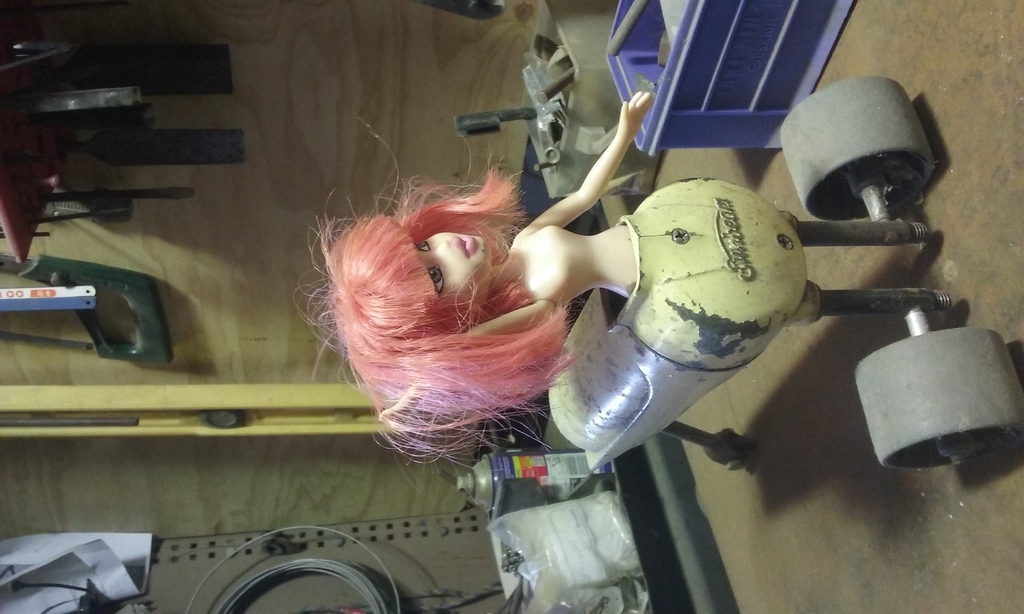
Sunbeam was a long time in the making. The inspiritational moment for me was when I picked up an old Sunbeam brand cake mixer on hard rubbish, and then I dropped it and broke off the handle, which was made of brittle bakelite. I then removed the handle, and the hole in the top looked like a cockpit, with the lovely 50s design of the mixer forming the body of a retro-futuristic vehicle. Somehow a pair of wheels from the nozzle of a garden blower got fitted, and a single trailing wheel that came from a sewing machine.
But there it stalled, as I wanted a figure in the cockpit, and I could never find one… until years later I found a fairly hideous doll which I’m told is a “Bratz”, and the legs came off and she became a cyborg, a post-human creature. Since I am a fan of Studio Ghibli movies I made a little propellor out of a brass valve because anything can fly if it has a propellor.
I left her sitting on my bench at my shared studio space at Footscray Maker Lab, and Emily the caretaker wandered by. She loved Sunbeam and added her own vision of a leopard print crop top and a hairdo using industrial strength hair lacquer made specially for punks.
Since then Sunbeam has always been around my house, a little ray of sushine with a heart of gold if you can get over the miniature-cyborg-punk-doll vibe.
Before Emily’s makeover…
And after…