All of the works for which I have records, photos and recollections.


Size: 50cm x 50cm x 60cm high.
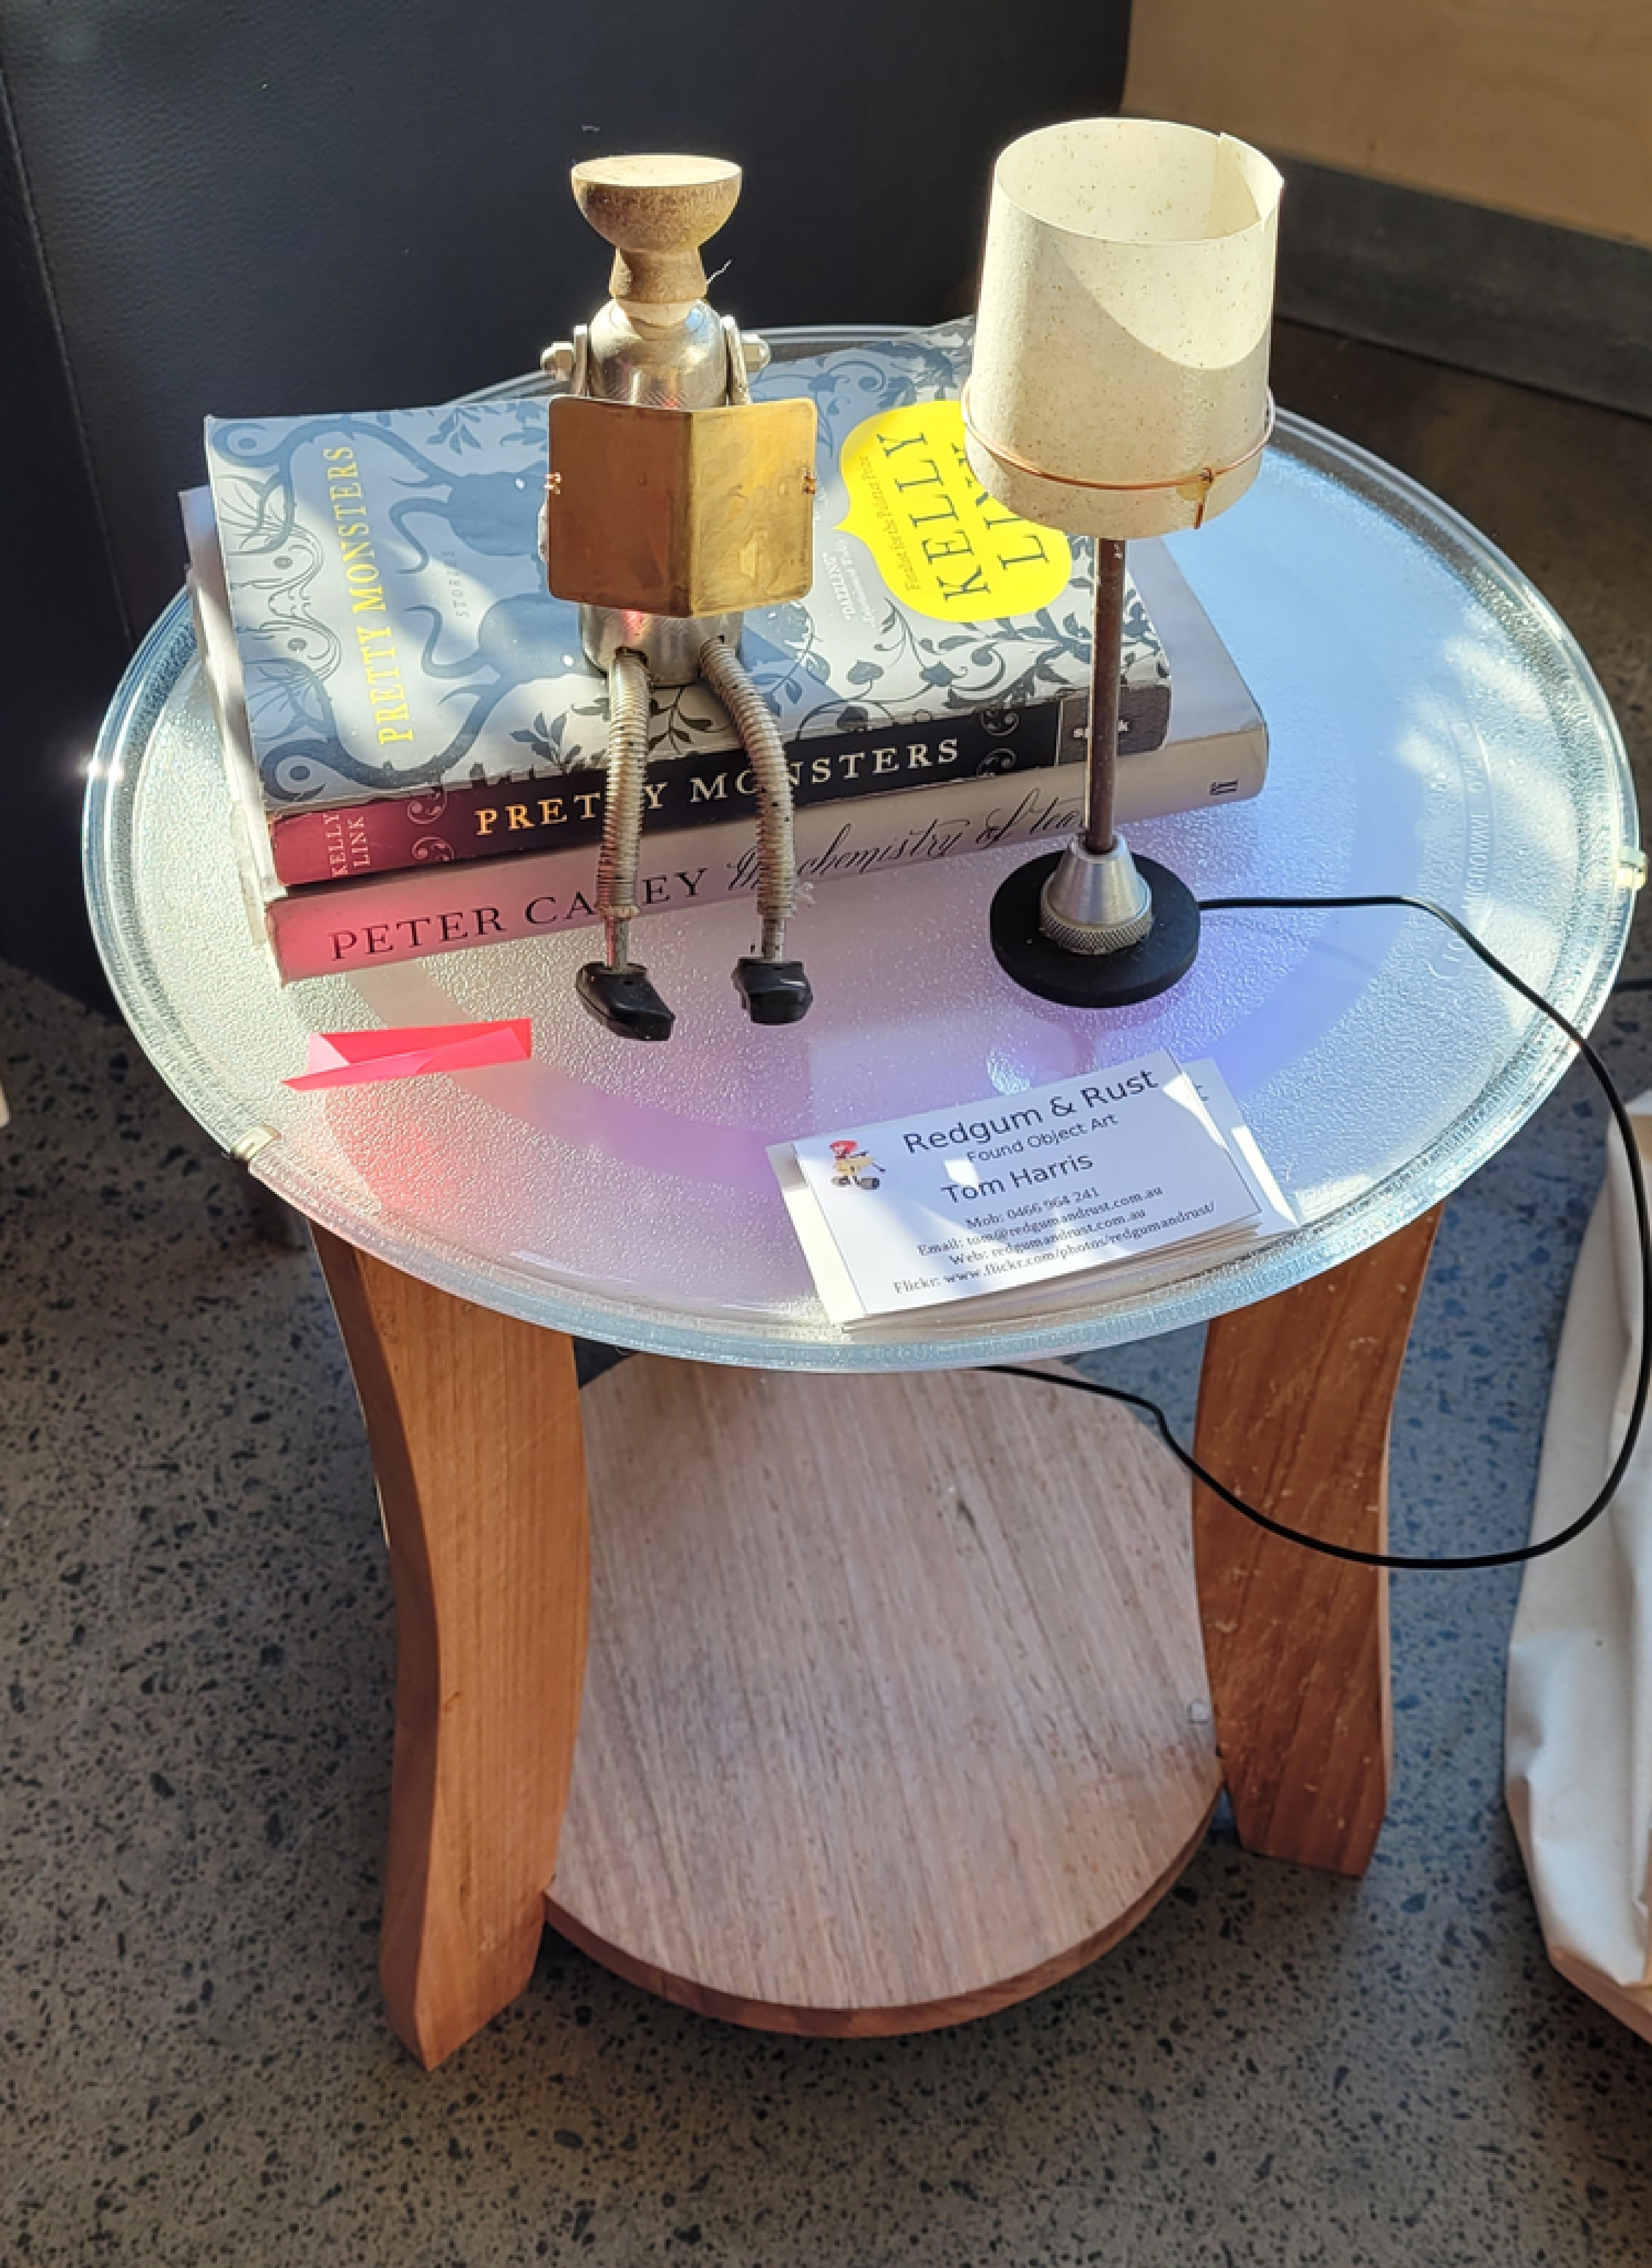
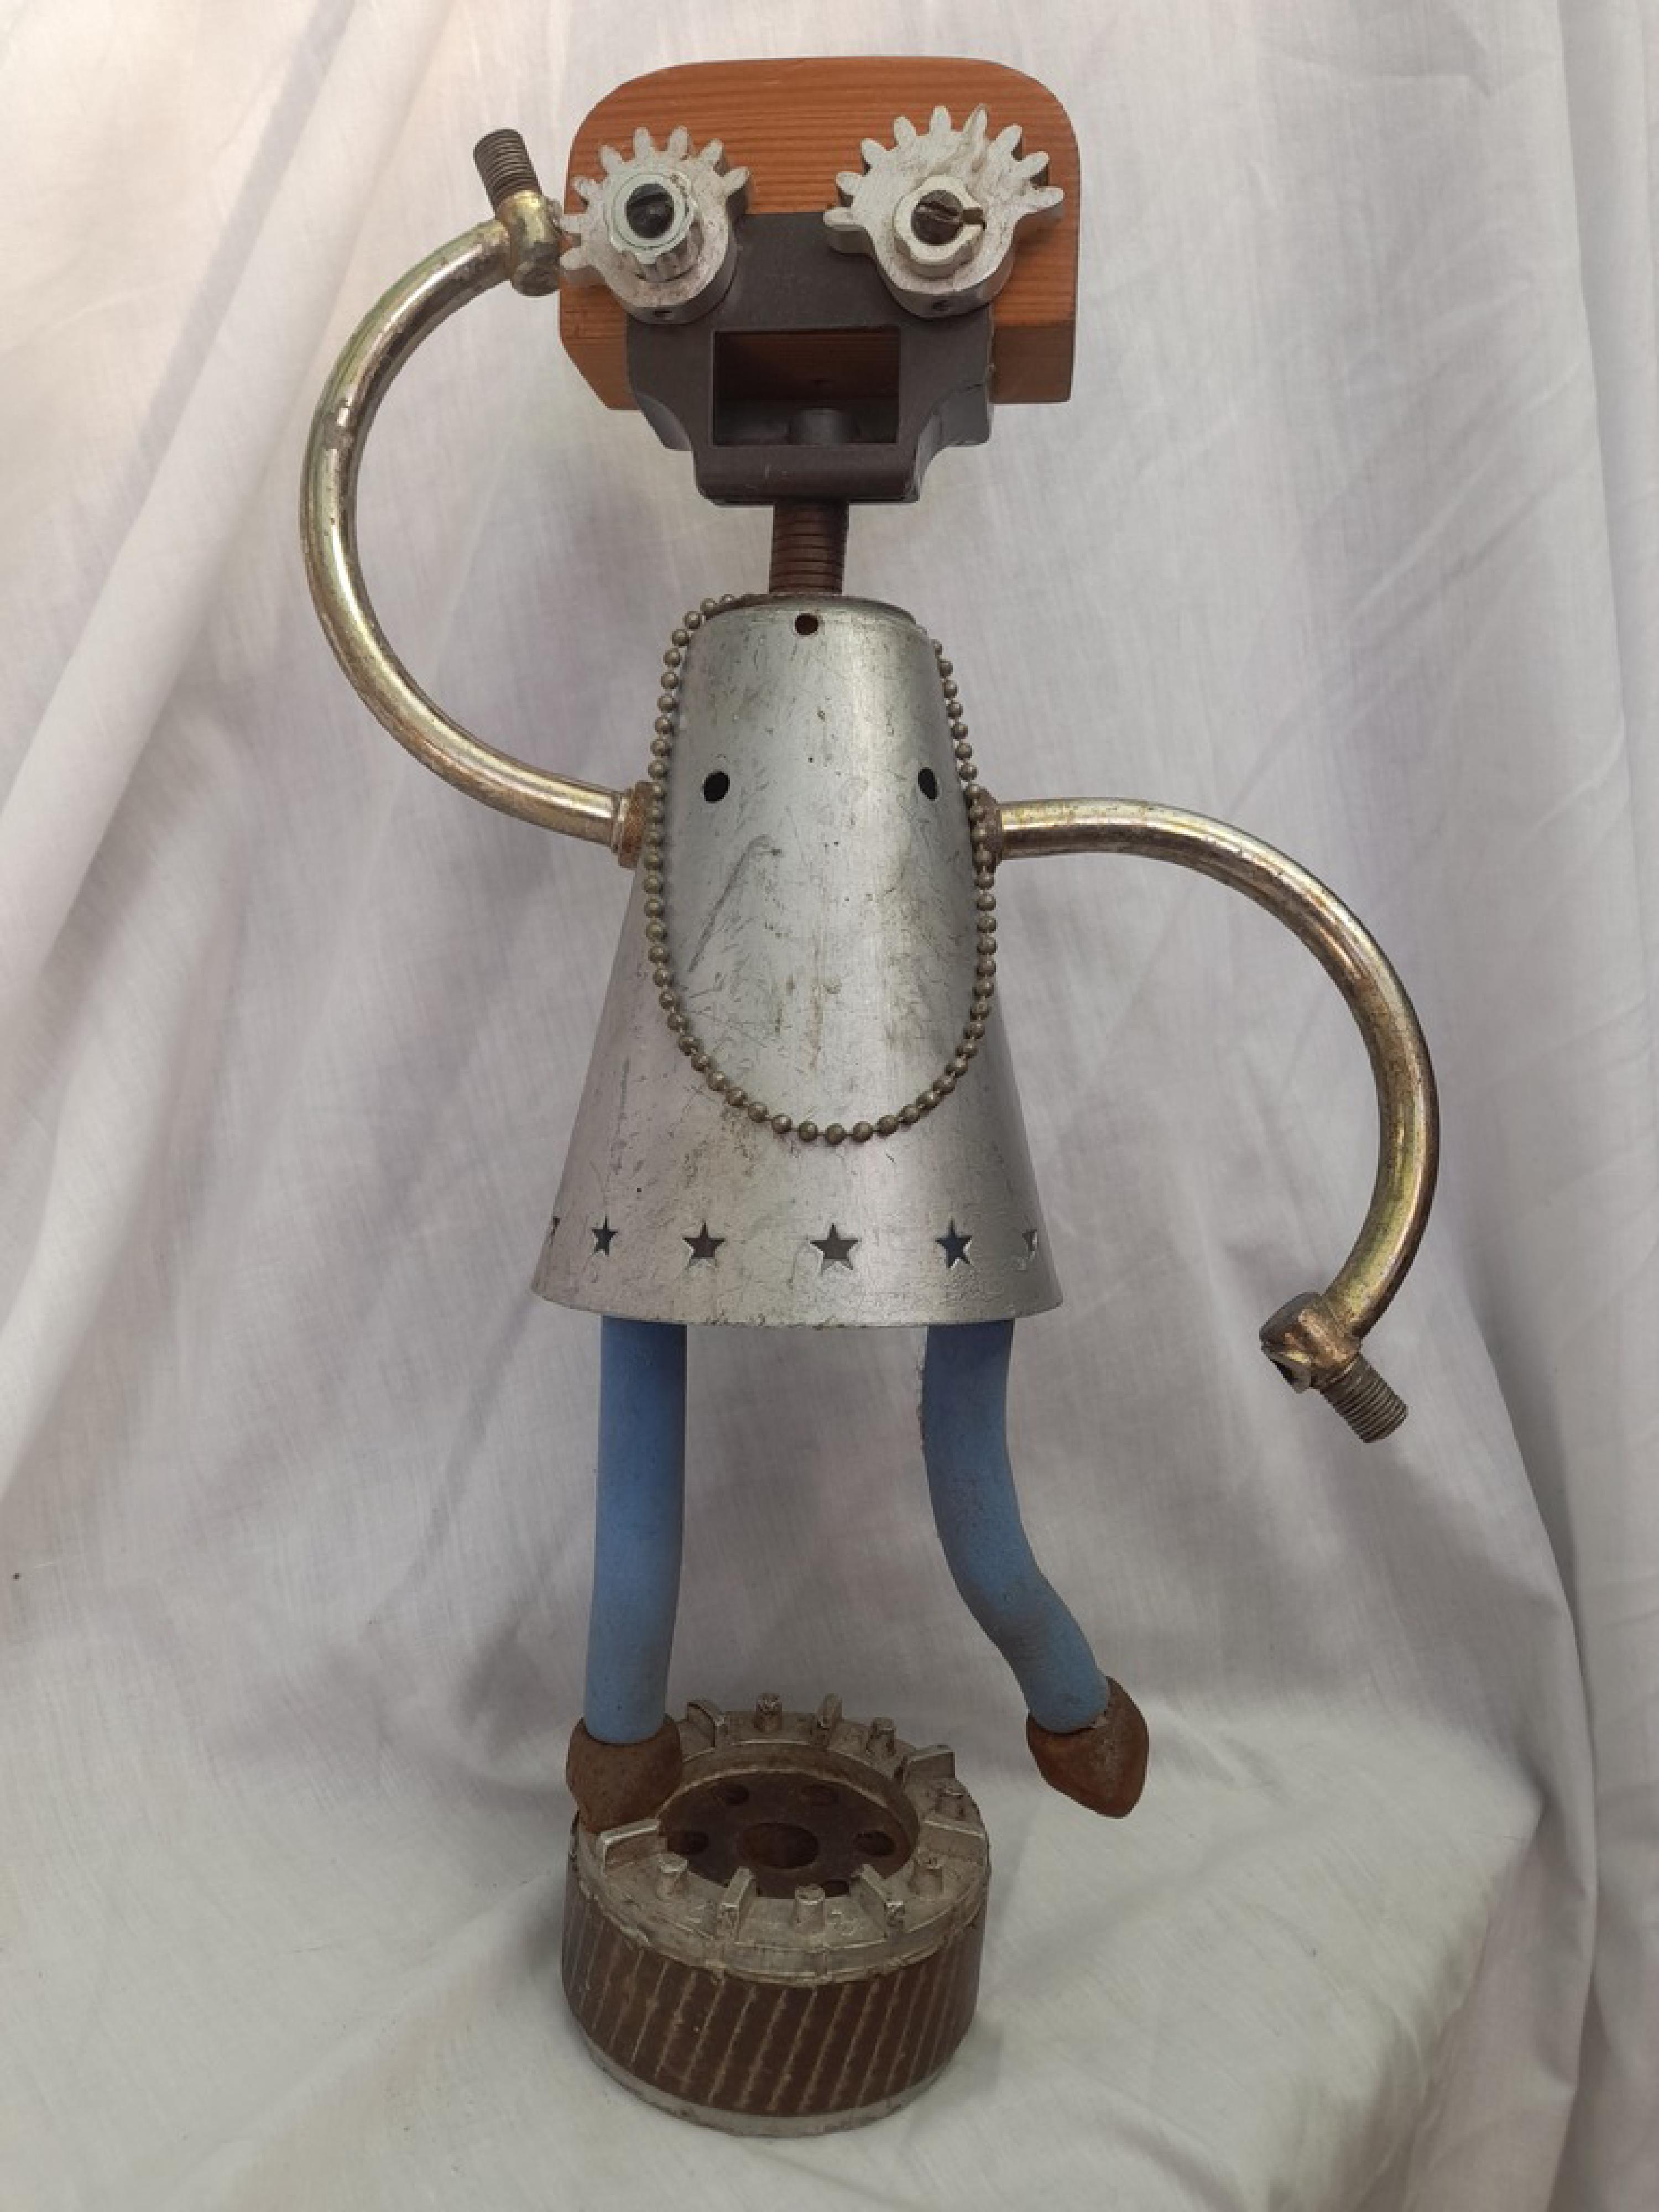
Materials: Lampshade and microwave oven plate from tip shop, legs are recycled furniture timber. Lights recycled Xmas decorations. Charger from e-waste. Books from my library, from op-shops. Reader made from miscellaneous workshop junk.
Date: 2023.
Note: requires mains power for lights.
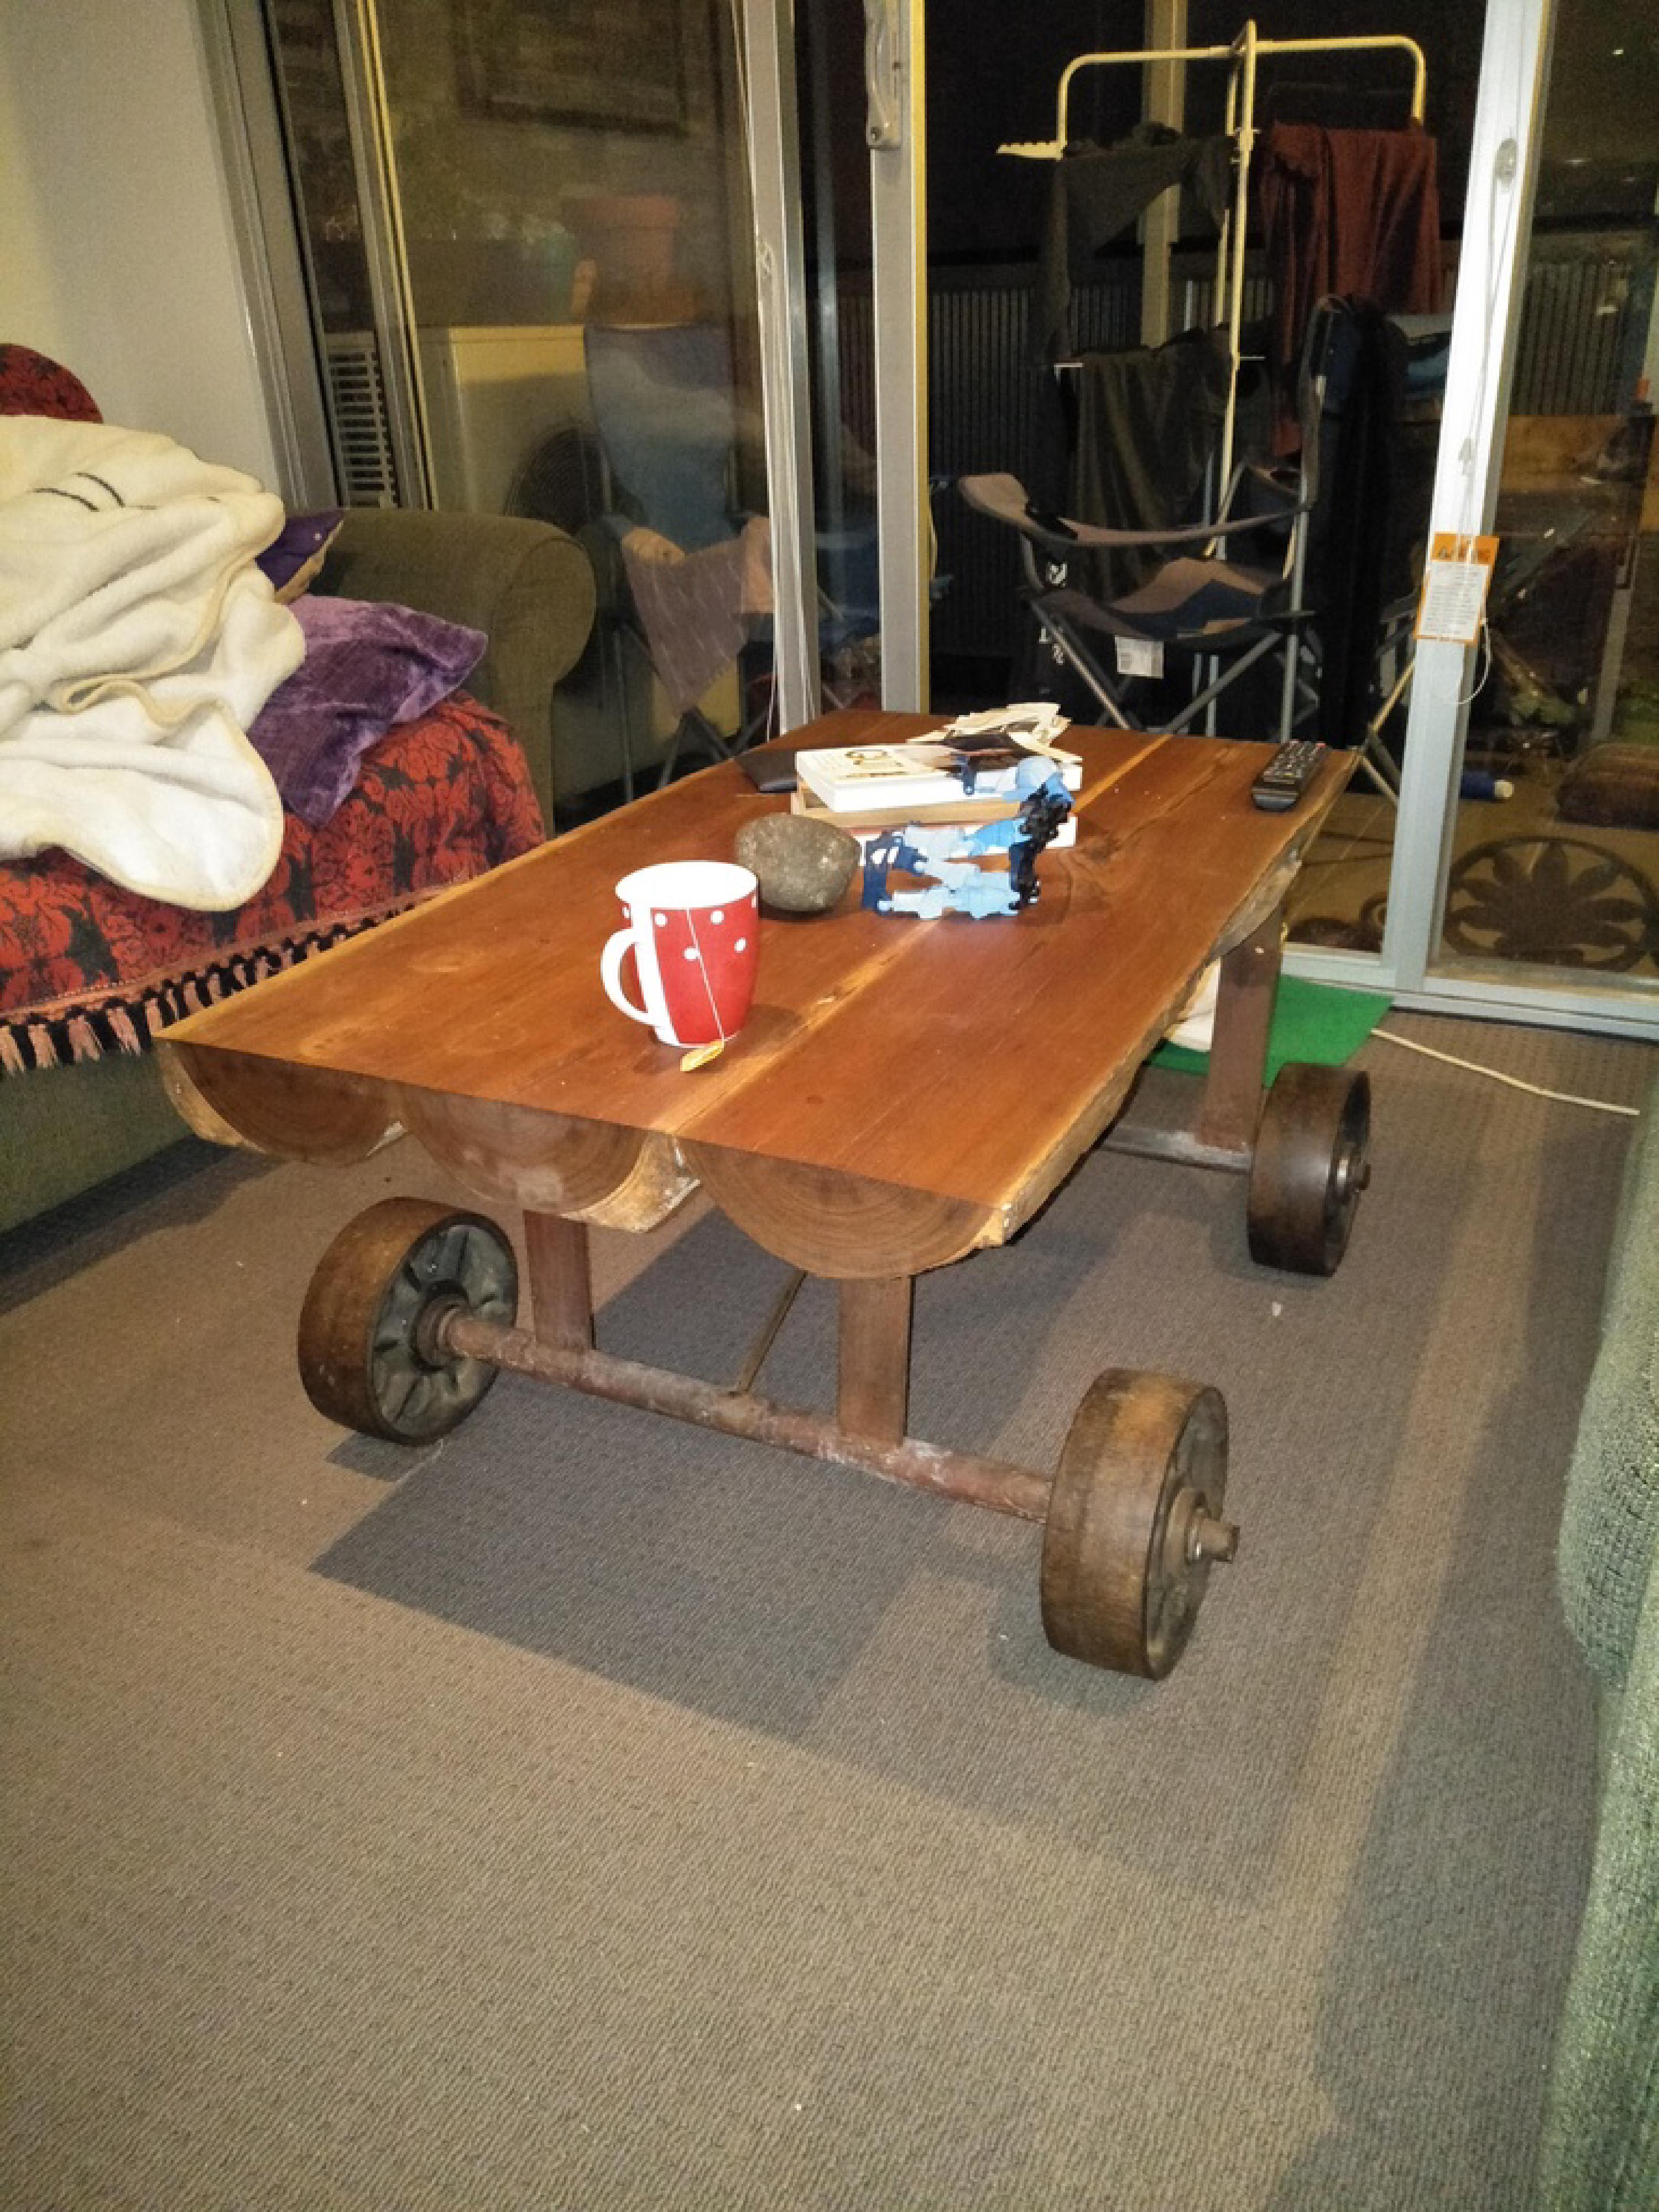
I made My Happy Place for a recycled art show held in Kingston in 2023 (I entered I Made It Myself in 2021, the show is biennial). The theme was “Health & Wellbeing” and the direction was “Through your artwork, let us know what makes you feel joy, gratitude, hope, a sense of belonging or purpose and/or a connection to nature.”.
Here’s the artist’s description I wrote:
As well as making art my happy place is reading somewhere quiet. As you can see I
have combined a coffee table to hold a drink and a few books with a relaxing light
show and a recharge socket for my tablet.
Of course one of my little creations has found a congenial place to sit and read and
has moved in. As she’s no trouble at all I’ve let her stay.
I won the amateur artist award this time.
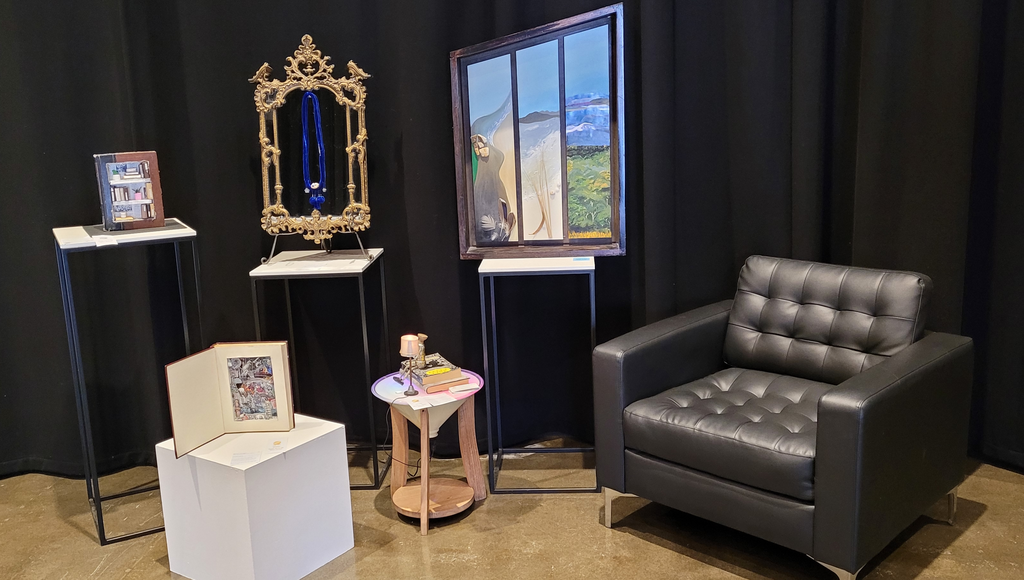
The curators made a sort of living room arrangement for a few themed pieces, I quite like the setting, even though mine does get a bit lost next to the ugly black armchair.
I’m splitting this up as the piece is really 3 parts.
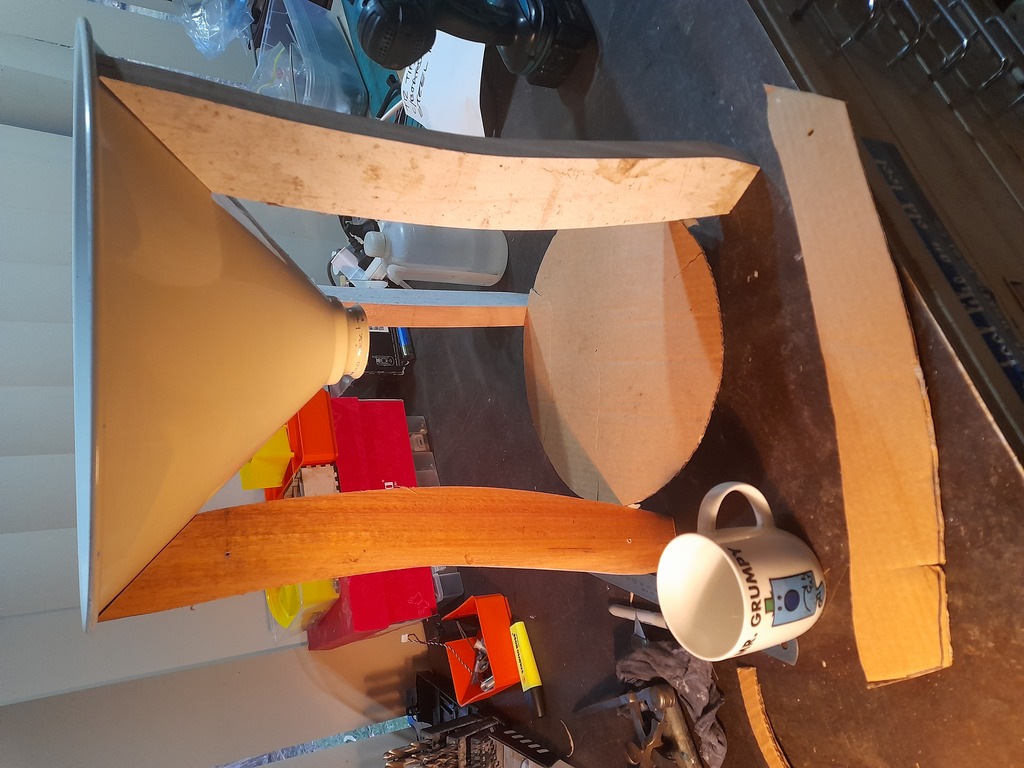
The inspirational part for this piece was the conical lampshade that I found at South Hobart Tip Shop, have I mentioned that this is one of the best tip shops I know? It was missing the fitting for the globe so I could use it with an easy conscience that I was not preventing something being used for its original prurpose. I also needed a library table for my reading room, and the shade would make a perfect base.
I made the top from an old microwave plate, for some reason there were 3 in the shed. It is quite a large one and fits perfectly on the shade. The only problem I had was holding it onto the shade. In the end I used 3 little clips made from picure hangers, but they are a bit flimsy and I should replace them with something stronger.
The legs were cut out of scrap hardwood I found in the shed. I have no idea what it was once part of, maybe furniture. It was fairly well used so had paint and dings on it, I sanded off the paint but left the dings, one shoudn’t erase history. I “designed” the profile of the legs by sketching a shape on cardboard and refining it until I decided I’d spent enough time with a Stanley knife and masking tape. Then I made a MDF template of the shape and cut out 3 legs on a router table with one of those bits that can follow a template stuck to the work. I call this process “CAD” which I use to mean “Cardboard Auded Design”.
The bottom circular shelf is a place a put more books and it was needed to tie the legs together, as the shade was soft aluminium so they wobbled and were not secure. It does look a bit thick when assembled, given more time I would have found a thinner bit or put a bevel on the edges to reduce the visual thickness.
Pro tip I learnt from theatre propmakers: if you don’t want something to wobble, give it 3 legs!
Here’s the legs attached minus the shelf. The somewhat battered cardboard design in in front.
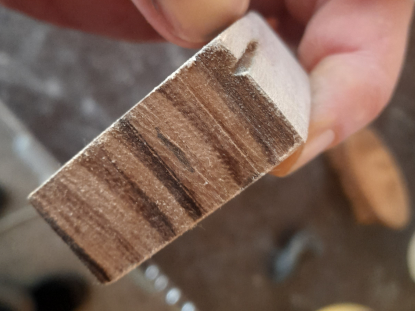
Here’s an annoyyance of using recycled timber: you never know when you are going to cut through an old hole which then becomes very visible. A fine furniture maker would carefully fit in a piece of wood carved to fit. I just used filler.
The bottom of the shade has a USB charger socket that I made with a broken car lighter plug adaptor. I use a power supply (donated to Hobart Hackerspace) to power it with the 12V it expects. Also (very importantly) there is a a brightness control, as sometimes you want things dialed down a bit. The LEDs mount on a circle of cardboard about half way up. The glass top has a sort of stippled finish on the bottom that does scatter the light a bit, but it was still a bit glarey. So I used another trick that I saw used in the theatre: frost gel, thick plastic sheet with a frosted finish, specifically made to diffuse light. A sheet of this under the top got exactly the look I wanted.
If somethings worth making its worth putting LEDs in it.
The lightshow inside is made from a strip or ribbon on tiny LEDs that can be stuck on just about anything, each LED (there are 22) can be programmed to any colour or brightness. I used one of my favourite electronics parts, an Arduino, a physically small cheap fairly brainless module that can control just about anything. I programmed it to generate a spectrum of pastel colours that slowly changed colour, repeating the sequence maybe in a minute.
The actual program is below. About half of it came as a demo and I just modified it until I was happy with the look. This is all that is running the LEDs and setting the brightness from a knob.
#include <FastLED.h>
FASTLED_USING_NAMESPACE

constexpr uint8_t DATA_PIN = A0;
constexpr uint8_t GPIO_BRIGHTNESS_POT = A1;
constexpr uint8_t GPIO_BRIGHTNESS_VCC = A2;

#define LED_TYPE    WS2811
#define COLOR_ORDER GRB
constexpr uint8_t NUM_LEDS = 22;
constexpr uint8_t BRIGHTNESS_MIN = 17;
constexpr uint8_t FRAMES_PER_SECOND = 10;

CRGB leds[NUM_LEDS];

void setup() {
  FastLED.addLeds<LED_TYPE, DATA_PIN, COLOR_ORDER>(leds, NUM_LEDS).setCorrection(TypicalLEDStrip);
  FastLED.setBrightness(50);		// Set default brightness until the main reads the control.
  pinMode(GPIO_BRIGHTNESS_VCC, 1);
  digitalWrite(GPIO_BRIGHTNESS_VCC, 1);
}

static uint8_t gHue;

void loop() {
  fill_rainbow( leds, NUM_LEDS, gHue, 7);
  FastLED.show();
  FastLED.delay(1000 / FRAMES_PER_SECOND);

  // do some periodic updates
  EVERY_N_MILLISECONDS( 20 ) {
    gHue++;  // slowly cycle the "base color" through the rainbow
  }

  EVERY_N_MILLISECONDS(100) {
    uint8_t b = (map(analogRead(GPIO_BRIGHTNESS_POT), 0, 1023, BRIGHTNESS_MIN, 255));
    FastLED.setBrightness(dim8_video(b));
  }
}
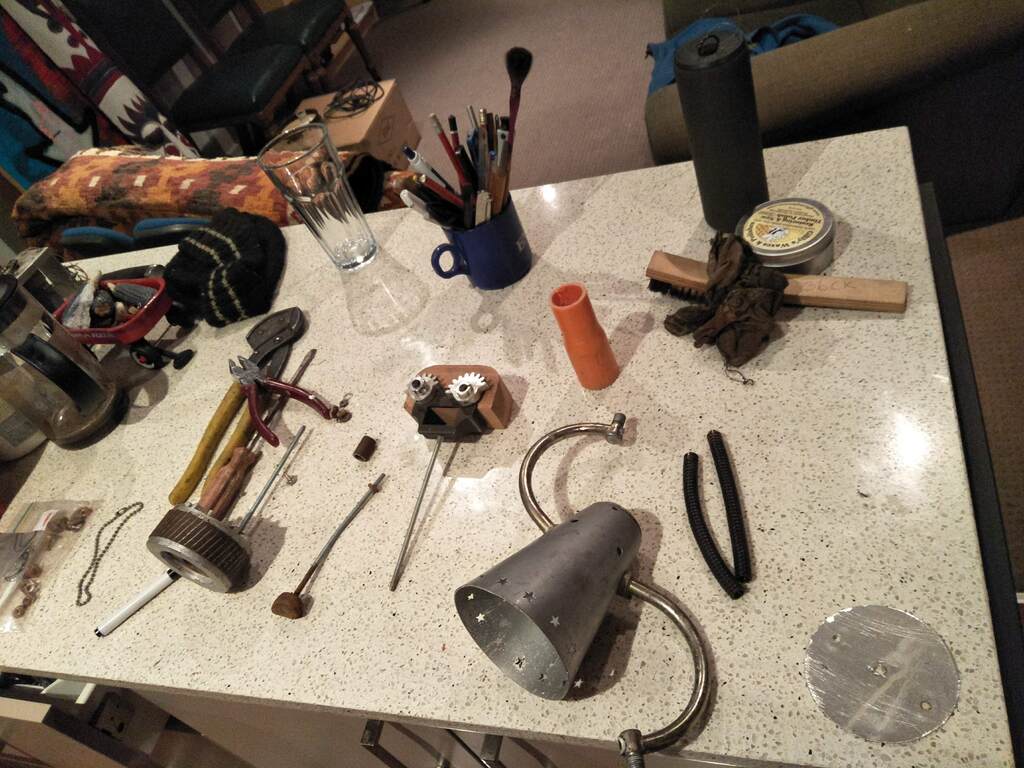
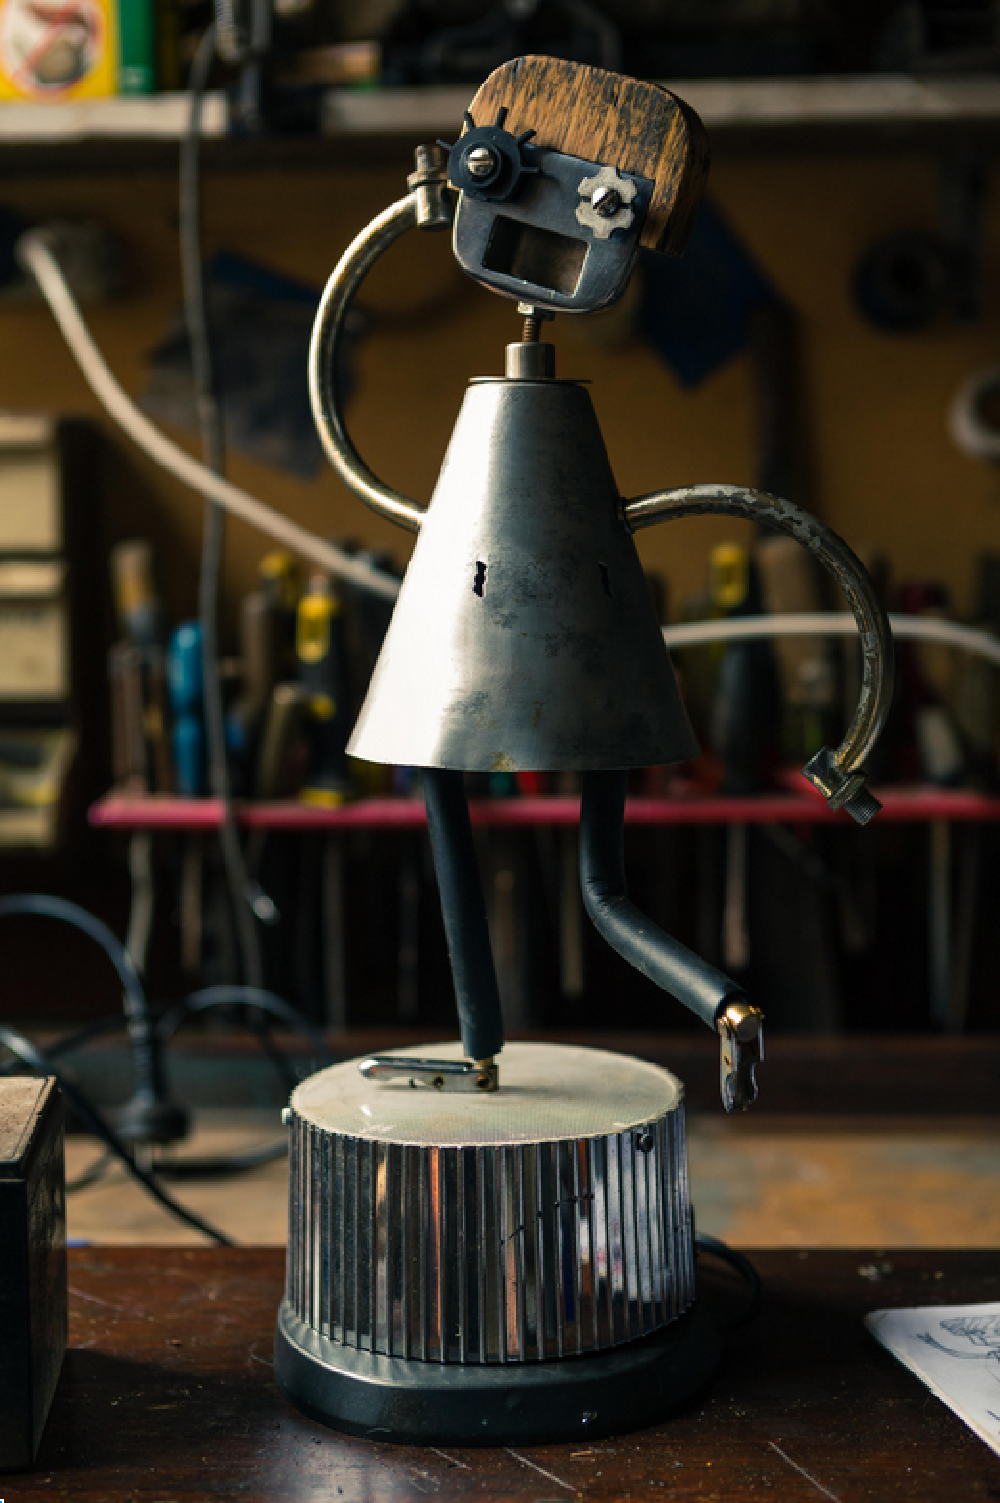
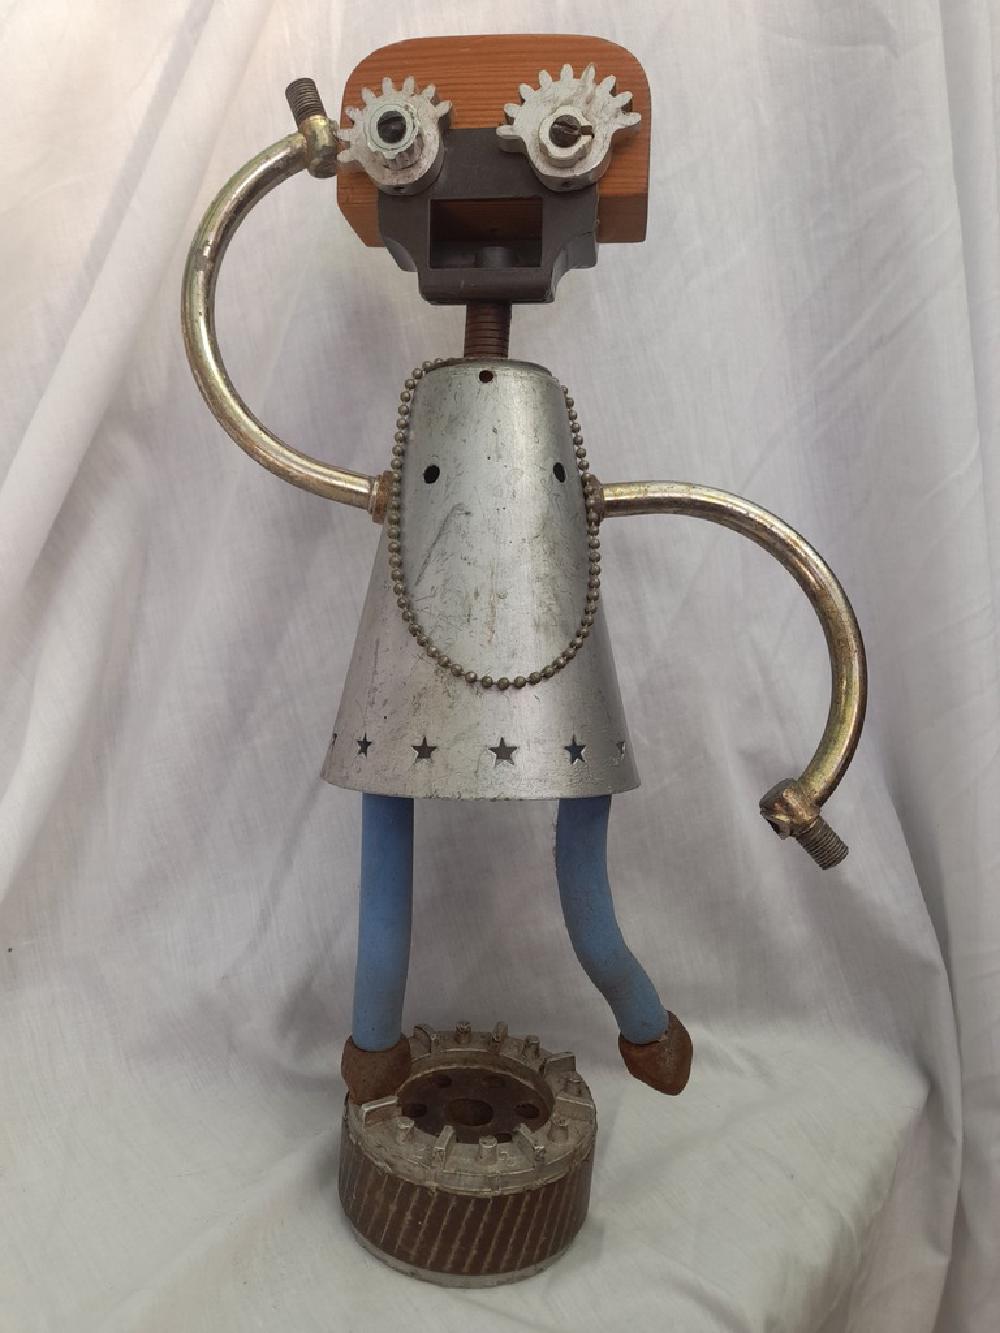
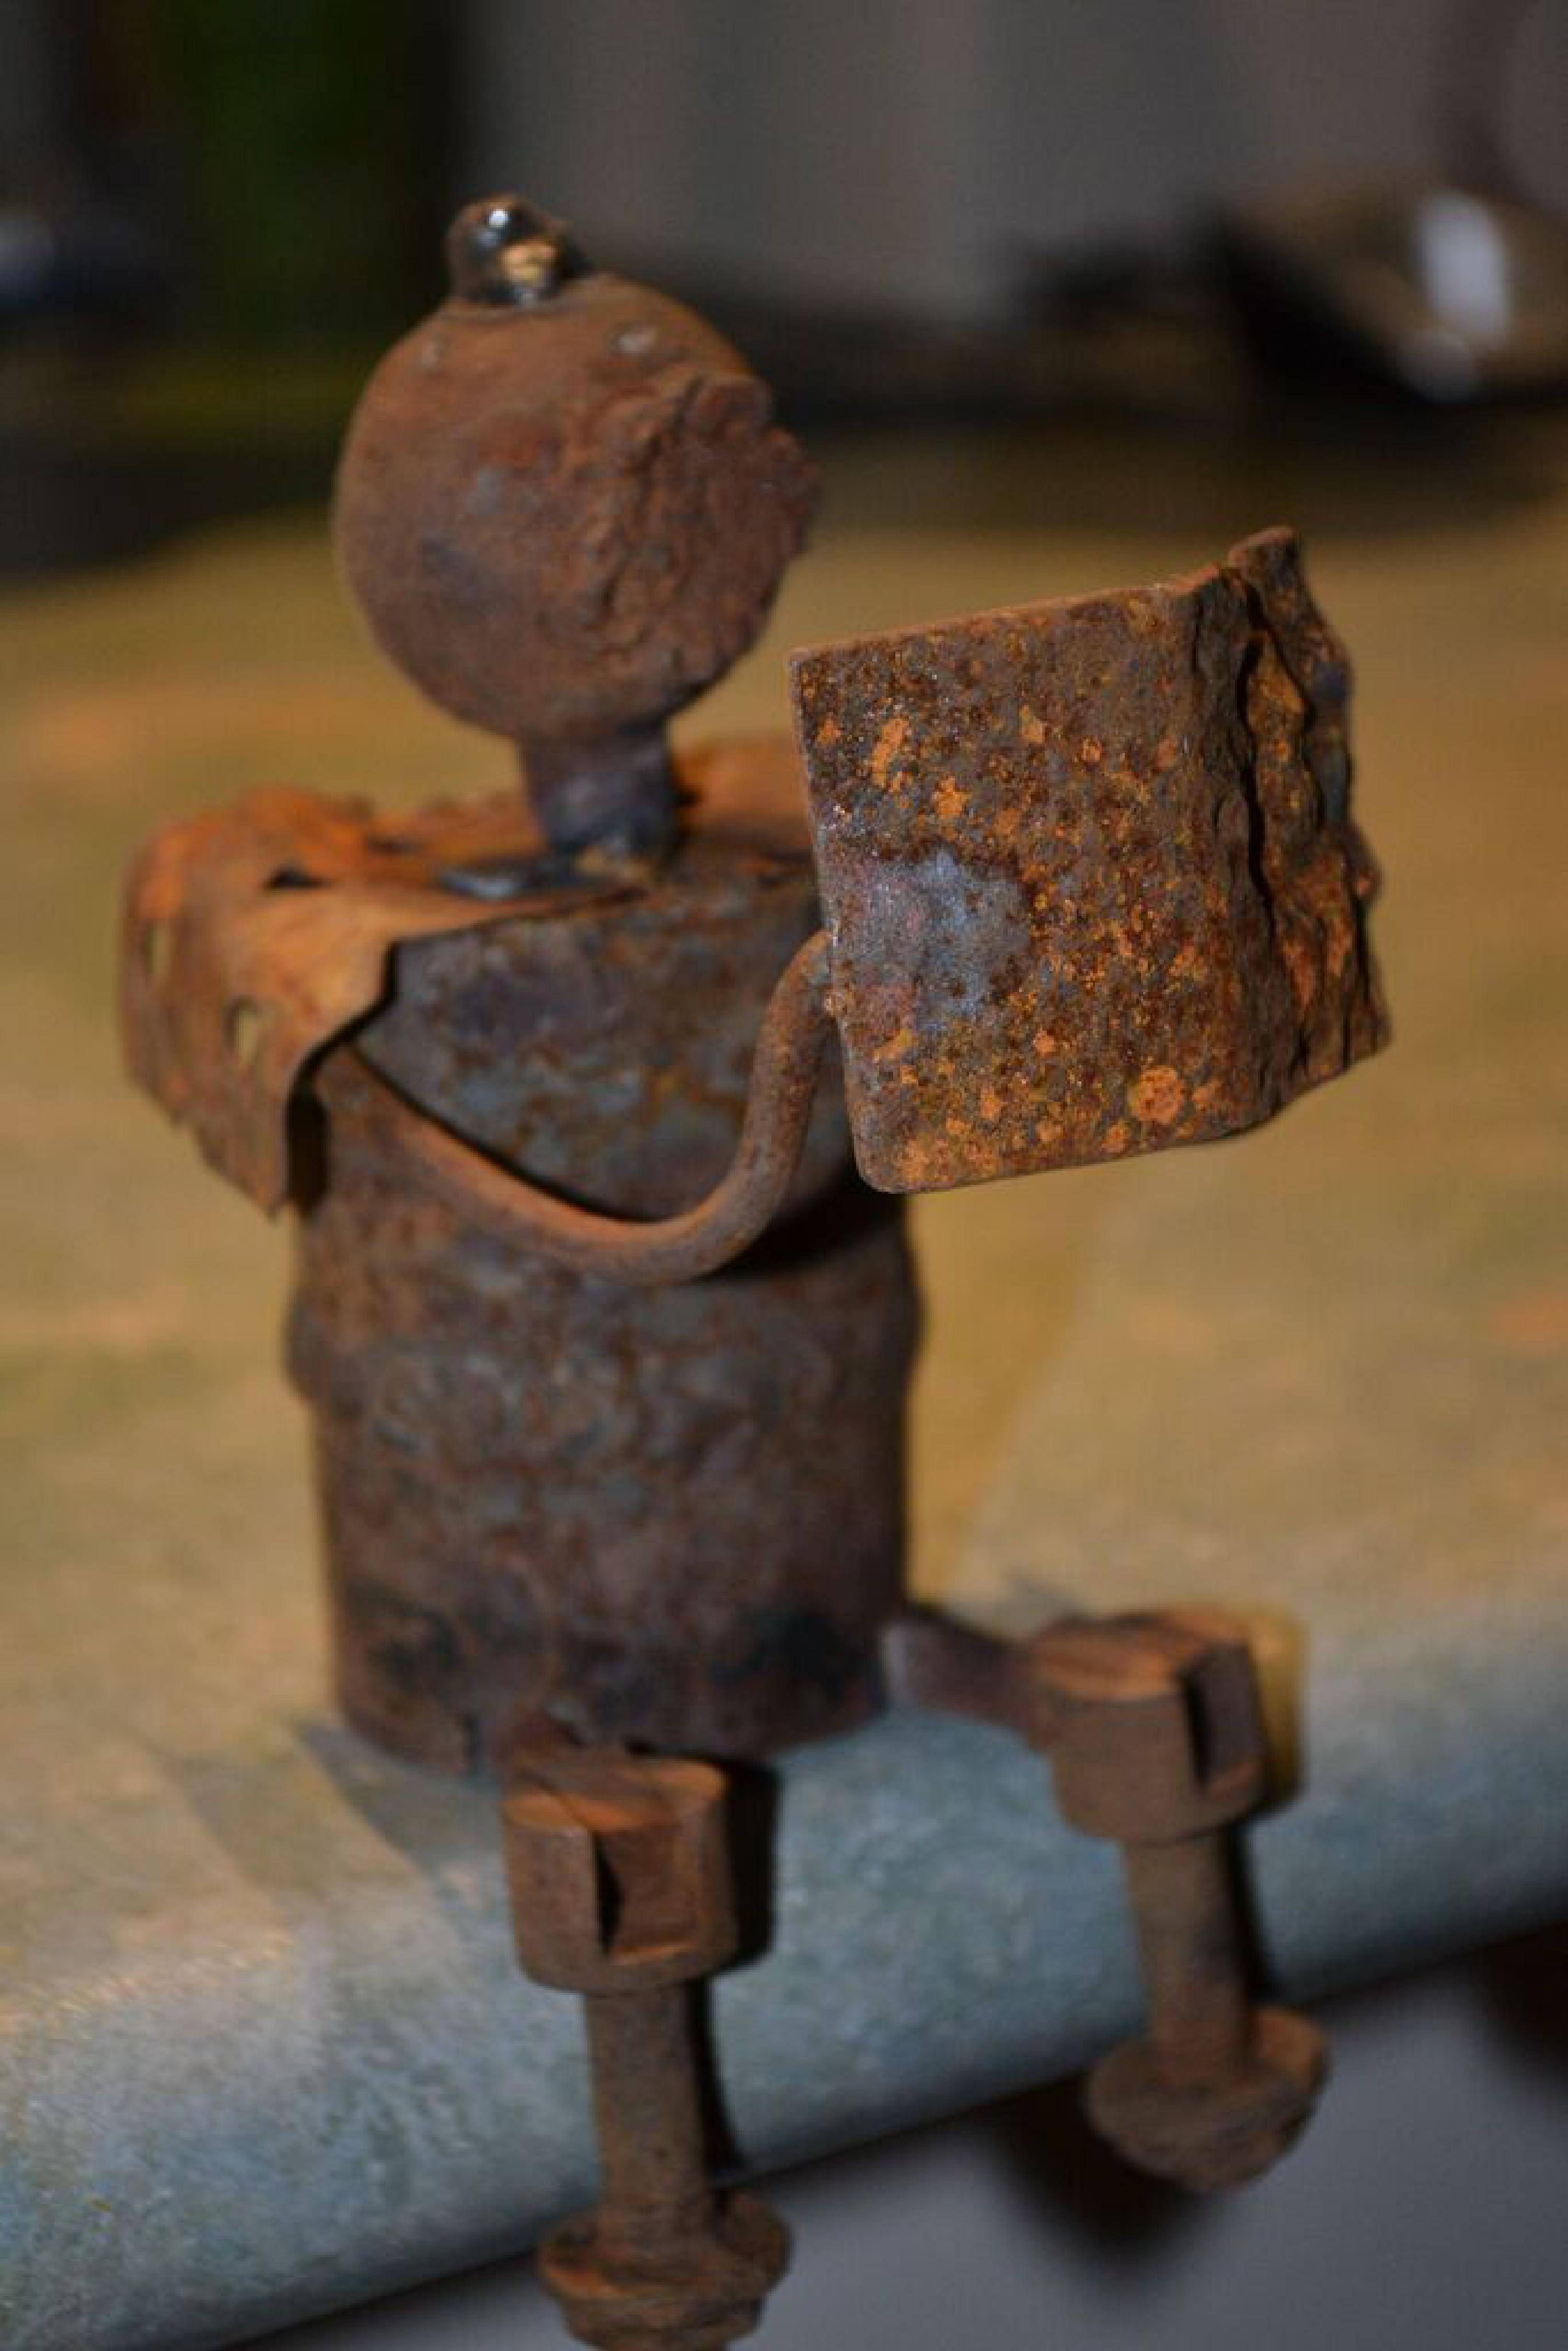
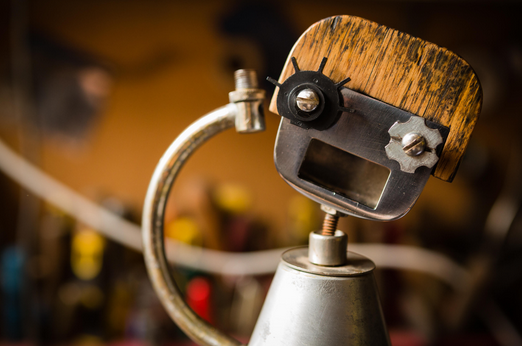
The tittle figure is a Reader, one of many little creatures who just sit on things reading. I made her years ago and never got around to giving her a book. The body is a tool for cleaning car battery terminals, legs are springs with bike brake blocks for feet. The head is a drawer pull.
As I had a spare USB socket with volts coming out of it I thought I’d make a lamp. The globe is probably from an old car, the lampshade is some heat resistant material that came out of an old hairdrier, I held it together with copper wire that was used as part of an instrument that measured environmental conditions as it was dropped into the ocean, sending the results back up to the surface; very useful stuff.
The show looks very pleasing and gentle, totally appropriate for a reading environment.

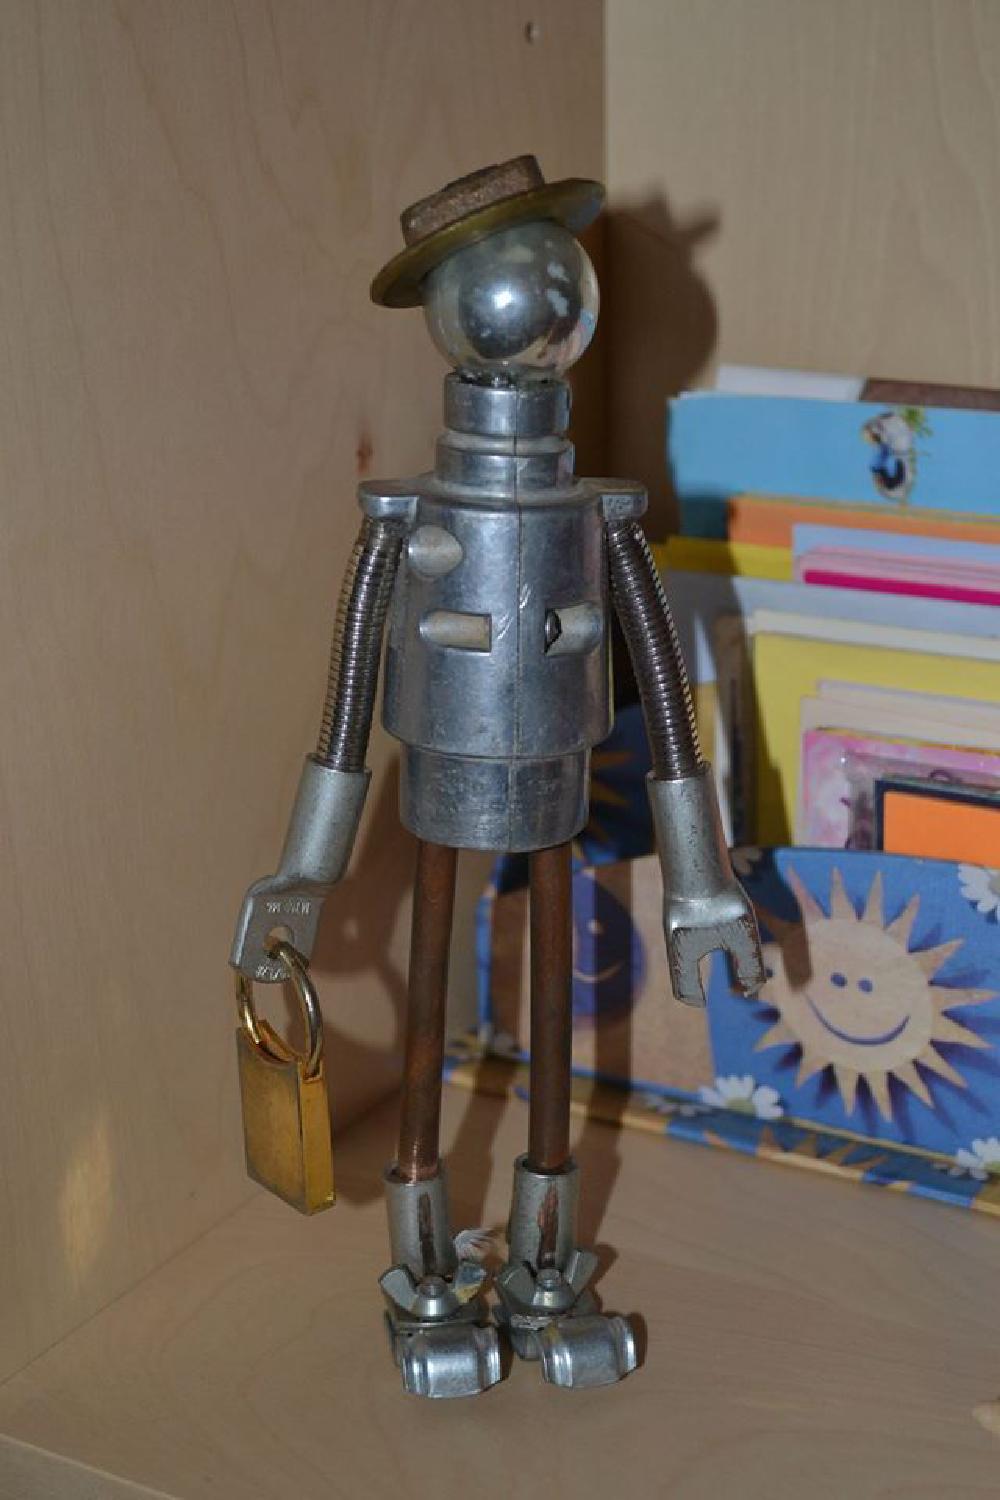
Miss New Zealand’s name was inspired by the mascot for the Sydney Mardi Gras one year, who was a 1950’s young lady in twinset & pearls, who obviously never went out without her coat, hat and gloves.
The starting point was the novelty Harrods branded padlock, it was an obvious handbag. Her body is a trailer plug, arms from a gas lighter and hands are electrical terminals. Her shoes are also some sort of electrical clippy thing. Her hat is a brass nut from a plumbing fitting.
I was pleases that she actually balances on her feet, its quite tricky to get this right, which is why so many of my pieces repose on plinths and podia.
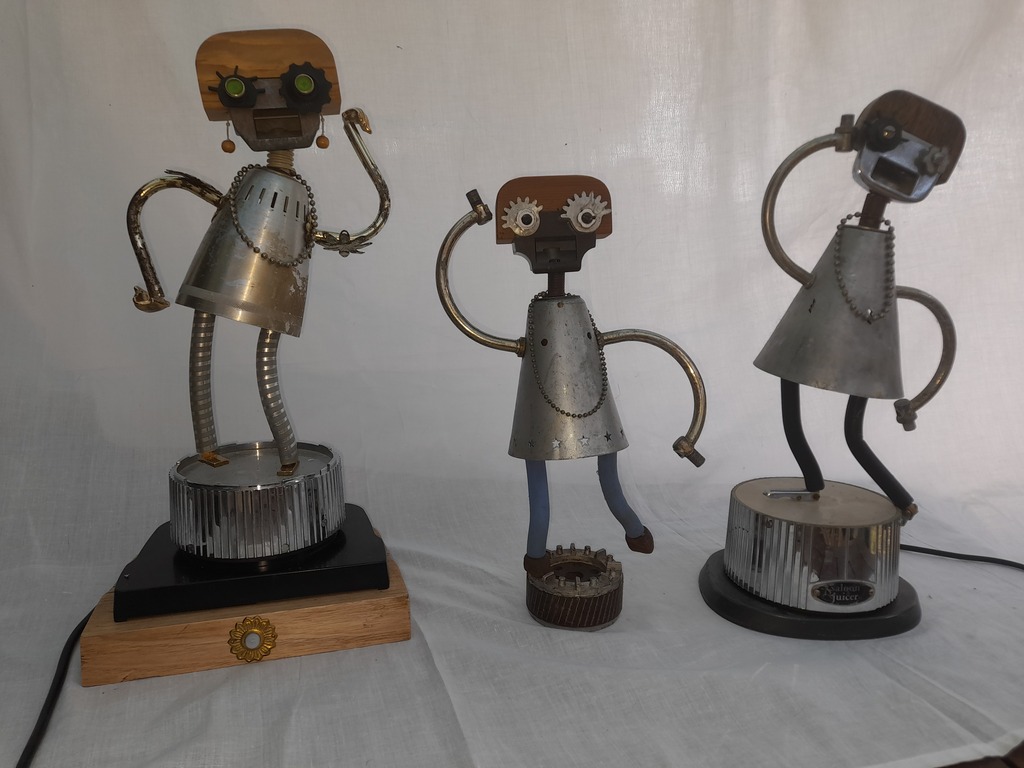
Here’s a lineup with a couple of other small figures.
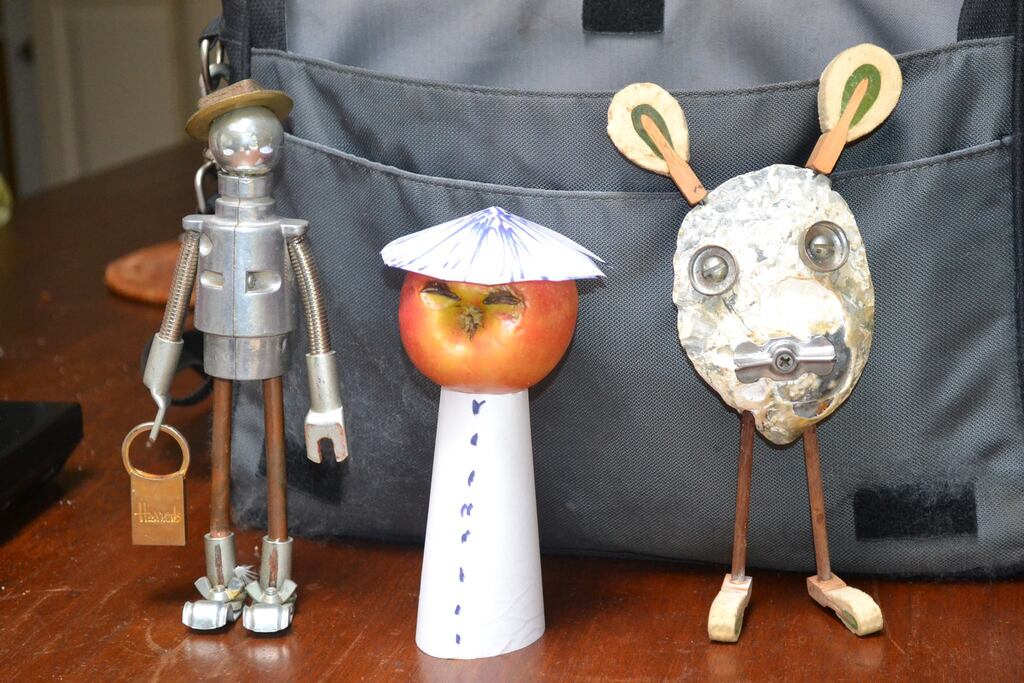
Also appearing are the Oyster Rabbit and a funny apple that looked to me like a cartoon Chinaman so I made him a hat.

Size: 30cm wide x 40cm high wall hanging; 30cmm deep.
Materials: Scrap acrylic, domestic & industrial fragments, silicone bathroom caulk. Figure is car battery terminal cleaner, springs, bike brake blocks, scraps.
Date: 2021.
Note: requires mains power for lights.
I made I Made It Myself for a recycled art show held in Kingston in 2021. The theme was “Messages of Hope” and the direction was to make a mailbox.
Here’s the artist’s description I wrote:
The happy fellow putting the finishing touches to his mailbox has had enough of doom and
gloom, assembling his mailbox from materials at hand, the castoffs of our mad throwaway
society: parts of smashed appliances, last year’s must-have techno-toys, unknown
fragments from a drawer, the detritus of shed and garage. Finding some broken Christmas
lights, he's illuminated his mailbox hoping to attract some gentle moth-like Hopeful
Messages.

He's quite proud that all parts are reused, saved from a one-way trip to the tip, reducing
the impacts of fossil fuels, before the parts resurface in the coming centuries as
microplastics & pollutants.
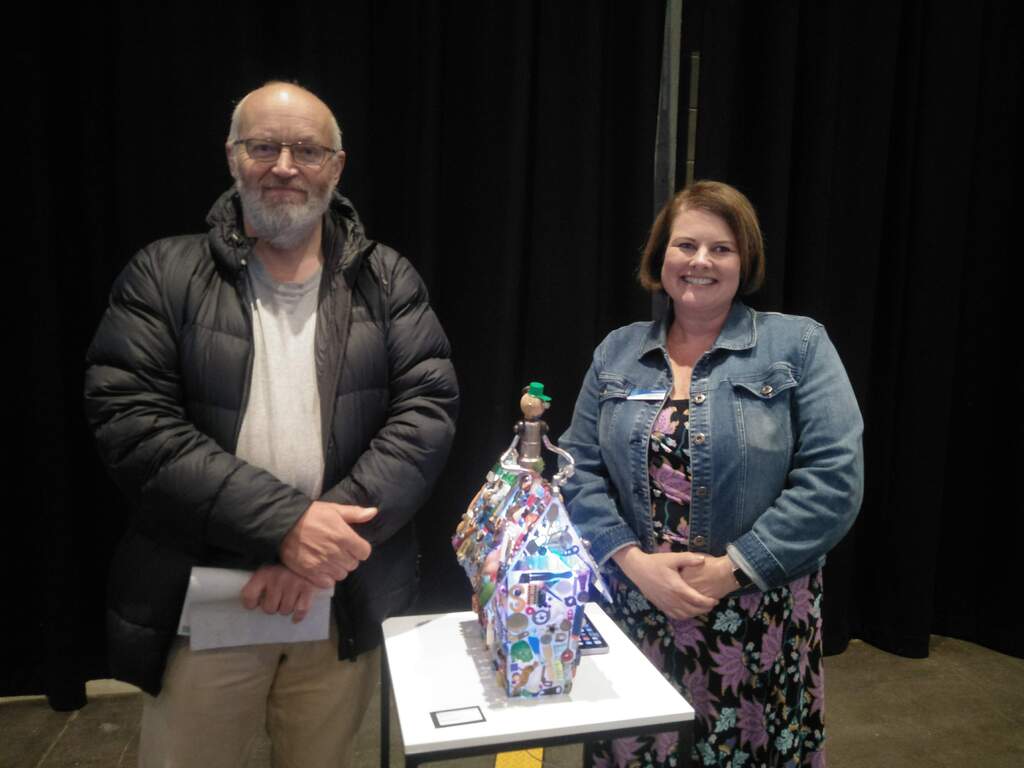
I was rather pleased that I won the open award, here’s me & the Mayor Paula Wreidt at the opening.
The box is made of scrap clear acrylic glued together. I have yet to find a good glue for acrylic, even bathroom silicone (the sort that smells like ants) doesn’t seem to hold very well. I probably should have sanded it first. I’ve fixed it a few times. Onto this I glued lots of fragments from my bits box, including fragments of a barbie doll, like the arms and the bum. On top there’s a little man putting the finishing touches to his creation. He’s quite proud that he built it himself, out of junk.
The lightshow inside is made from a string of LEDs from Aliexpress that I bought to make a desklamp, unfortunately they were far too dim and were incapable of producing a white light that does not give a headache. However they are perfect for a gentle lightshow if the colour is dialed down a bit. I used a cheap little microcontroller to drive the LED string, its got about enough brains to run a toaster so it can do a dozen LEDs no problem.
I like going to the openings, I like to loiter and see how people react to my creations. As usual people had lots of fun recognising things reused as fragments “Oh that’s a ….”. Kids especially like the idea of sticking lots of things together. One mother did accuse me of being a bit creepy with the use of doll parts, but I don’t think her opinion was shared by her daughter who ran off to show her friend the doll’s bum stuck to the side, with lots of giggles.

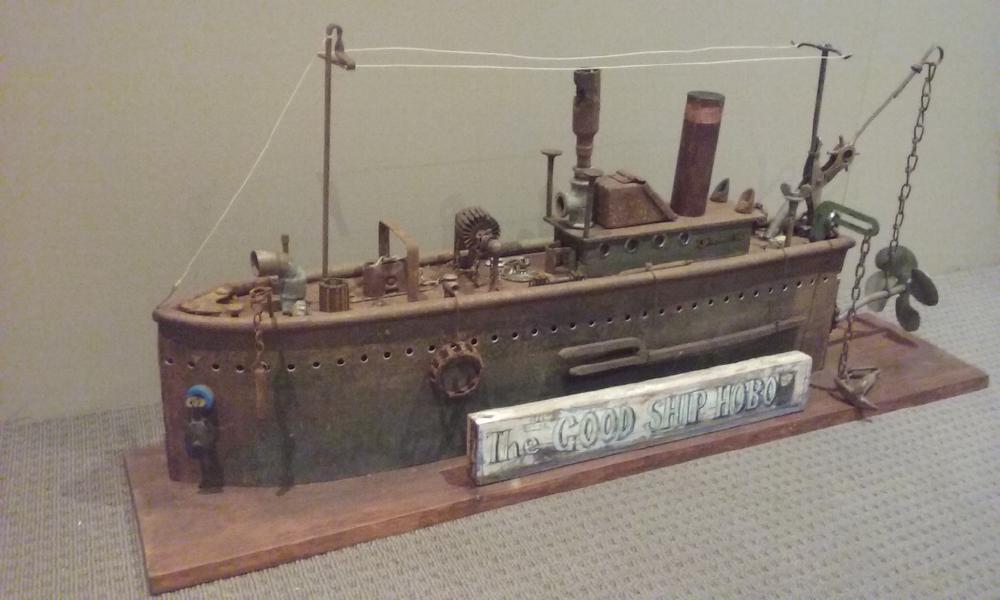
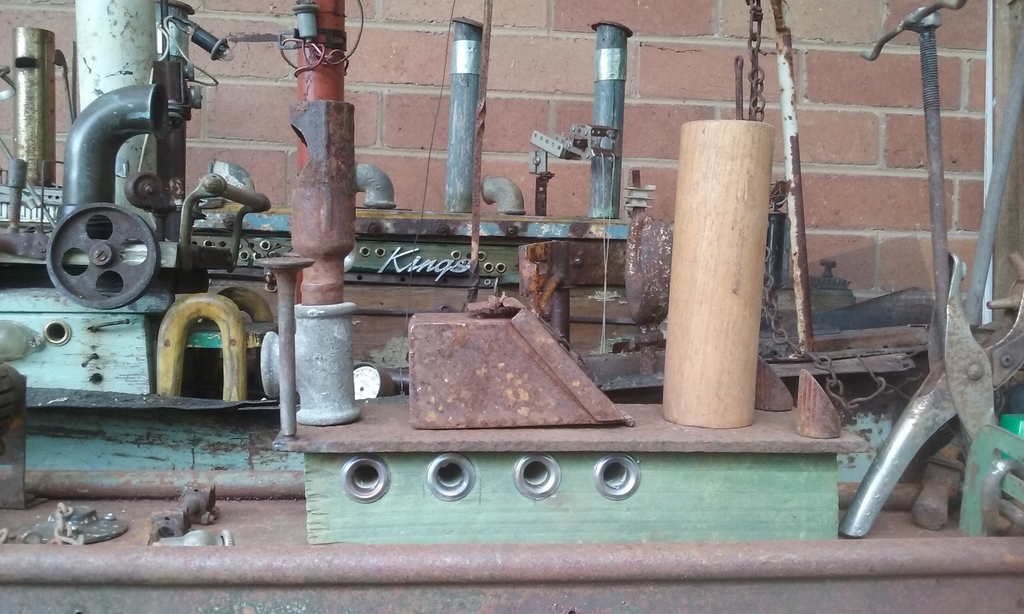
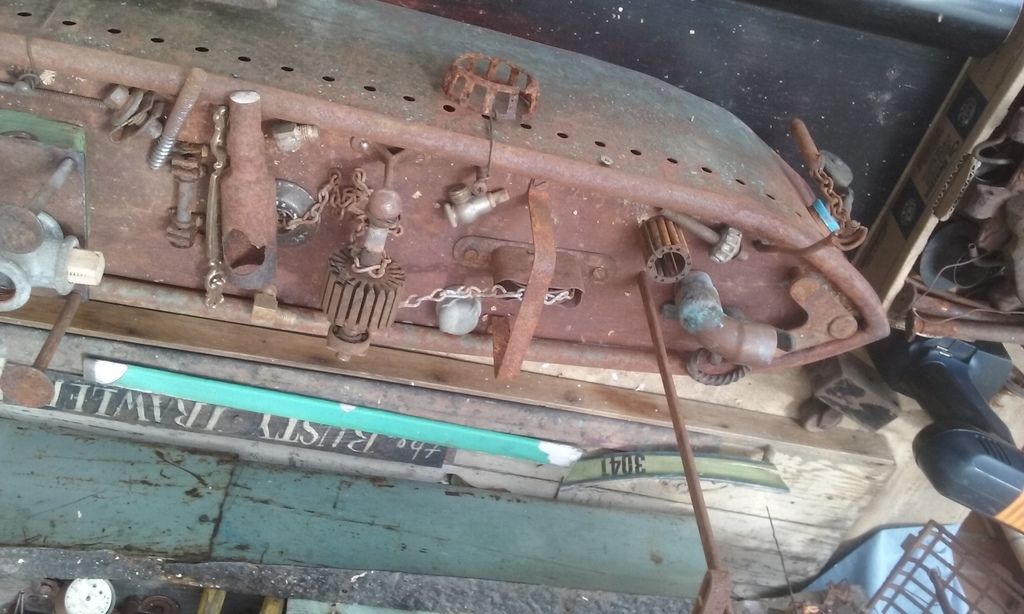
The Good Ship Hobo was a collaboration with Claude Ciccione of Belgrave. I made the hull out of an upright from a set of Brownbuilt steel shelves, the row of holes where the shelves could be fixed looked to me like portholes. I did get the hull welded up by a professional welder who is also an artist. Claude and I worked on the trimmings on the deck together, using mainly my bits & pieces.
Heres a shot of the complete display I made for the show.
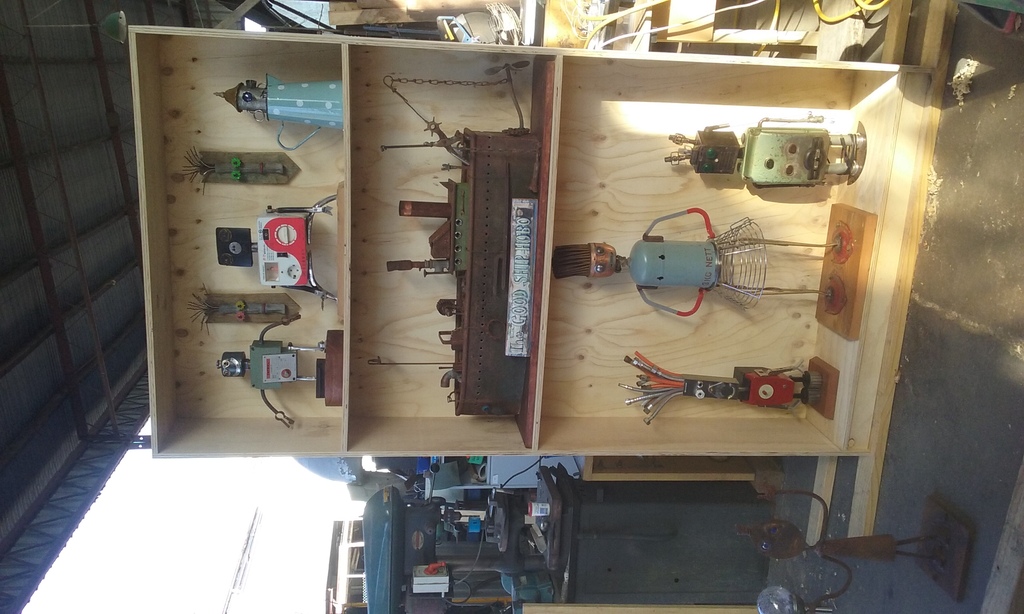
And here are some work in progress shots taken on a dull day at Claude’s house in Belgrave.
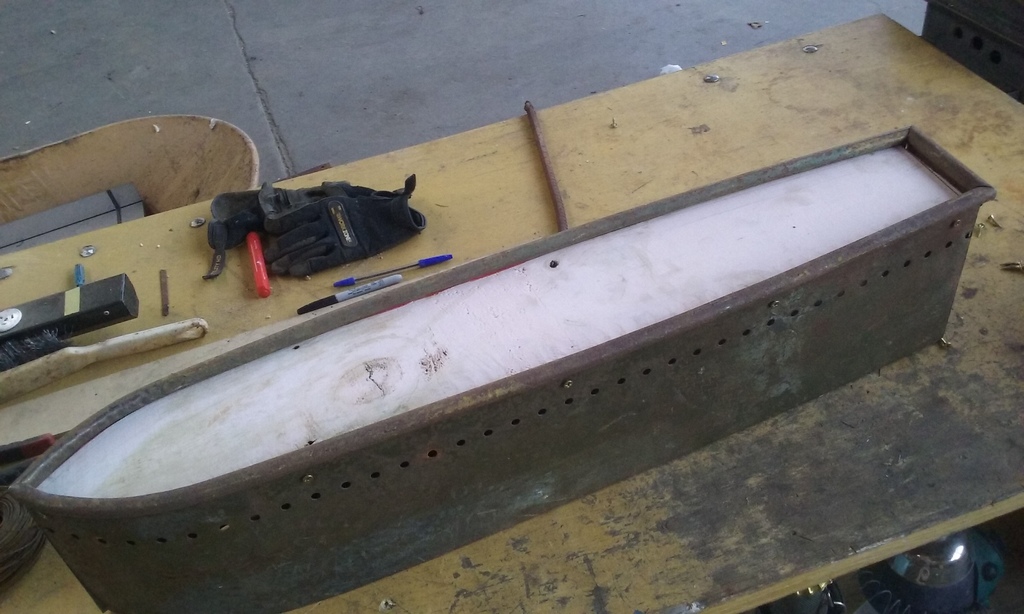
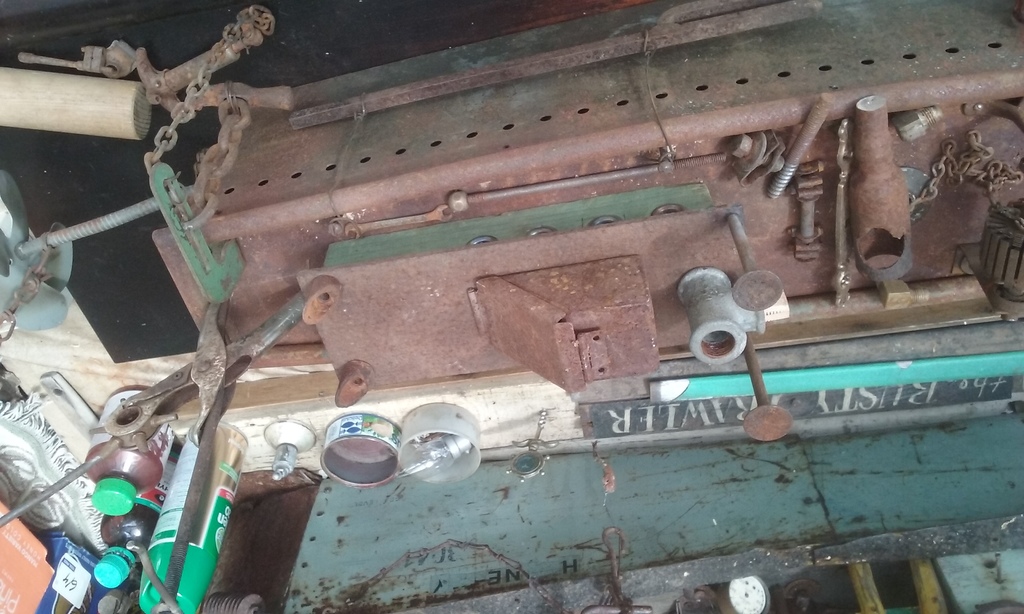
Since The Good Ship Hobo sold (my biggest sale!) at the show I don’t have any better photos. I installed LEDs inside the hull which shone out of the portholes so she looked fantastic in subdued lighting, like a real ship. I hope she went to a good home.
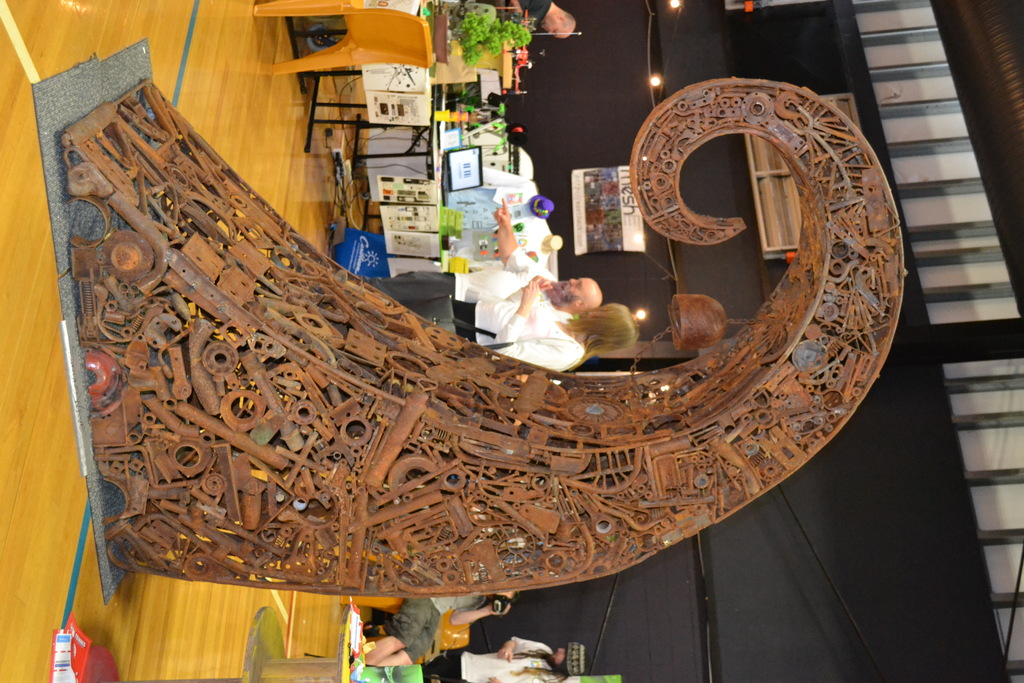
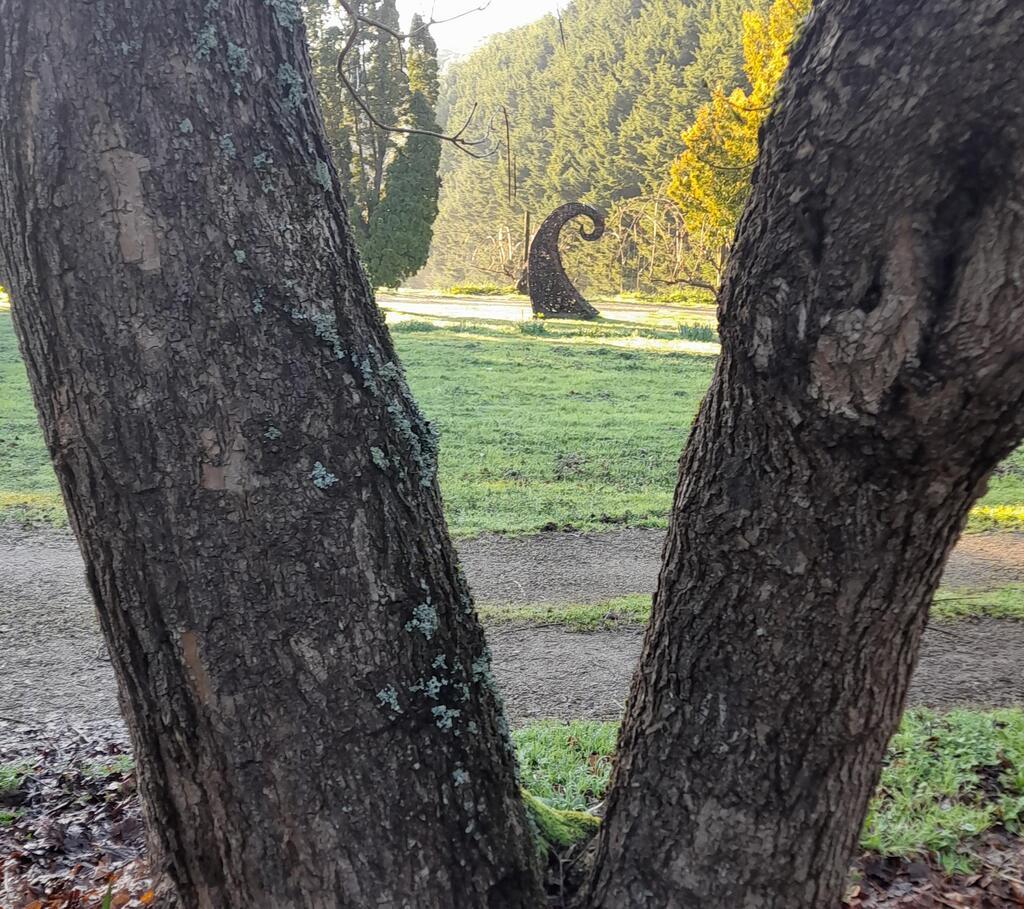
Sound Wave was easily my biggest and heaviest sculpture, 2.4m high and over 250Kg as that’s where my scale stops! Like most of my ideas the actual result differed from the concept.
My concept was inspired by a fern shoot bursting through the ground. It always amazes me how something as soft as a fern shoot can break through hard earth and push through layers of packed bark and forest trash considering that it is about the strength of an asparagas stalk. In New Zealand Moari culture such a shoot or koru is a central symbol of the strength of new life, and stylised forms are seen everywhere in NZ. Of course plant shoots are a commonly shaped like spirals, and people just like spirals. They look cool.
Somehow inspiration struck one day (how I wish you could bottle it) and I had a vision of Sound Wave bursting though a brickpaved patch of ground. I immediately did a sketch like a good boy. Unfortunately I left the sketch outside in the rain on my old workspace and that was the end of it. I really should get better at keeping records.
Sound Wave is made exclusively of scrap iron and steel. This was a mistake, the frame should have been made of new steel to give the finished piece structural strength. I’ve had to perform repairs over the years.
All parts were first burned in a furnace to get rid of grease and plating, and then tumbled in a cement mixer with a slurry of sand and crushed rock. This was a huge undertaking in itself, as I could only process about 15Kg at a time. The noise made by a cement mixer with rocks and old iron in it has to be heard to be believed! Some parts what couldn’t fit in the cement mixer were cleaned with a 1950’s era pedestal grinder that I fitted with a wire brush.
I had to make a special bench to build Sound Wave, it was a single sheet of plywood 2.4m by 1.2m. I still have this, I made it with removable legs, now it’s on castors so I can move it out of the shed for dirty work. The bench also needed an outrigger to do the curly bit on the top.
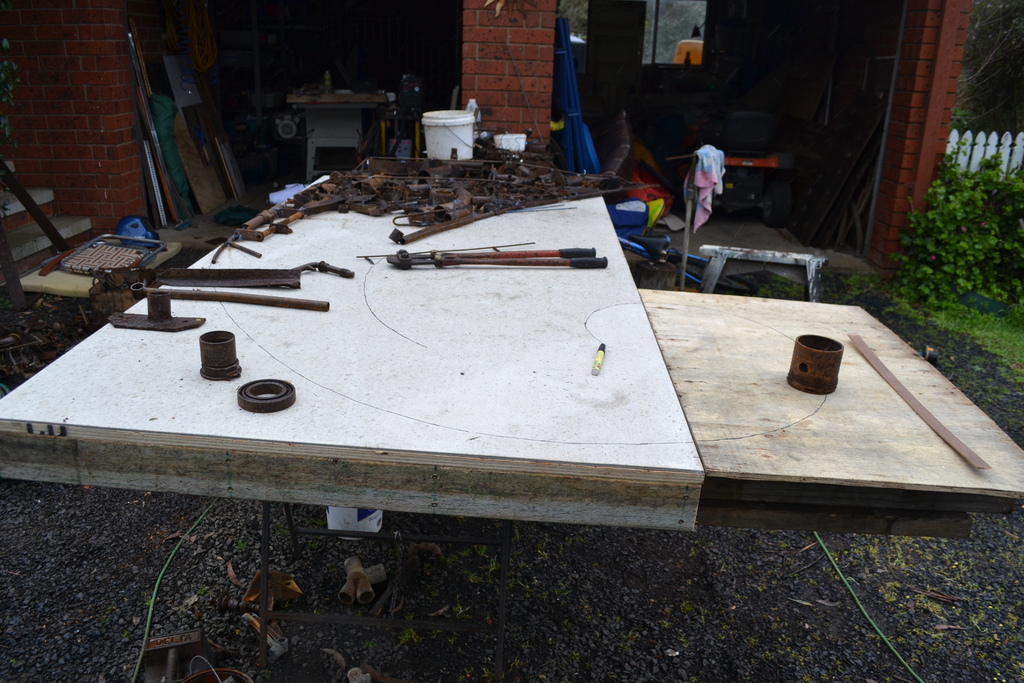
I transferred my design from a sketchbook by the old method of drawing squares over it, and then magnifying each and drawing on to my bench. I built the sides on the bench, then put them side by side and started welding the rest of it, using odd bits of wood to make sure the design was flat between the sides. This was difficult enough, I have no idea how people freeform sculptures with no armature. I suspect they use polystyrene or wood and burn it out.
I don’t remember how long it took but it was months of work.
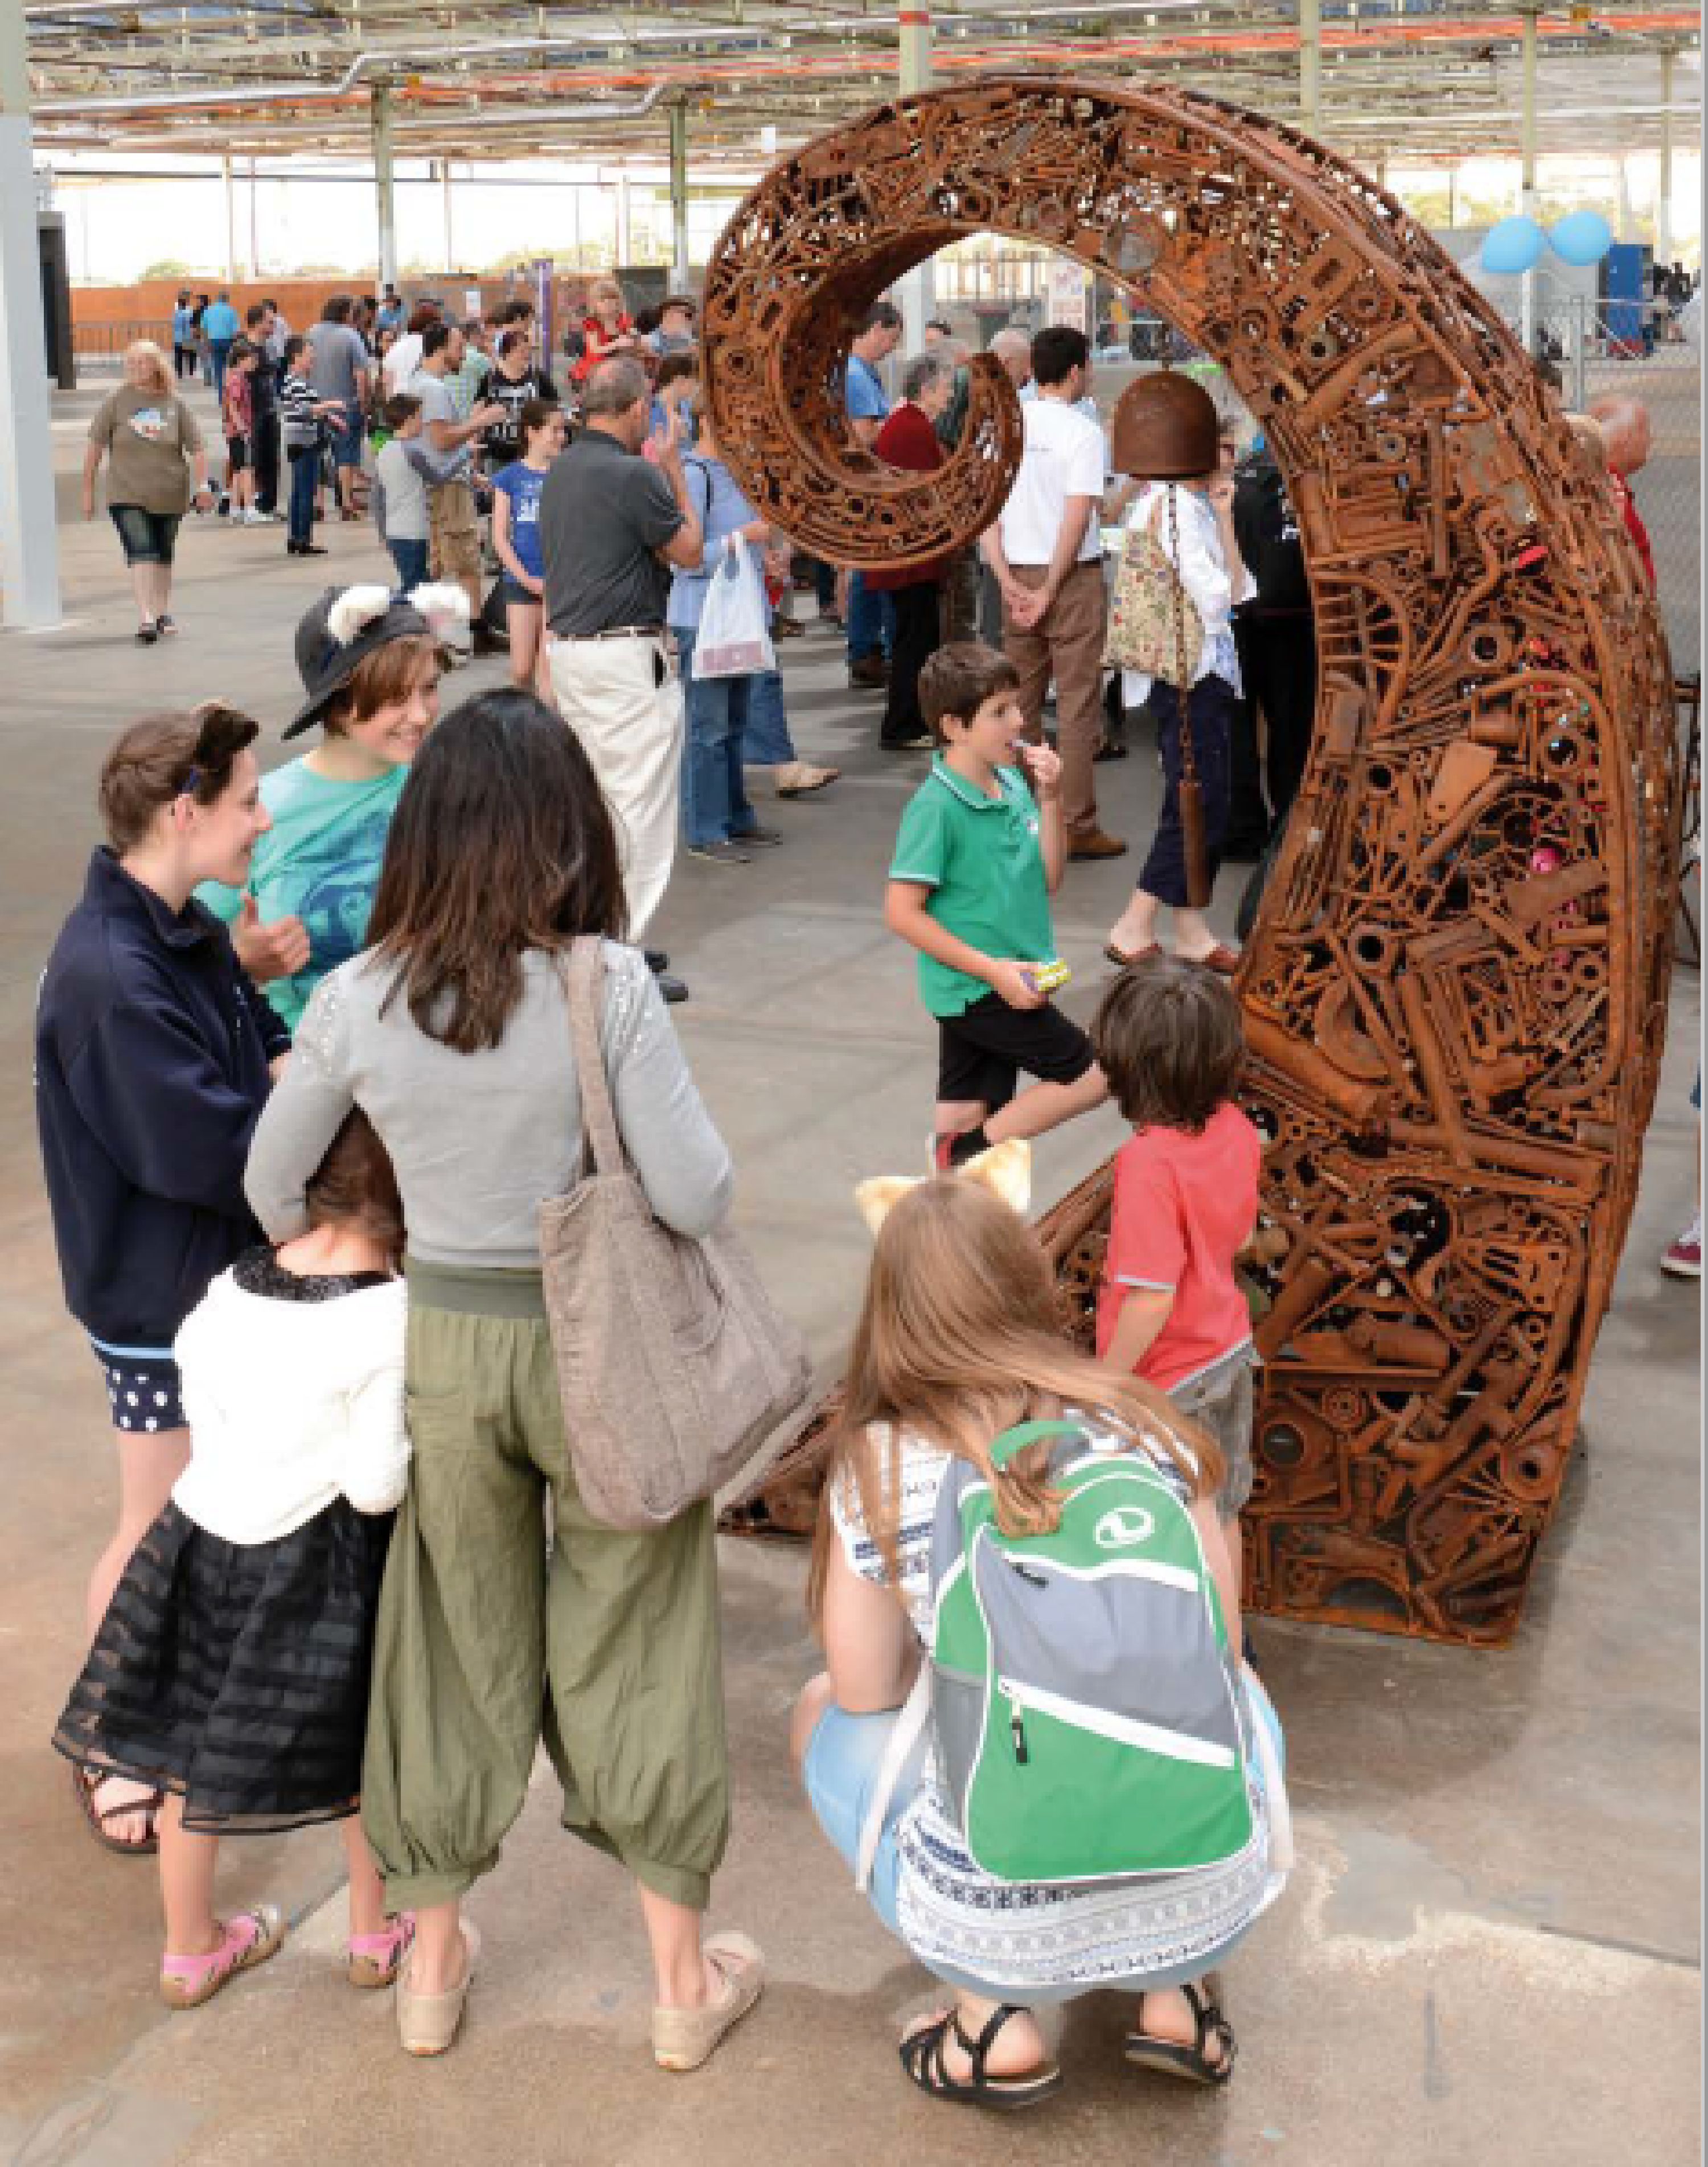
Then I had the problem of what to do with it. It featured in a few local galleries, and I took it to Maker Fayre in Adelaide, I got lots of comments along the drive from Melbourne. It fitted in the ute as I had designed the footprint so that it just fitted between the wheelwells. The SA Makers (organisers of the Fayre) must have liked it, they featured in their final report (source of title image) and they gave me a grant to attend next year.
I did enter it in a country show in Boort in Victoria in 2015 or so, it actually won second prize, which was impressive. Boort somehow has a bit of a tradition of junk sculpture, I helped them make an iron fish and a cormorant that now are displayed by the Boort Lake.
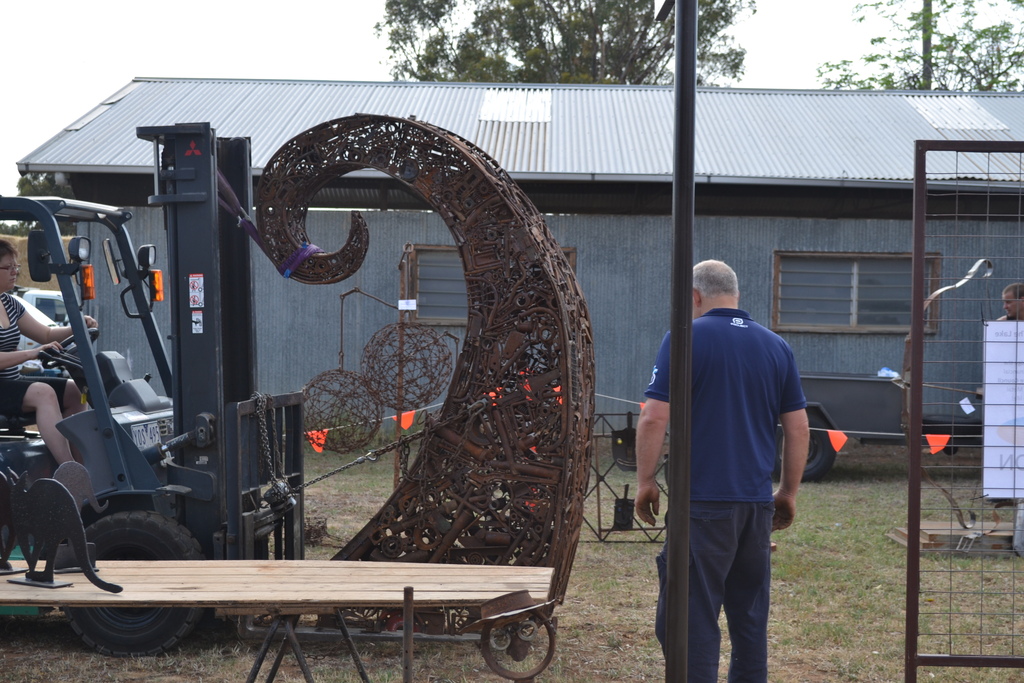
Unloading was a breeze, the local tyre shop owner used her heavy 4WD forklift to move it across site.
When I lived in Victoria my makerspace had a big presence at a local festival organised by the council, unusually for such affairs it was quite good with lots of good stuff going on. As part of the makerspace display I took along Sound Wave. The access was so tight we had to lift it onto the forklift by hand. That look a lot of hands!
Still it was worth it; the kids loved it!
It did live in the yard at my shared studio space for quite a while, I had a hoist there so I could get it onto the ute easily, as long as they had a forklift at the other end to unload it. Now I have it on longterm loan to my ex-boss on his farm in rural Silvan where he also runs his disability engineering business.
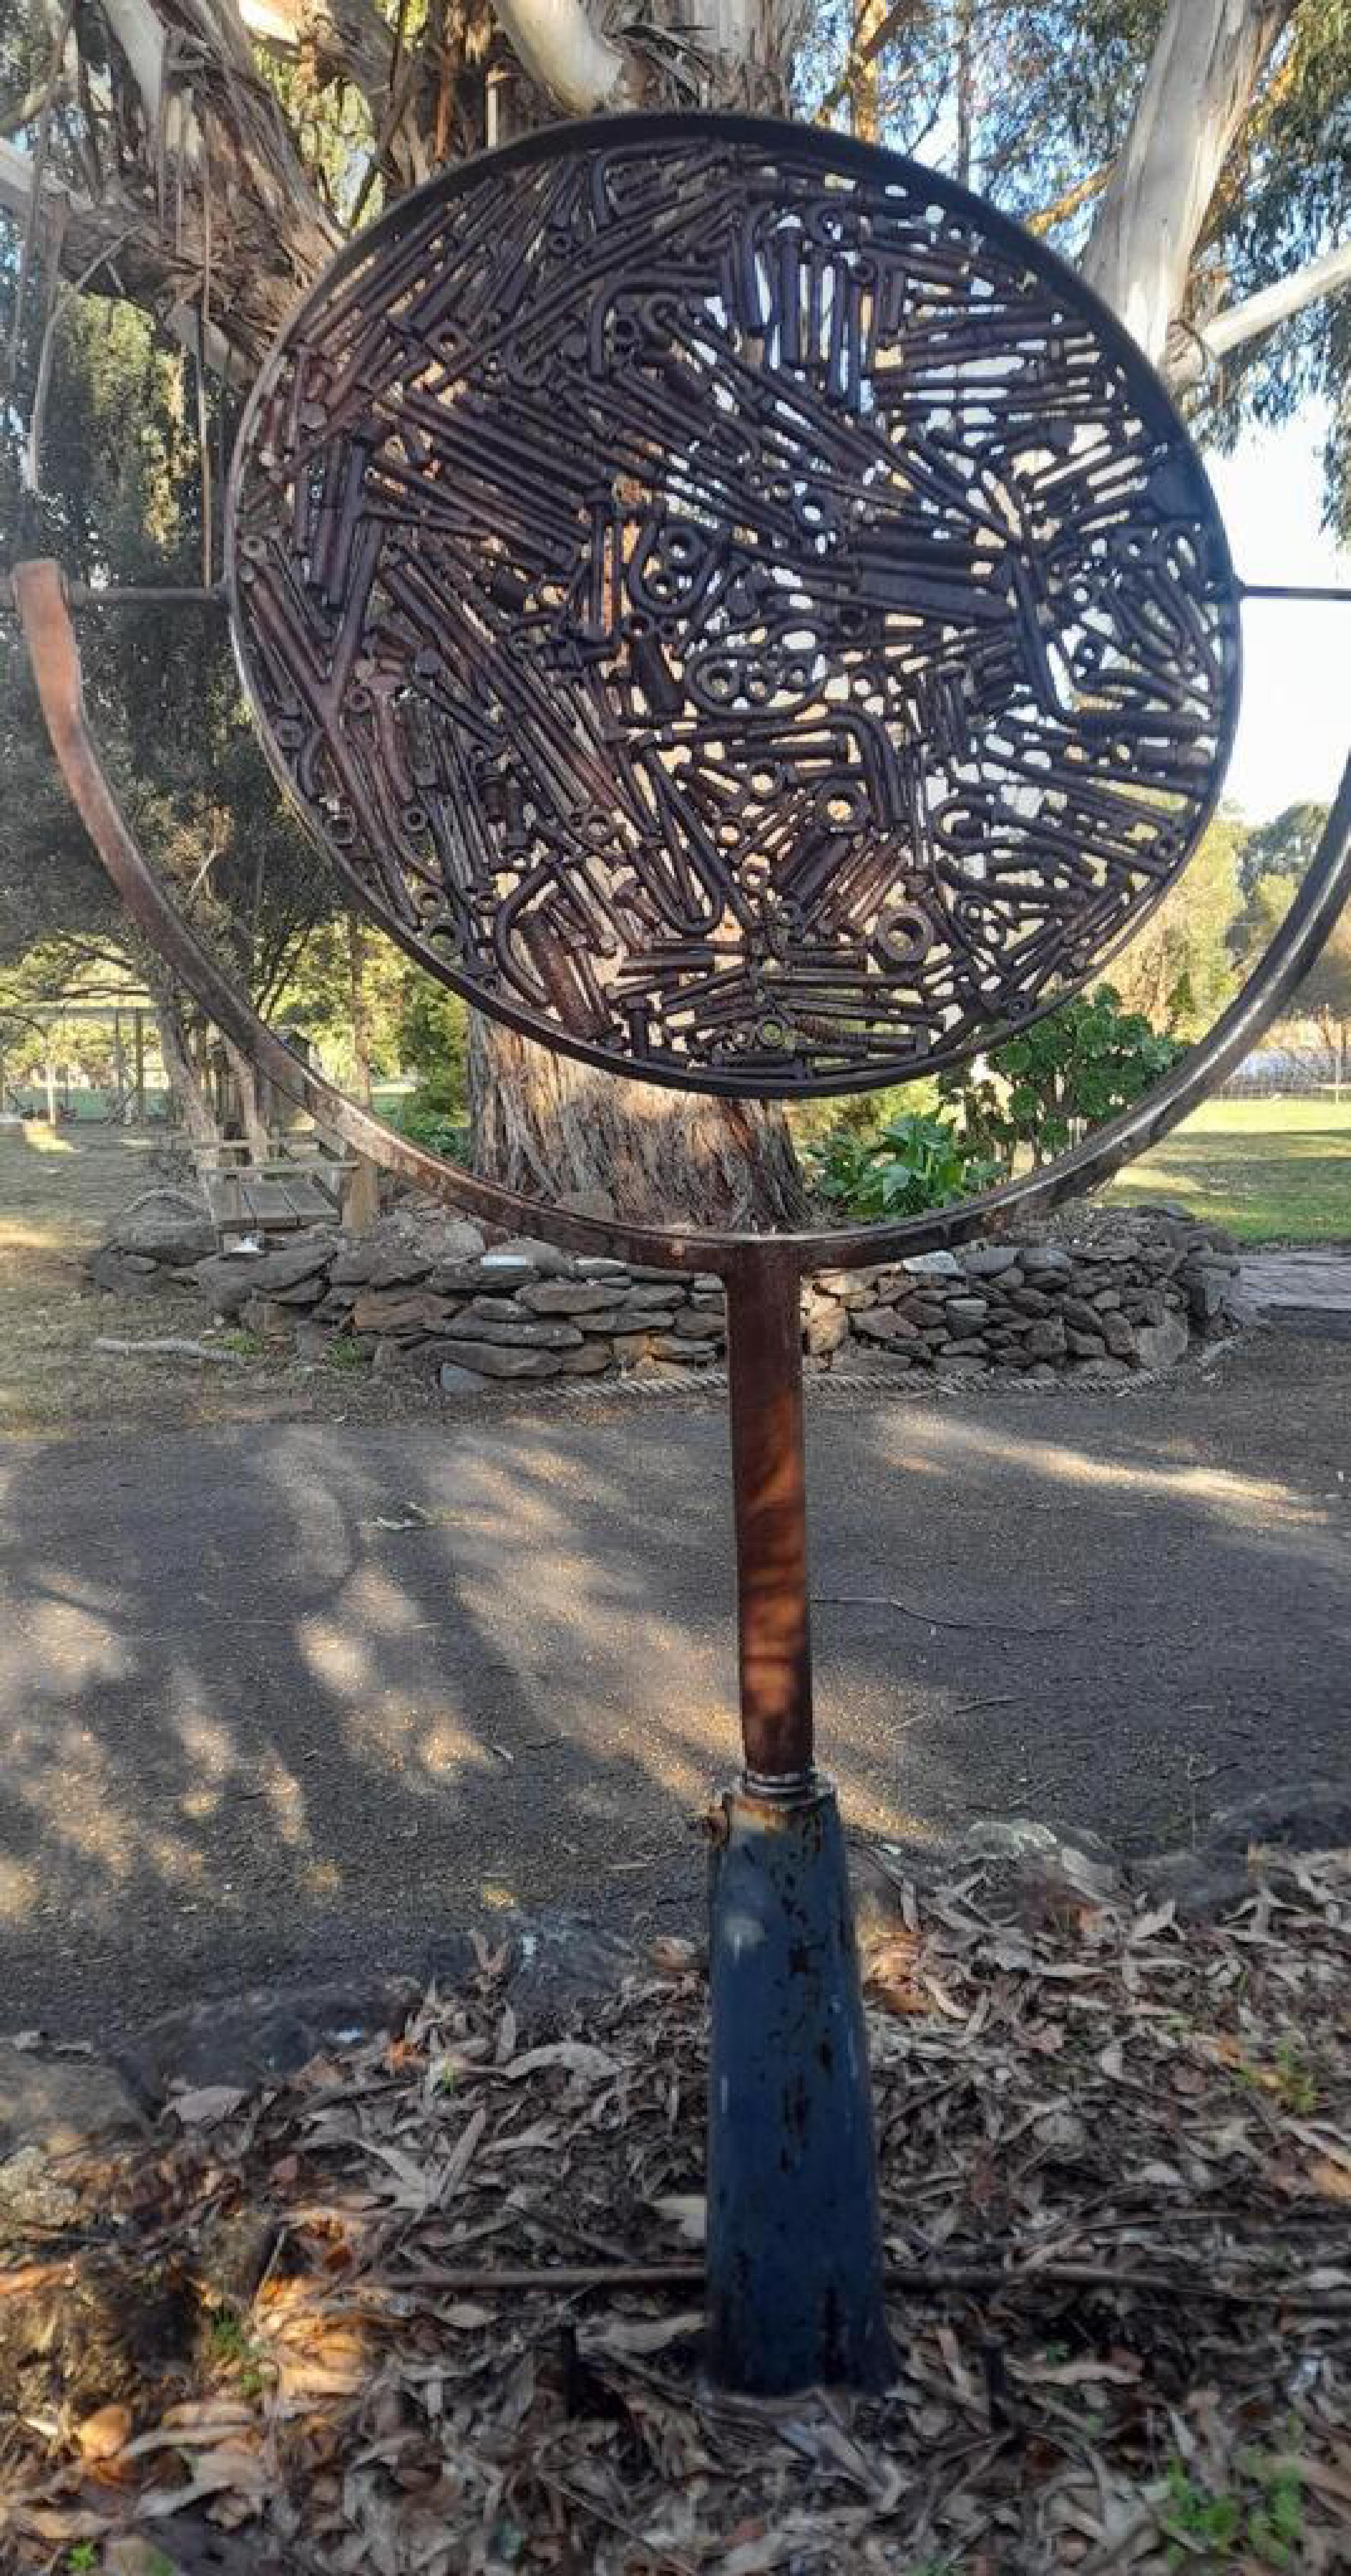
Iron Mirror 1 is a model for a piece that I never completed. It had a slightly complicated gestation.
I initially made a circular frame for sitting a piece of tempered glass into. I made the frame from strip steel on a machine called a Ring Roller, that passes the work over two undriven rollers in a row with a third driven roller pressing down on the work, so by repeated passes it forms a perfect circle (apart from the ends, which remain straight as they can’t go through the machine). Then you cut the unbent ends off and weld it together to form a ring. The machine was very heavily built and hard work as it was completely manual. I have since found that I can make a perfectly acceptable ring by just tying two round fenceposts together, and passing the steel over it whilst an assistant hits the steel over the gap in the middle with a sledgehammer. It’s a bit tricky to keep things straight so that the ring isn’t twisted, but not too difficult, and the ring can always be twisted or bashed into shape.
Then I infilled the ring with lots of iron scrap bolts and engine parts. I first burned the grease and plating off them in a homemade forge powered with a leafblower, and then cleaned them up in a cement mixer with a slurry of beachsand. One side of the infill I kept very flat as it was going to have the glass resting on it, whilst I welded the bits on the other side. I used fluxcore wire in the MIG welder. It’s easier than using sticks where you need to strike the arc before welding, which usually moves little bits like bolts etc. which are not clamped together. Also fluxcore gives better welds on dirty metal, as after cleaning the bolts are bright steel which goes rusty very quickly.
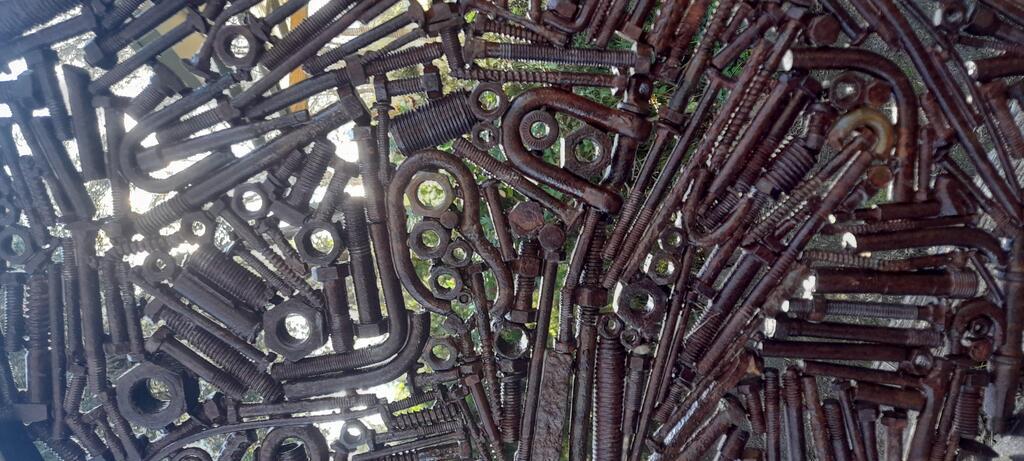
I didn’t really do a design, just filled it with whatever I had to hand, as I was just trying out how it looked. I found that nuts & bolts can easily be formed into all sorts of designs, suggesting stars or flowers, and were easy to bend as their soak in the forge had removed the hardness / toughness of the steel. Other design elements can be realised with odd bits of scrap, but I mostly had nuts & bolts.
But then I wasn’t happy with the look of the design, so I never built the table, just kept the top lying around.
Years later I was doing a local art event “Art in the Hills” which is a huge open studios weekend for lots of artists around the Dandenong Ranges near Melbourne. As I was new to the event the organisers assigned me a “buddy” Jessie Jornaud-Ryan, who makes sculptural mosaic pieces from broken crockery that are really worth a look, particularly birds, I have one of her wrens in the kitchen. She did a walkround of my workspace, and I showed her the tabletop, and asked for suggestions, she suggested mounting it on a pedestal.
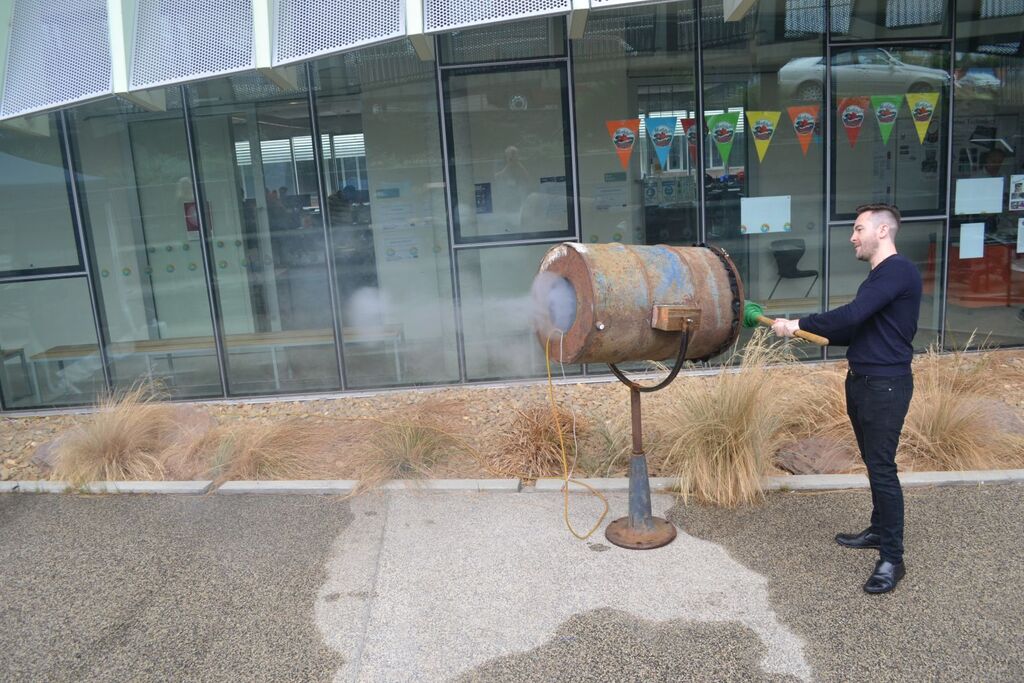
I happened to have made a large U shaped mount for my vortex cannon (a machine that launches smoke rings when whacked with a largemallet) which I made after observing ihe trials of savant Mark Thomson’s giant cannon, allegedly a Nazi secret weapon, cunningly disguised as a tin water tank. I had junked the cannon since I had nowhere to store it, but I still had the mount, consisting of a large U on a central axis, that could swivel horizontally and vertically. It was easy to fit the round panel in the mount, and I knew that I had something.
It is extraordinarily satisfying to look at (or through or into?) the Mirror, and to turn it to different positions. I certainly enjoy having it around, and the visitors on the weekend of my open studio were intrigued with it. I still have it, and visitors still stop to admire it. Of particular interest is the two sides to the mirror, with the design mirrored of course, but one clear of welds, the other chockers with spotwelds. Of course the mirror world is only an approximate copy of our world…

Here’s me with the mirror in actuality. Tle local balckbirds like to perch on it and the spiders like it as a base for webs so it does need a bit of a clean sometimes. I wonder if there is a metal treatment that includes wildlife repellant?
I really should make the final version of this piece, with a properly engineered mount with some sort of bearing rather than unlubricated metal on metal, and a nice design for the Mirror. I’d like to up the diameter to a metre to make give it more presence, and about 1.8m high.

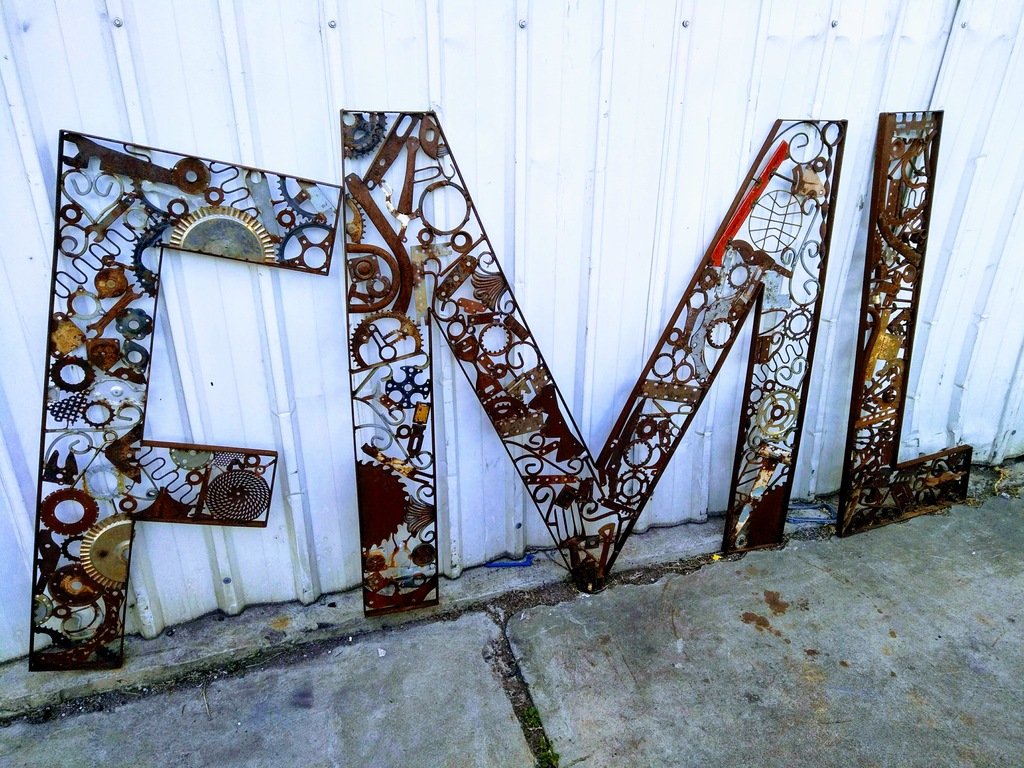
FML Sign was a sign for the shared studio space “Footscray Maker Lab” or FML in inner Melbourne. Situated in a semi-derelict warehouse that the owners only leased to us as I suspect no-one else would rent it. It was a noted rave venue in the 90s, and there was plenty of graffiti in the place, but even the ravers thought it too shabby and moved on. It was an interesting experience at a difficult personal time, and certainly gave me something else to think about.
The sign was intended to go on the roof on a wire fence that had once contained the building’s electrical supply, backlit with red diffused light (shades of Dark Mofo?), but it ended up being fixed to a wall in the yard. I don’t have a good photo of it now. I still think it would look fantastic backlit.
I built the frame freehand with strap iron, and then infilled with the most lightweight bits of steel that I could find. I think I got a good selection of shapes. I used fluxcore wire in the MIG, as it makes a good weld even through paint or plating. I do know that welding through plating is a bad idea as the fumes can make you sick as a dog so please don’t tell me.
Looks like I sharpened this photo up a bit, the place rarely looked that clean!


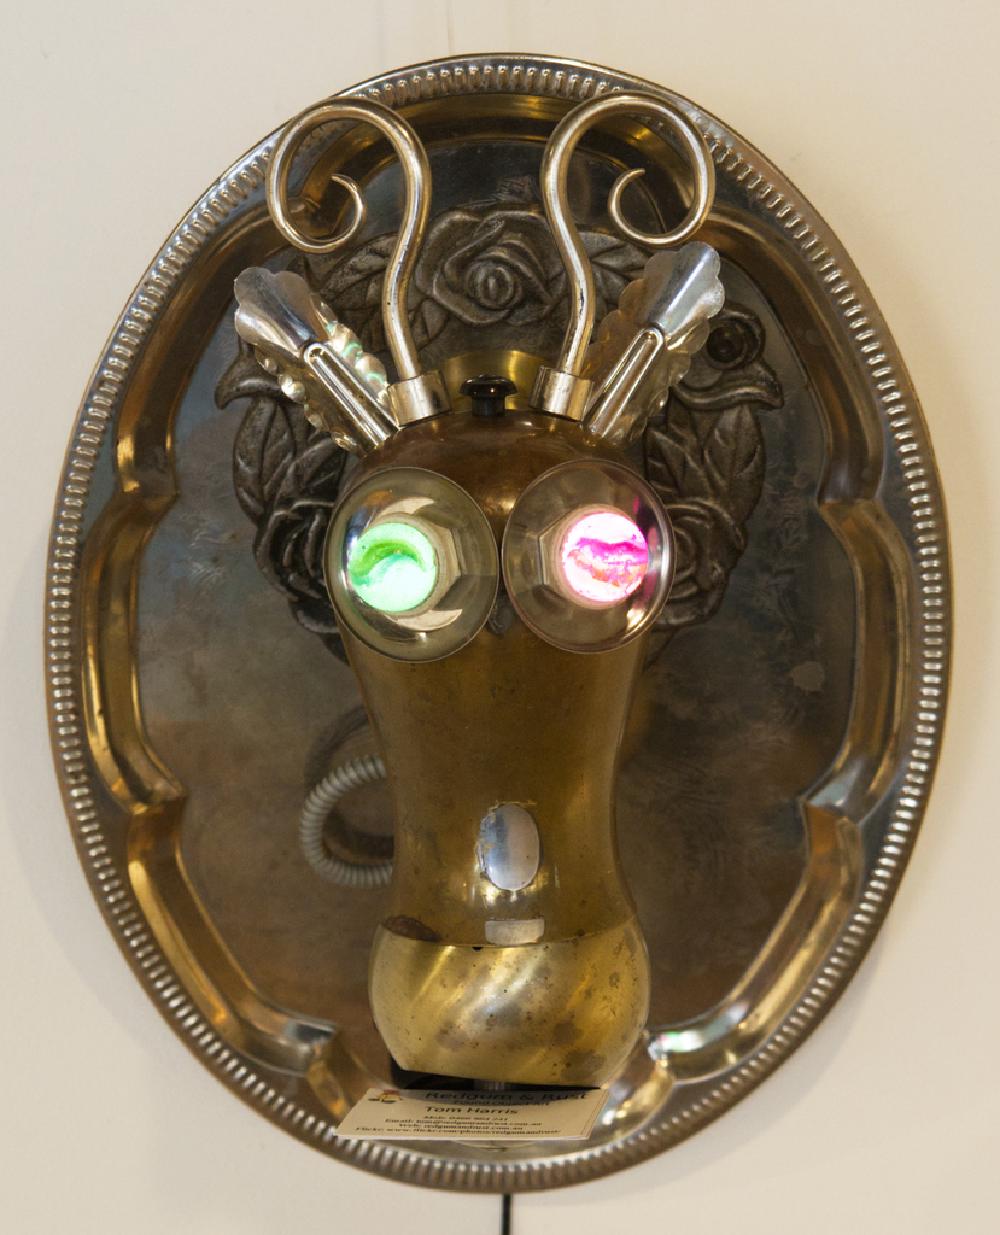
Size: 30cm wide x 40cm high wall hanging; 30cmm deep.
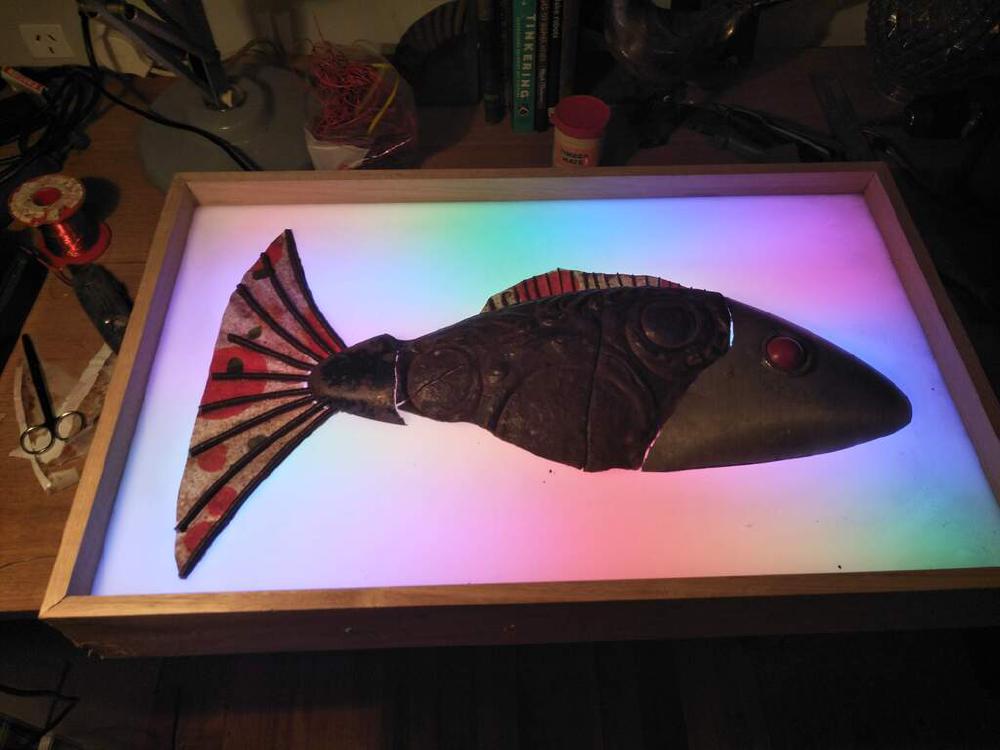
Materials: Brass coffeepot, saucepan lid, lighting fixture parts, tongs, curtain rod ends, old marbles, industrial electrical plug parts, Christmas lights, old phone cable, tea tray.
Date: 2023.
Note: requires USB for lights.
Still Ahead was made for the annual “Art From Trash” art show in 2023 at the Long Gallery, Salamanca Arts Centre, Hobart. Organised by South Hobart Tip Shop, perhaps the premier tip shop in the state, though Mornington is pretty good as well.
Here’s the artist’s description I wrote:
Years ago I picked up an old coffeepot with broken legs and spout from the scrap yard. I just
liked the shape and used it for incense. Then it went to the shed for a while, until it
happened to come together with the ball thing from an old lamp. Still Ahead was alive!
It didn't take long to find ears and horns, all sorts of things will do the job. I needed
new tongs for the barbie anyway.
The eyes took a bit longer to get right. They are big marbles glued into some sort of
electrical plug bit from Margate tip shop. My happy place, me & my partner went on our
first date there! An old tea tray and a mystery aluminium wreath from the tip shop make
a fine plaque.
Some Christmas lights, an old phone charger and bits from my big box of electrical junk
make the eyes light up.
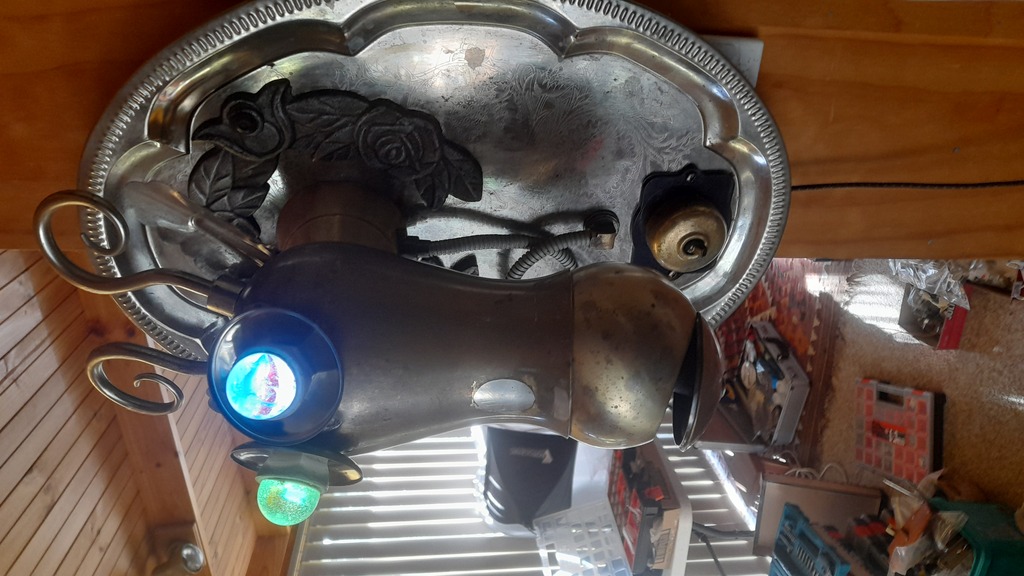
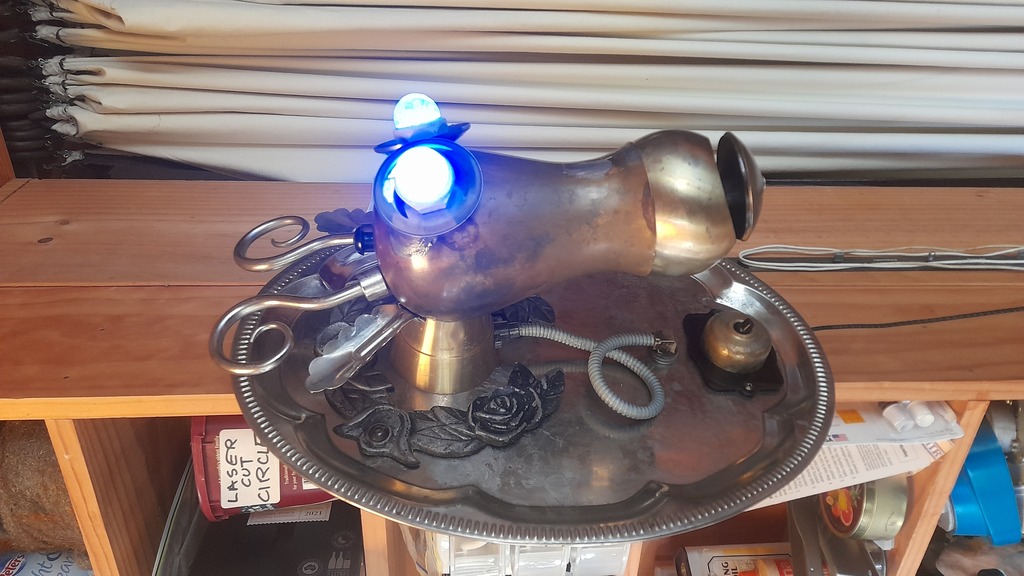
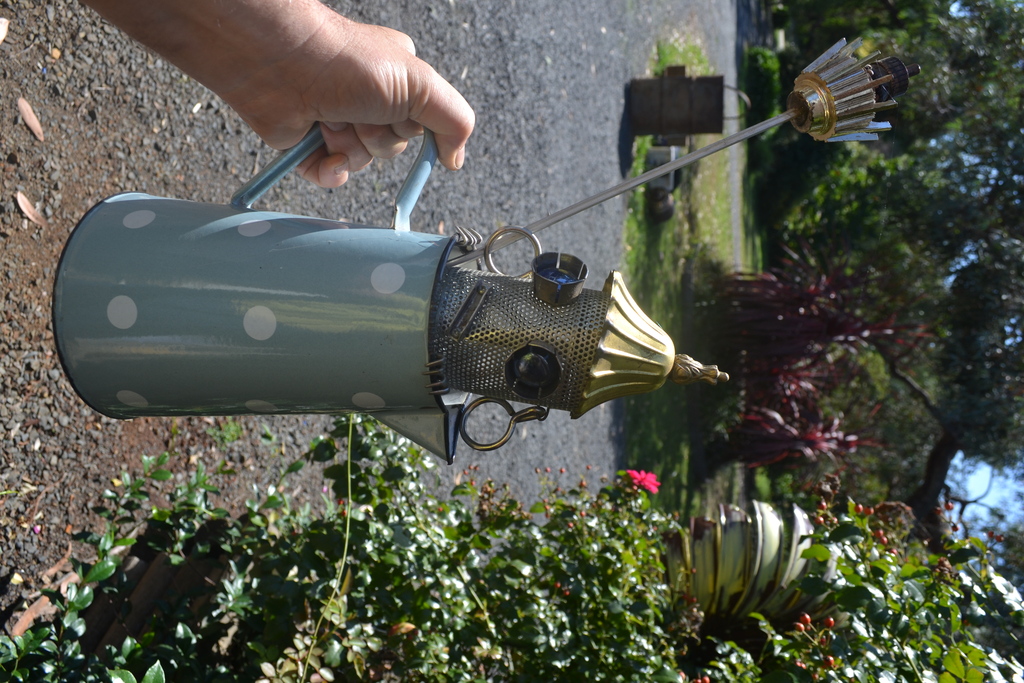
As I was entering Aurora in the show as well I wanted to do another piece, but was a bit stuck. Then inspiration arrived from the usual source: the Shed. I was looking through a box of old pots and bits and I found the broken brass jug that forms the top of the head, and then I found a ball shaped bit that fitted perfectly in the mouth of the jug, making a perfect mouth, I think it was part of a standard lamp. Instant head! I’ve made a few trophy heads over the years, so I thought that I’d make another, as they are a bit folk-arty, variations on a theme: onto a head goes horns and ears, and some eyes, the whole lot mounted on something flat.
The two head parts are put together with a spring, which means that the mouth bit is movable side to side, which gives a small variety of expressions. The mouth also makes an admirable card dispenser. The silver spot on the head is where the handle was soldered to, but looks like it belongs there. The horns were made for the ends of fancy curtain rods and do the job very well. The ears were from an old rusty set of tongs.
The silver eye surrounds are plumbing fittings: they hide the mess where a pipe goes through the wall. The eyeballs are old worn glass marbles glued into some sort of electrical fitting. Behind the marbles are more of my colour changing LEDs. They are controlled by the large switch on the bottom of the plaque, with a fairly unnecessary bit of flexible metal conduit for a bit of a steampunk look. The plaque is an old tea tray, with an aluminium wreath from somewhere bolted on.
Someone must have liked it as it sold at the show. Hope they enjoy it. And that it keeps working, but the LEDs are running at very low power so they should last forever.
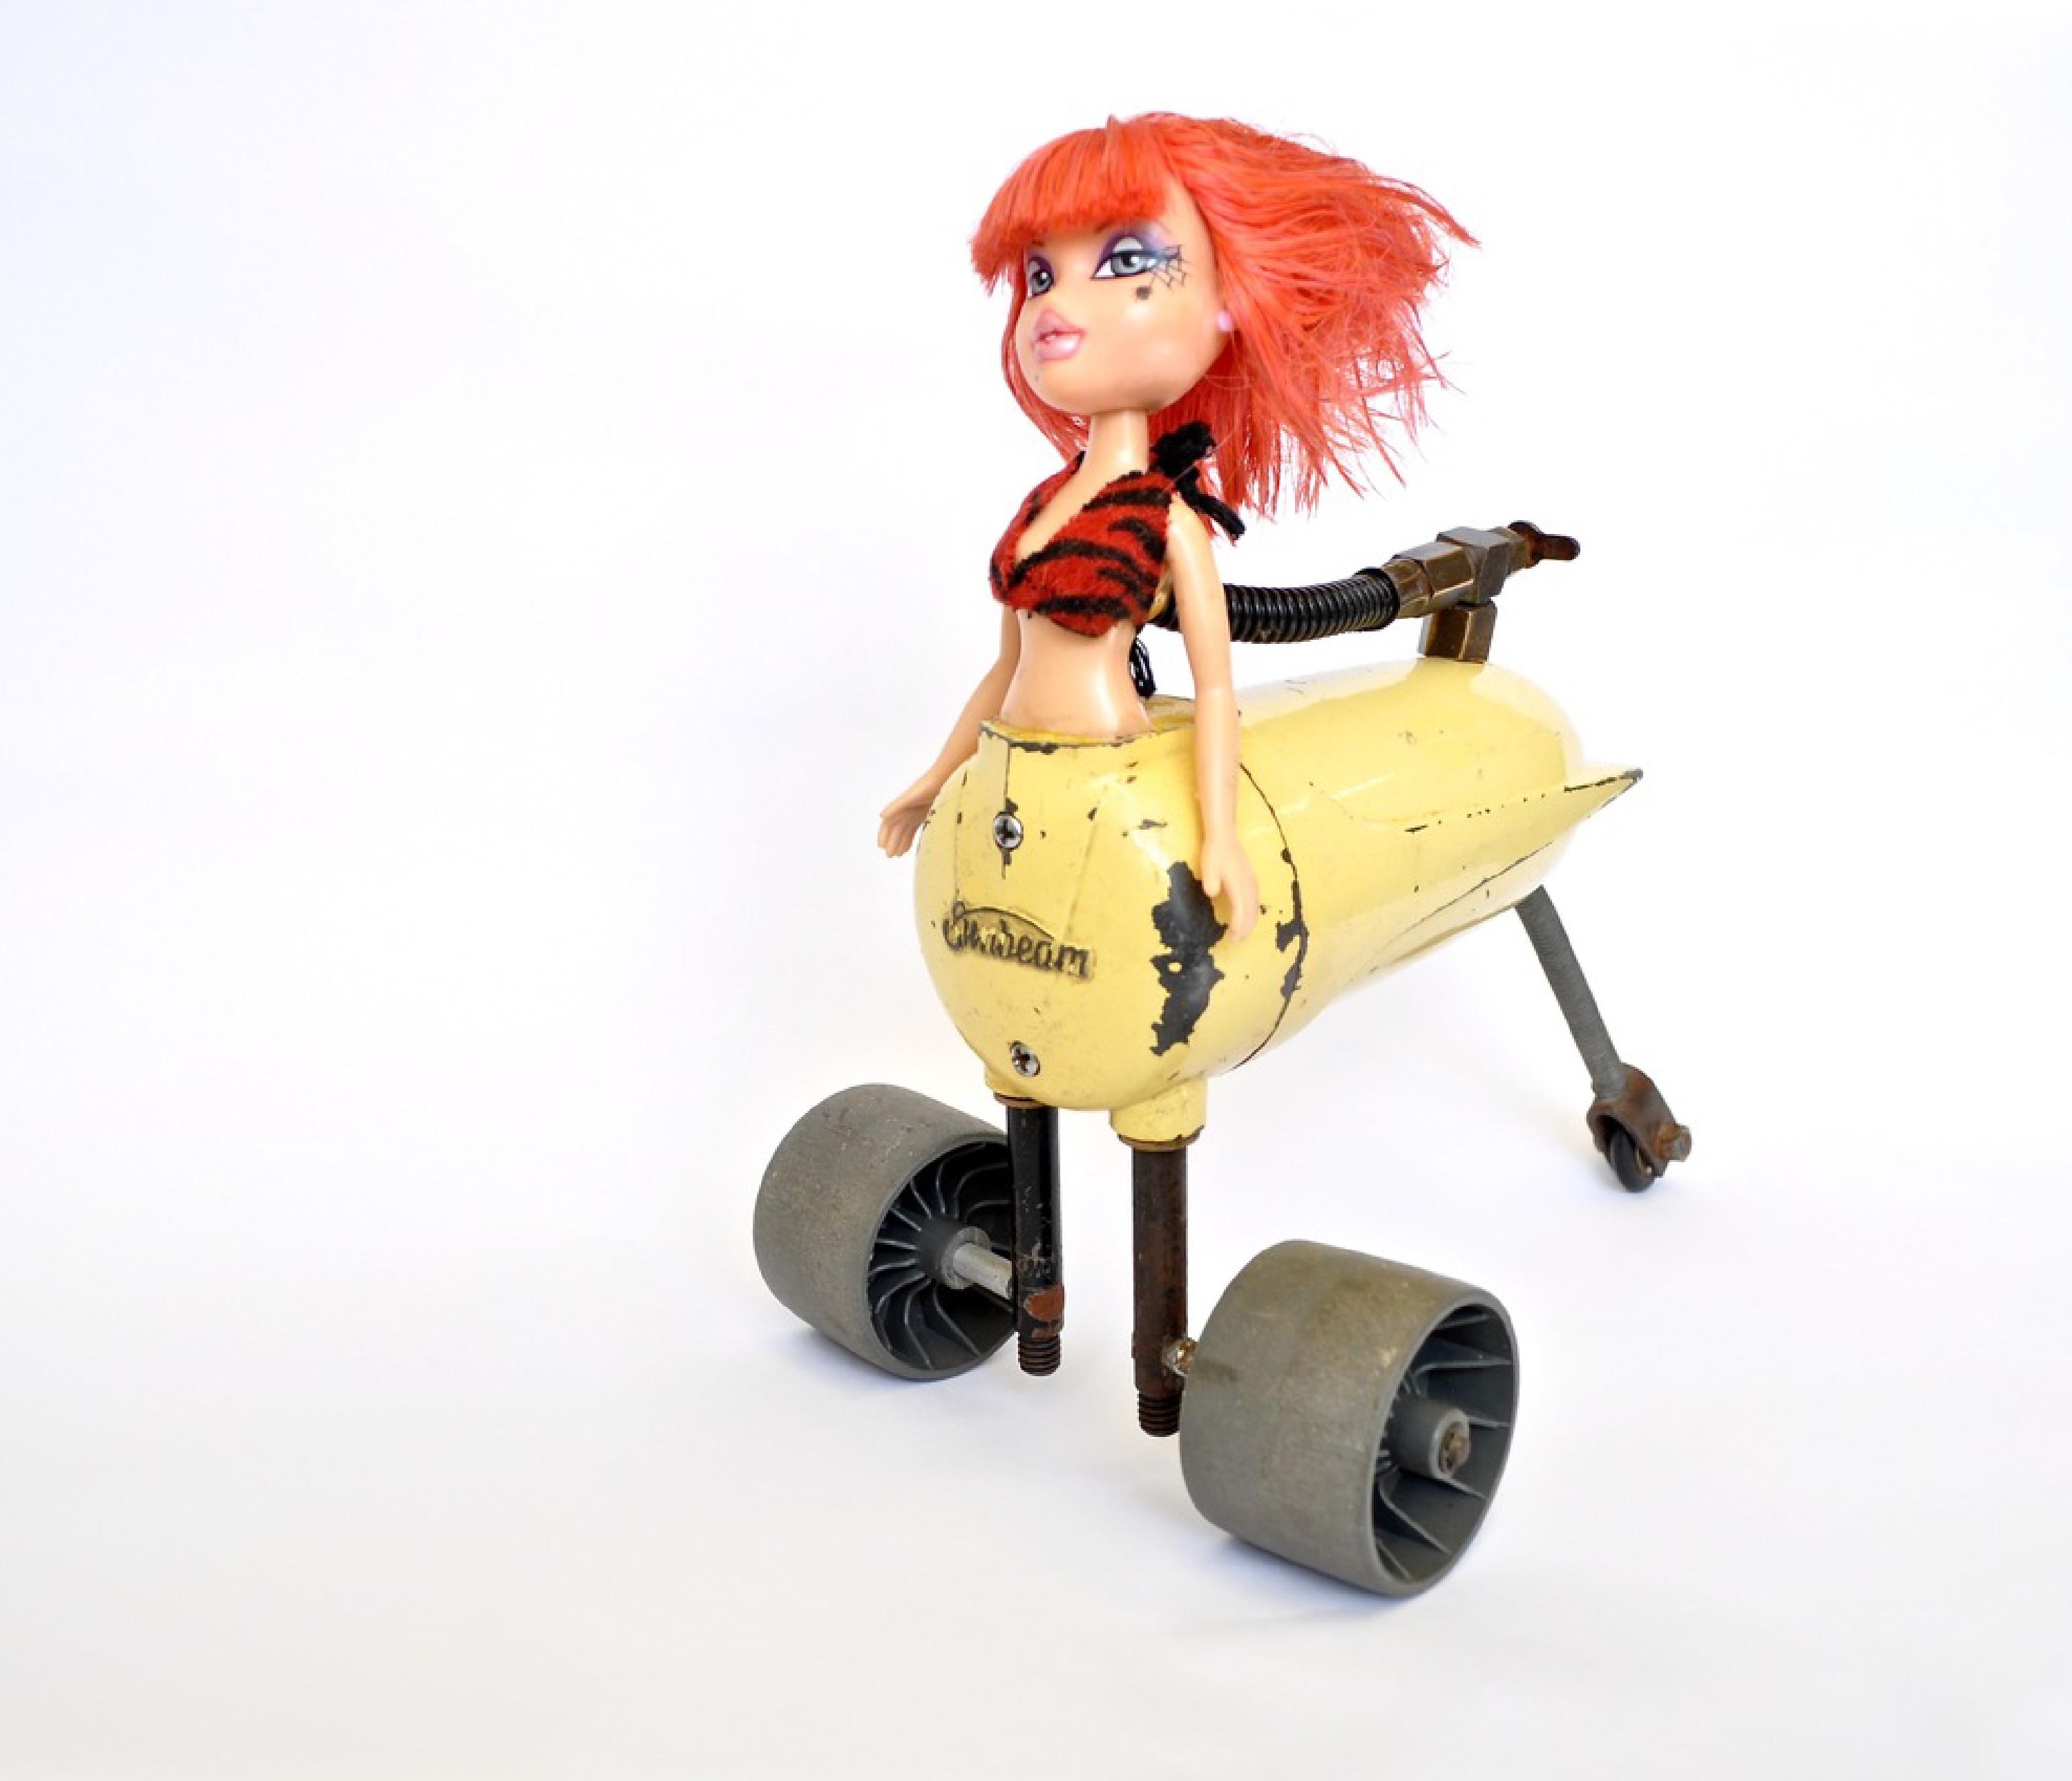
Sunbeam was a long time in the making. The inspiritational moment for me was when I picked up an old Sunbeam brand cake mixer on hard rubbish, and then I dropped it and broke off the handle, which was made of brittle bakelite. I then removed the handle, and the hole in the top looked like a cockpit, with the lovely 50s design of the mixer forming the body of a retro-futuristic vehicle. Somehow a pair of wheels from the nozzle of a garden blower got fitted, and a single trailing wheel that came from a sewing machine.
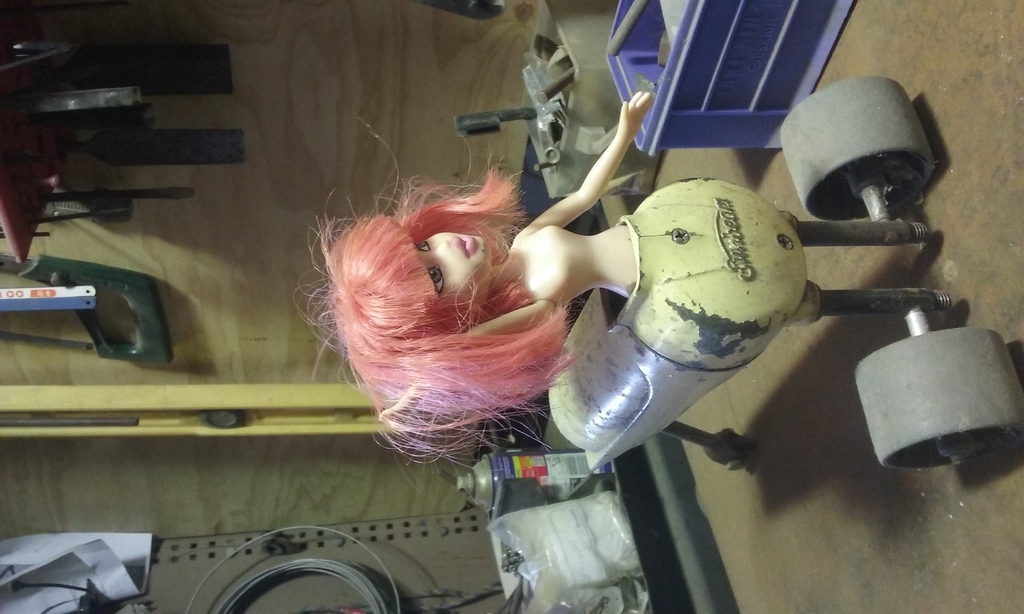
But there it stalled, as I wanted a figure in the cockpit, and I could never find one… until years later I found a fairly hideous doll which I’m told is a “Bratz”, and the legs came off and she became a cyborg, a post-human creature. Since I am a fan of Studio Ghibli movies I made a little propellor out of a brass valve because anything can fly if it has a propellor.
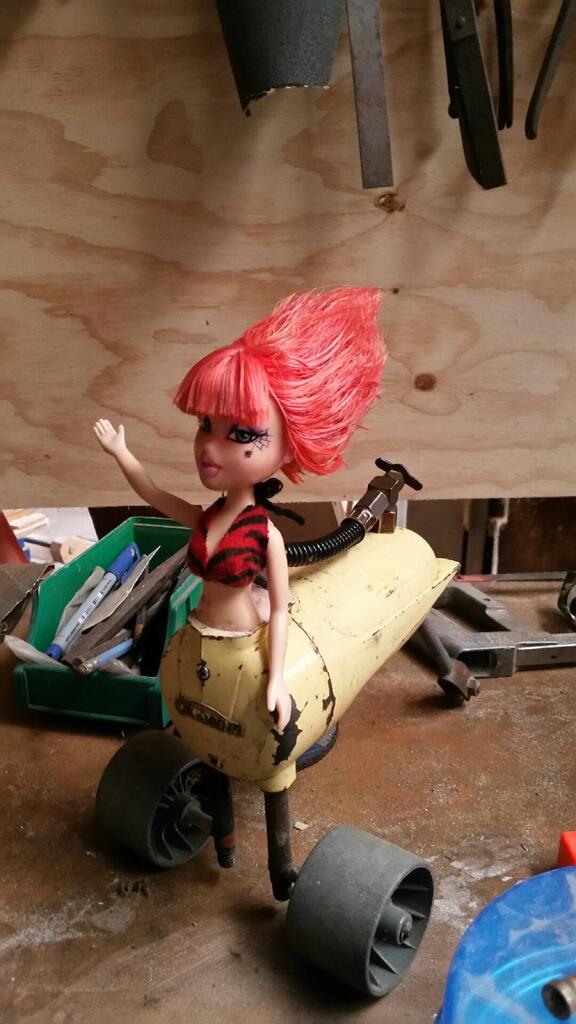
I left her sitting on my bench at my shared studio space at Footscray Maker Lab, and Emily the caretaker wandered by. She loved Sunbeam and added her own vision of a leopard print crop top and a hairdo using industrial strength hair lacquer made specially for punks.
Since then Sunbeam has always been around my house, a little ray of sushine with a heart of gold if you can get over the miniature-cyborg-punk-doll vibe.
Before Emily’s makeover…
And after…

Height: 37cm
Materials: Coffee pot, lamp parts, glass beads, curtain rings, table forks.
Date: 2016
Domestic Goddess is a piece of folk art, so like all such she’s not particularly original, you will find plenty like her out there in internet land. Folk art endlessly reuses motifs: Domestic Goddess' hands are table forks and she lives in a piece of retro kitchenalia. My kids really used to like that her earrings are curtain rings; a favourite movie was Planes, Trains and Automobiles where John Candy’s character makes quick money peddling shower curtain rings to various people, telling two young teens girls that as earrings “You know something? It makes you look a little older, too. I mean not just a little bit. You could pass for 18 or 19.”.
But she’s a happy thing to brighten a dull corner; or a dull day.
She used to have a flower but it got lost, I think she looks fine without it. I just made her when I found the old enamel coffee pot and the brass bit of a lamp that I turned into a hat. The other parts are just stuff I had to hand.

Size: base 17cm x 17cm; height 40cm. Materials: electric heater base, reproduction blender, lampshade, chandelier parts, door lock, salvaged wood, Christmas lights. Date: 2015. Note: requires mains 240V power.
Celeste Goes Dancing was my earliest attempt at a kinetic (moving) sculpture. The name comes from a book of South American fantastic short stories that I owned when I was into the magical realism style, I remember nothing about the book apart that it was my introduction to the wonder of Jorge Luis Borges, so it deserves to be memorialised.
She is a depiction of a “flapper”, the party girls of the 1920’s, who were simultaneously lionised and demonised by the media of the time (oddly enough for the same reasons). The canonical flapper had a bobbed haircut and a shamefully short dress and was usually photographed as though in the midst of some energetic crazy dance. To learn more, read about the insane exploits of Zelda Fitzgerald or immerse youself in the wonderful madness of the “Bright Young Things” in Evelyn Waugh’s “Vile Bodies”, also a good movie. Anyway you get the picture, I have a mild appreciation of the 1920’s.
I don’t recall the genesis of the design, beyond picking up the door lock part that forms her mouth, and having inspiration strike. I made her hair from a piece of salvaged timber from the benches in a 1960’s chemistry laboratory; the wonderful patina is a result of stains from it lying in the rain on my steel welding bench. I’m not sure what her eyes were made of (perhaps parts out of an old printer?), but they look fantastic with the wild eyelashes, and a little bit asymmetric, perhaps she’s been at the “naughty salt” (see Vile Bodies!). I was going to give her earrings, but it never happened, so she must have gone out in a hurry. Her body and arms are from and old desk lamp and a chandelier respectively and give her a wonderful profile straight out of a classic 1920’s studio photograph.
I remember looking for a while for some little item for the feet, and I found a locking mechanism from a golfing umbrella had just the look I wanted, like tiny slippers. Her legs are hollow foam rubber intended for pipe insulation, very handy stuff.
Her podium is a reproduction retro food blender that I cut up and mounted a patterned plastic sheet from the light diffuser in an LCD computer monitor. Inside this is about 20 or so special LEDs intended for Christmas lights or similar, they randomly show different colours and rhythms. Quite suitable for a party!
The podium is mounted on a base for an oscillating heater, one of those that moved slowly from side to side. The mechanism for these is so simple I hope the inventor got their due. Basically the top can rotate on a bearing and has a portion of ring gear, about 1/8 of a circle, with endstops that prevent rotation beyond the end of the ring gear. It rotates on a base which has a motor with a cog that engages with the ring gear. It rotates until it hits the end stop, then the motor stalls and then reverses due to magic (as an electrical enigineer I do know exactly why, but the explanation is out of place in an art blog). It is similar to those in microwaves that rotate the turntable, which will start in either direction randomly. Unfortunately the motors run on mains power only, I would much prefer to use safe low voltages.
Celeste Goes Dancing is one of my special pieces, I really like having her around, I fire her up now and again for a spin (as it were). I have made her some sisters over the years, currently Astrid and Aurora. Here’s a group shot:
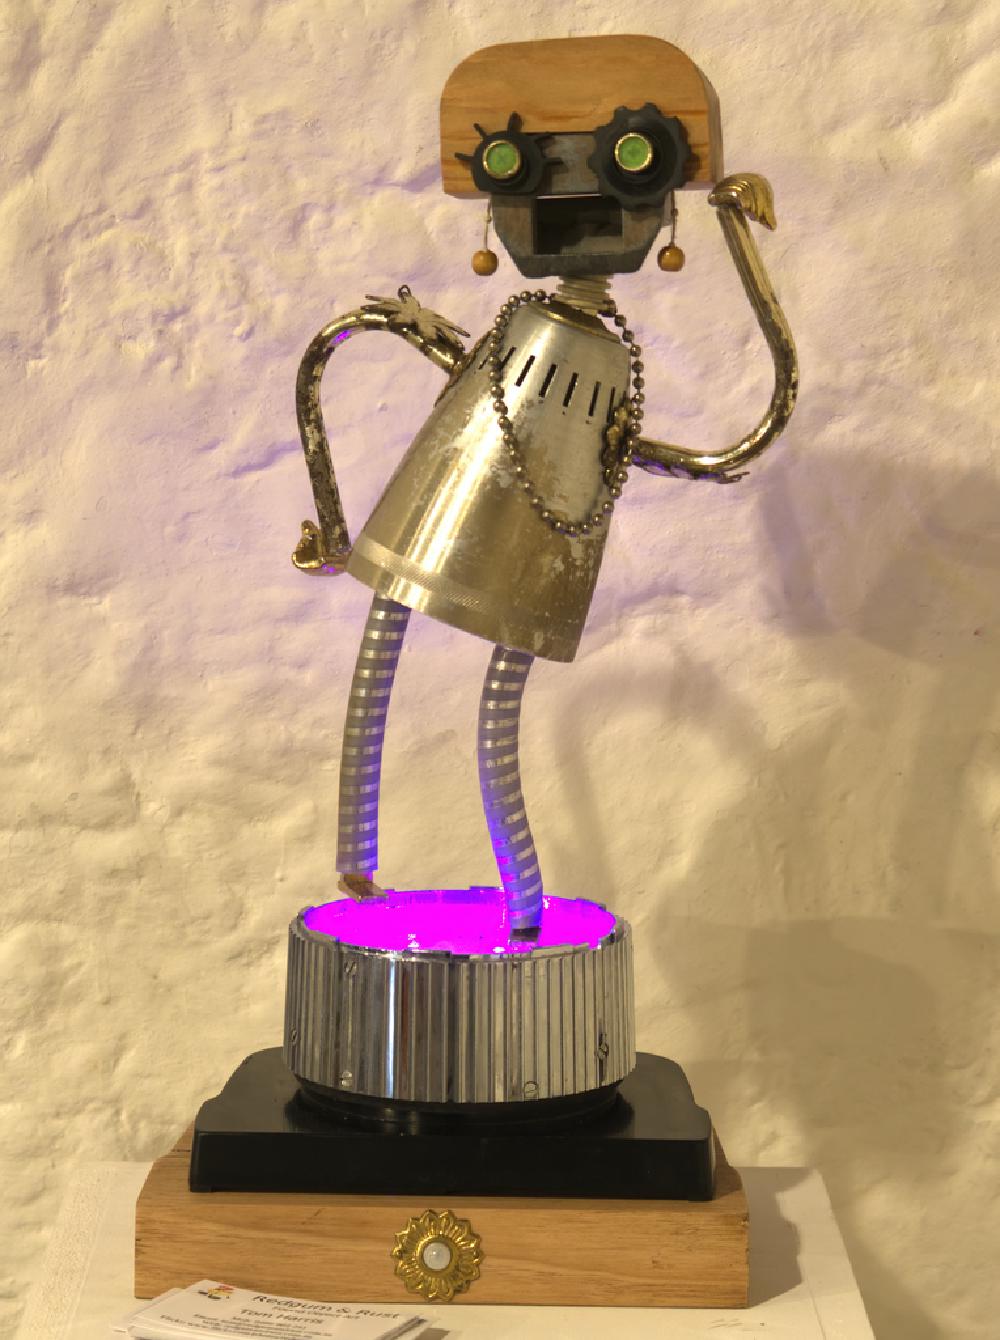
Size: height 40cm; base 20cm x 20cm.
Materials: scrap hardwood, electric heater base, reproduction blender, lampshade, chandelier parts, door lock, salvaged wood, Christmas lights.
Date: 2023.
Note: requires mains 240V power.
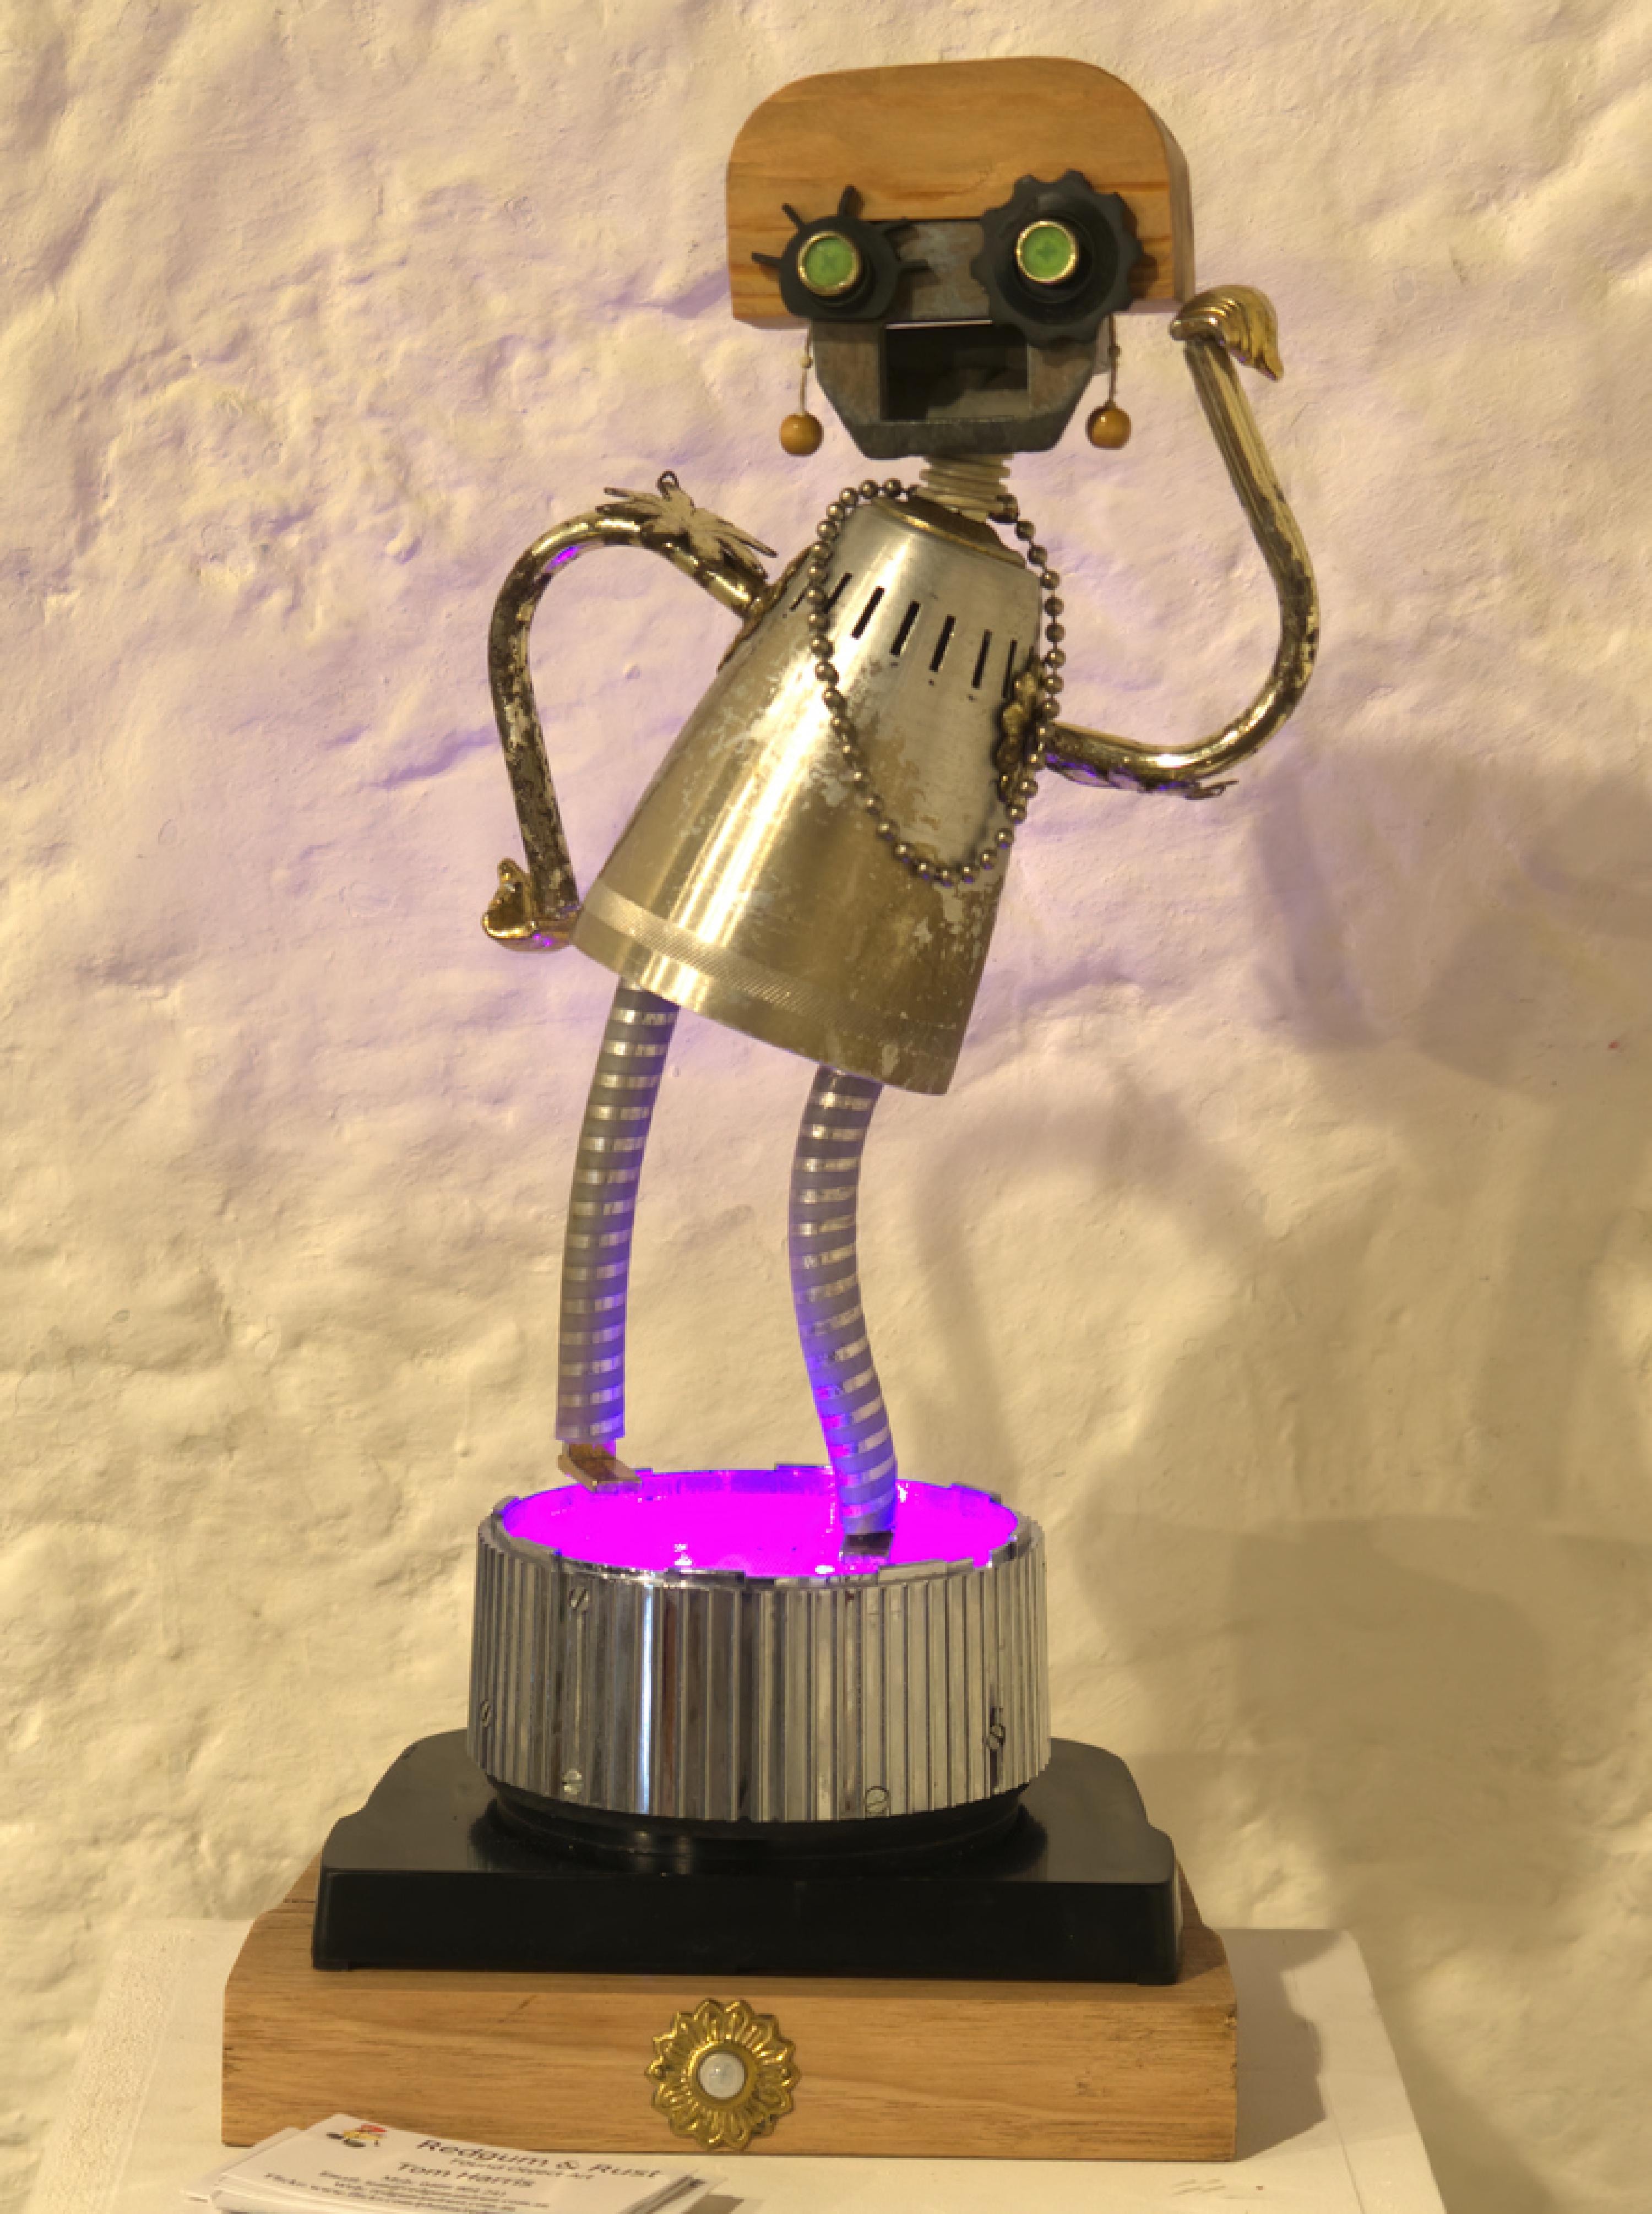
Aurora was made for the annual “Art From Trash” art show in 2023 at the Long Gallery, Salamanca Arts Centre, Hobart. Organised by South Hobart Tip Shop, perhaps the premier tip shop in the state, though Mornington is pretty good as well.
Here’s the artist’s description I wrote:
Aurora is a party girl from the 1920’s, a “flapper” as they were called with bobbed hair and
short (showing her knees!) dress. She never goes out without her string of pearls. Now along
a bit in years but still up for a good time. She only dances when people are near, a bit of a
showoff!

The head was suggested to me from an offcut of red pine from an old bed frame I was given,
at least 50 years old. I just thought “1920’s hairdo”. There the matter rested till I found
an old door lock at the tip shop. Then she had a face. Her frock, arms and hands are from old
light fittings, and make her a very graceful dancer. The base mechanism is from a heater
with the body of a blender attached, top made from a monitor screen, and old Christmas lights
inside. People sensor from a broken smart heat pump.

All materials were discarded rubbish, even the nuts and bolts. Many of them are from Margate
Tip Shop and from donations to Hobart Hackerspace.
She is another flapper, a sister to Celeste, but of course she differs in the details. Here’s a group shot:
Her arms came off a hideous 1970’s gilt chandelier, but look much better made into arms. I also managed to find two pieces that make excellent hands, these held the glass shade of a light in place. Oh how I love light fittings!
The door lock for her face actually came from the tip shop, a nice touch. They gave it to me as it was missing the bit that goes on the door, but I never found a use for those bits, besides I’d sooner leave a working lock for someone who needs one.
Her eyes are rubber paper feeding bits from a computer printer, that give her my trademark staring eyes look. The green pupils are from a broken plastic chopping mat, a nice colour & texture.
Her hair is a piece of some old growth softwood, very close grained, it might by celerytop pine; it came from an old bed frame I was given. Now such timber would be reserved for boatbuilding. This time I gave her pearl earrings: more bead chain from a roller blind with a bead from a broken neclklace on the end.
Her legs are plastic tubing from a bathroom shower, they look pretty special. Her feet are the bits I cut off the light fitting to make her hands. Waste not want not!
Her podium is identical to that I made for Celeste: a retro blender case with a sheet of plastic from a LCD monitor on top.
But the lightshow is rather different, rather than using the LEDs that change colour on their own I had to use the programmable coloured LED strip. THis was because the flashing LEDs had somehow corroded in storage to the point where I ouldn’t reliably solder the leads. So I took them out and used a strip of addressable RGB LEDs and a controller like I Made It Myself. I made the lights fade a bit faster and added a bit of flashing, but not too much.
As a final nice touch I fitted a movement sensor to her, same sort that are used in burglar alarms. This turns on the lightshow when it triggers, than a few seconds later she does a few twirls. This had the intended effect, as people would pause to look at her, then she would start dancing, I heard a few “ooohs”. Nice to give a bit of happiness.
Size: height 36cm; width 22cm, depth 10cm. Materials: electric motor part as base, car parts, lampshade, chandelier parts, metal blind cord, door lock, salvaged wood, workshop scraps. Date: 2018.
Astrid was an attempt to make a sister for Celeste, but I never managed to get the oscillating mechanism working reliably. So I used the armature from an induction motor as the base, nice and heavy and an interesting design without overwhelming the figure.
She is not a copy of Celeste, but the resemblance is certaintly striking. Her arms came from the same chandelier, but the door lock forming her face is a completely different shape, making her look a bit gaunt.
Her hair is from an offcut of old growth oregon that I found in the roof of my shared studio, probably left when it was built in the 1960’s. The growth rings are very close together, indicating that it was grown in a cold climate, likely Canada. Now timber of that quality would be used for fine furniture or boatbuilding.
Her legs are foam rubber tubes, not from pipe insulation but from a trouser hanger with a lovely matte texture. I really like the effect. Her shoes are some rusty engine part that I found a bucket of at the scrapyard.
Astrid has a string of pearls (an essential accoutrement for the flapper) that are really a bit of that metal blind cord with lots of little beads on it. The proper name is “bead chain”.
Her eyes are fantastic, and (like Celeste) slightly asymmetric, I have no idea where they came from. I wish I could remember, I’d get some more!
Astrid currently lives on our kitchen windowsill.
Here’s a group shot with her sisters:
Here she is in pieces, poor thing, but she managed to pull herself together. The eagle-eyed will notice that I was using black plastic for her legs, must have been before I got the blue foam.